NSX-T for OpenShift
While looking at the various documentation sets I found it difficult to understand the NSX-T and OpenShift integration. A lot was masked by configuration performed by Ansible scripts. Here I try and record my understanding of the technology and then work through getting this running in a capacity constrained lab environment.
NSX T
NSX-T (NSX Transformers) can provide network virtualization for multi-hypervisor environments, including both vSphere and KVM. It is also designed to address emerging application frameworks and architectures that have heterogeneous endpoints and technology stacks such as OpenStack, Red Hat OpenShift, Pivotal Cloud Foundry, Kubernetes, and Docker. NSX-V (NSX for vSphere) Manager integrates into vCenter and leverages a vSphere dvSwitch to form an overlay. NSX-T Manager can be used with vSphere it does not integrate with vCenter or dvSwitch, instead NSX is managed via its API, and its overlay is formed by each member having Open vSwitch (OVS) installed.
Red Hat OpenShift
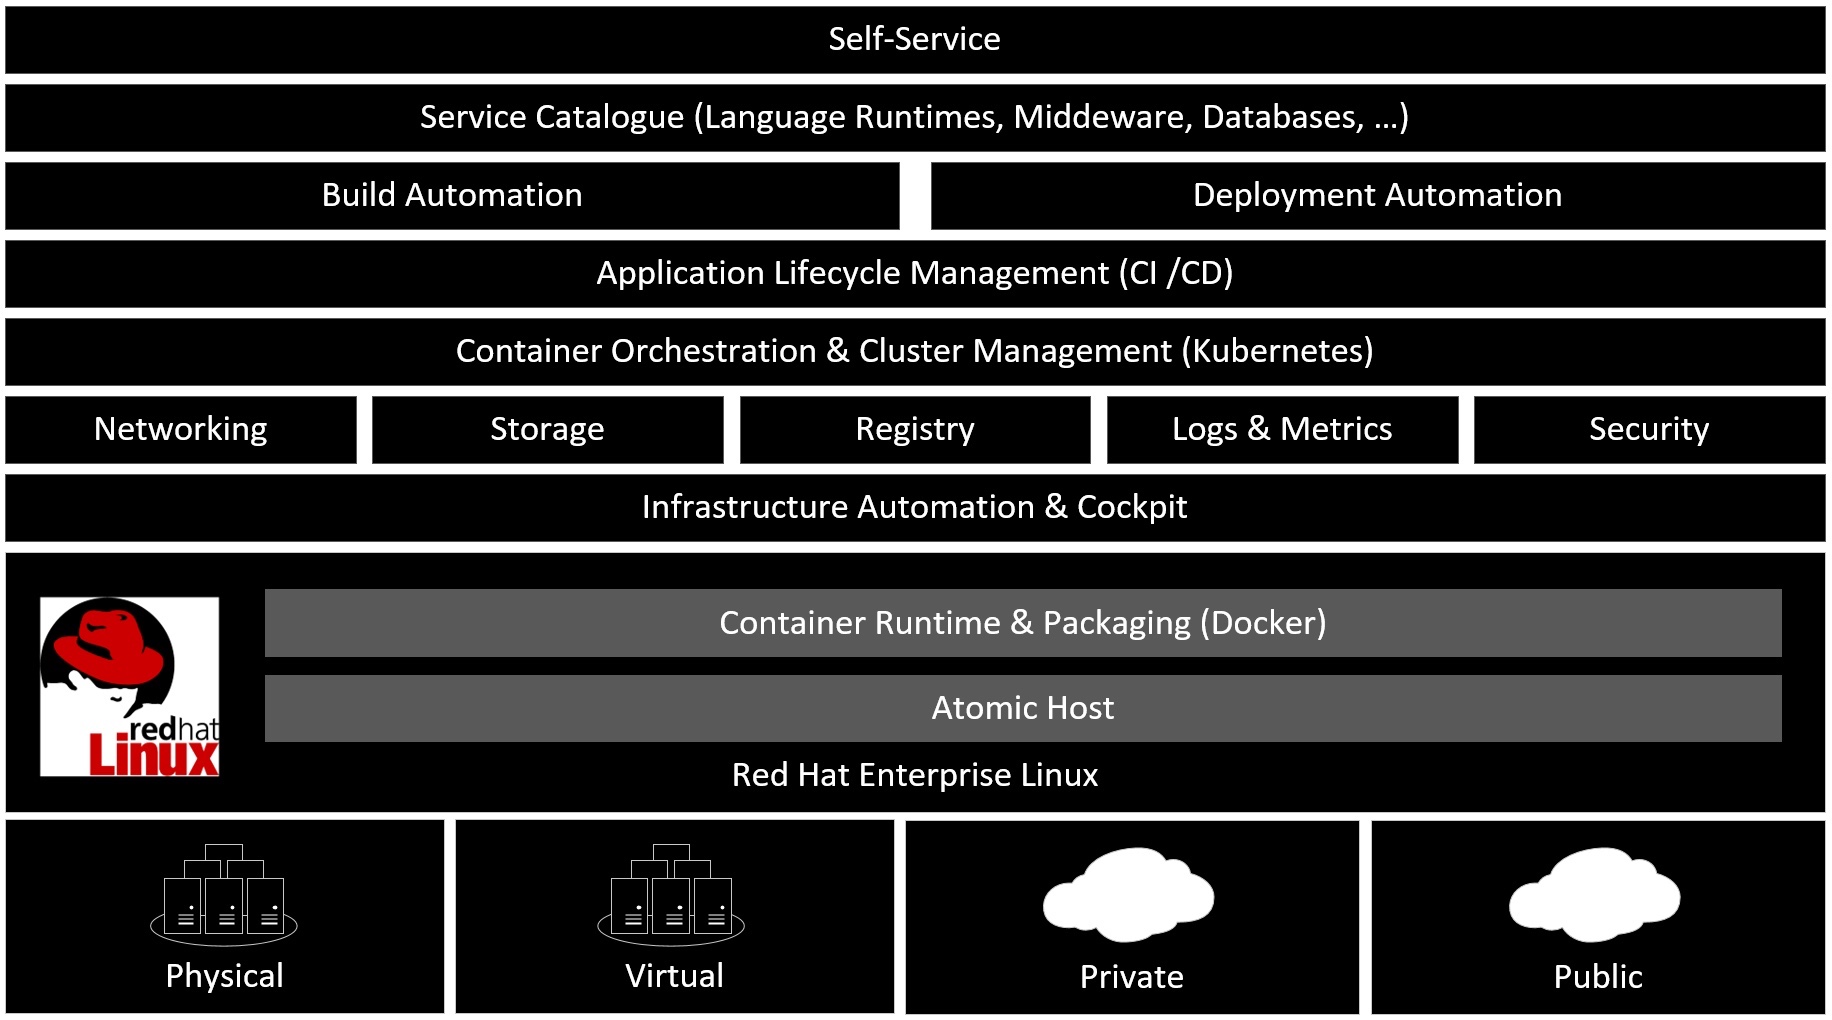
OpenShift helps you to develop, deploy, and manage container-based applications. It provides you with a self-service platform to create, modify, and deploy applications on demand, thus enabling faster development and release life cycles. OpenShift is built around a core of application containers powered by Docker, with orchestration and management provided by Kubernetes.
Container Networking Framework Background
Libnetwork is the canonical implementation Container Network Model (CNM) which formalizes the steps required to provide networking for containers while providing an abstraction that can be used to support multiple network drivers. Libnetwork provides an interface between the Docker daemon and network drivers. Container Network Model (CNM) is designed to support the Docker runtime engine only.
Container Network Interface (CNI), consists of a specification and libraries for writing plugins to configure network interfaces in Linux containers, along with a number of supported plugins. Container Network Interface (CNI) supports integration with any container runtime.

VMware NSX and Kubernetes Integration
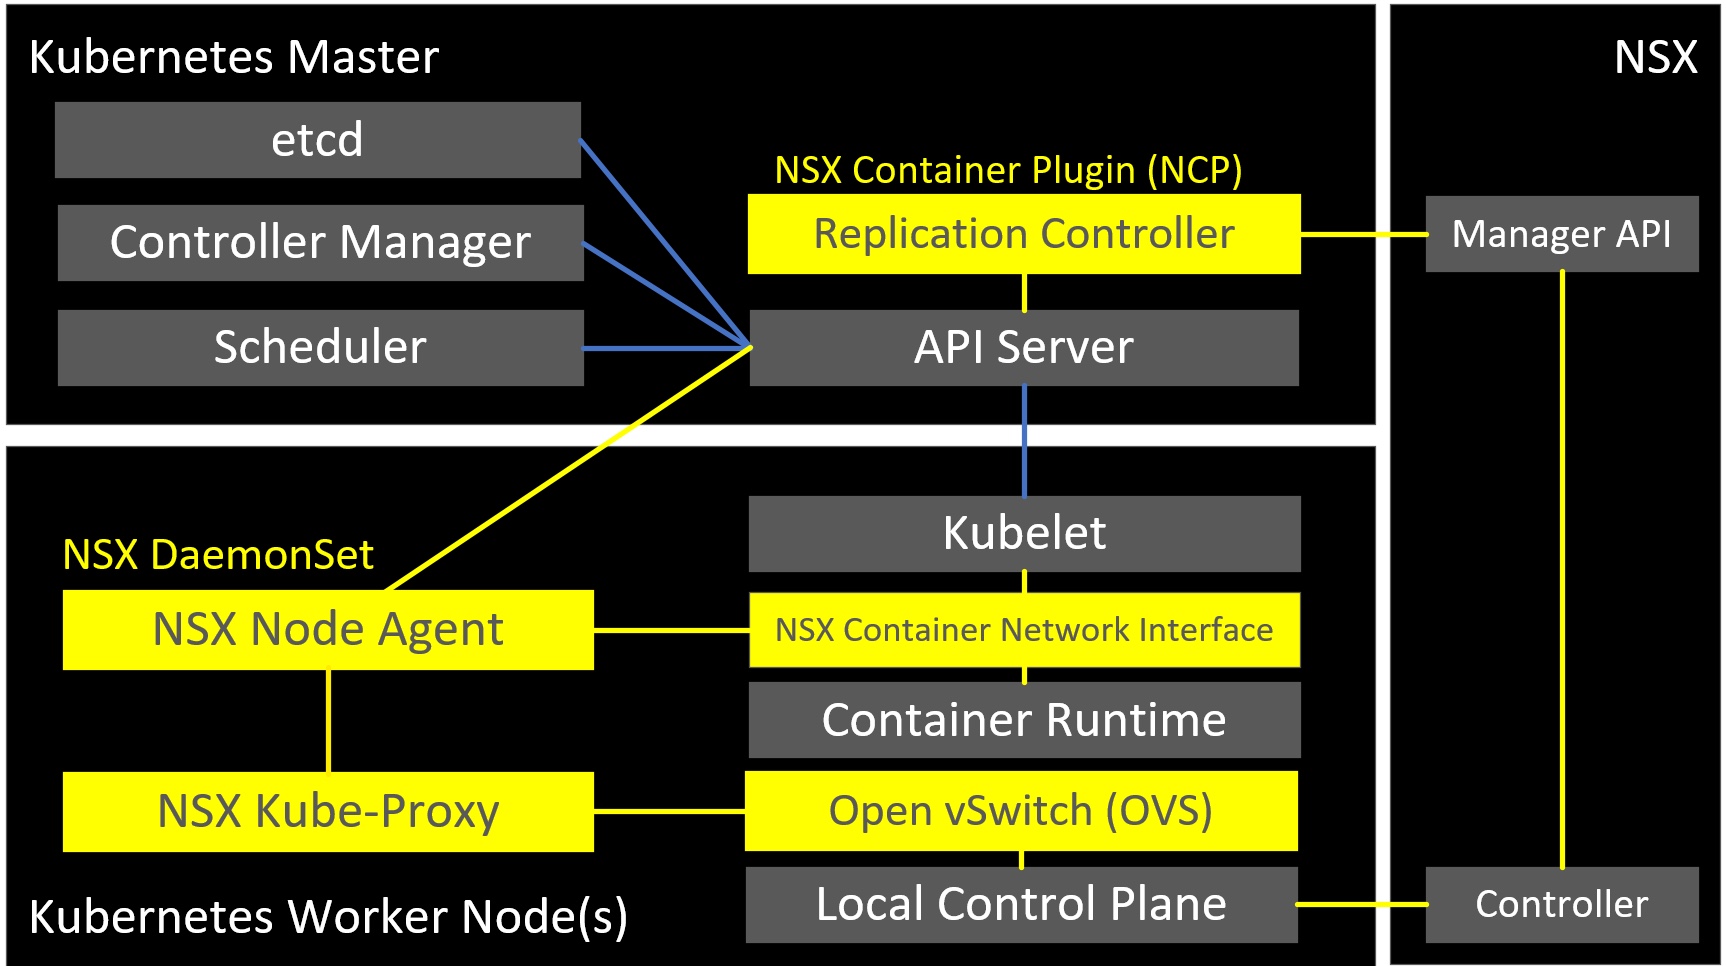
VMware provide an NSX Container Plugin package which contains the required modules to integrate NSX-T with Kubernetes.
- NSX Container Plugin (NCP) - is a container image which watches the Kubernetes API for changes to Kubernetes Objects (namespaces, network policies, services etc.). It calls the NSX API to creates network constructs based on object addition and changes.
- NSX DaemonSet
- NSX Node Agent - is a container image which manages the container network interface
- NSX Kube-Proxy - is a container image which replaces the native distributed east-west load balancer in Kubernetes with the NSX load-balancer based on Open vSwitch (OVS).
- NSX Container Network Interface (CNI) - is an executable which allow the integration of NSX into Kubernetes.
- Open vSwitch
NSX For OpenShift
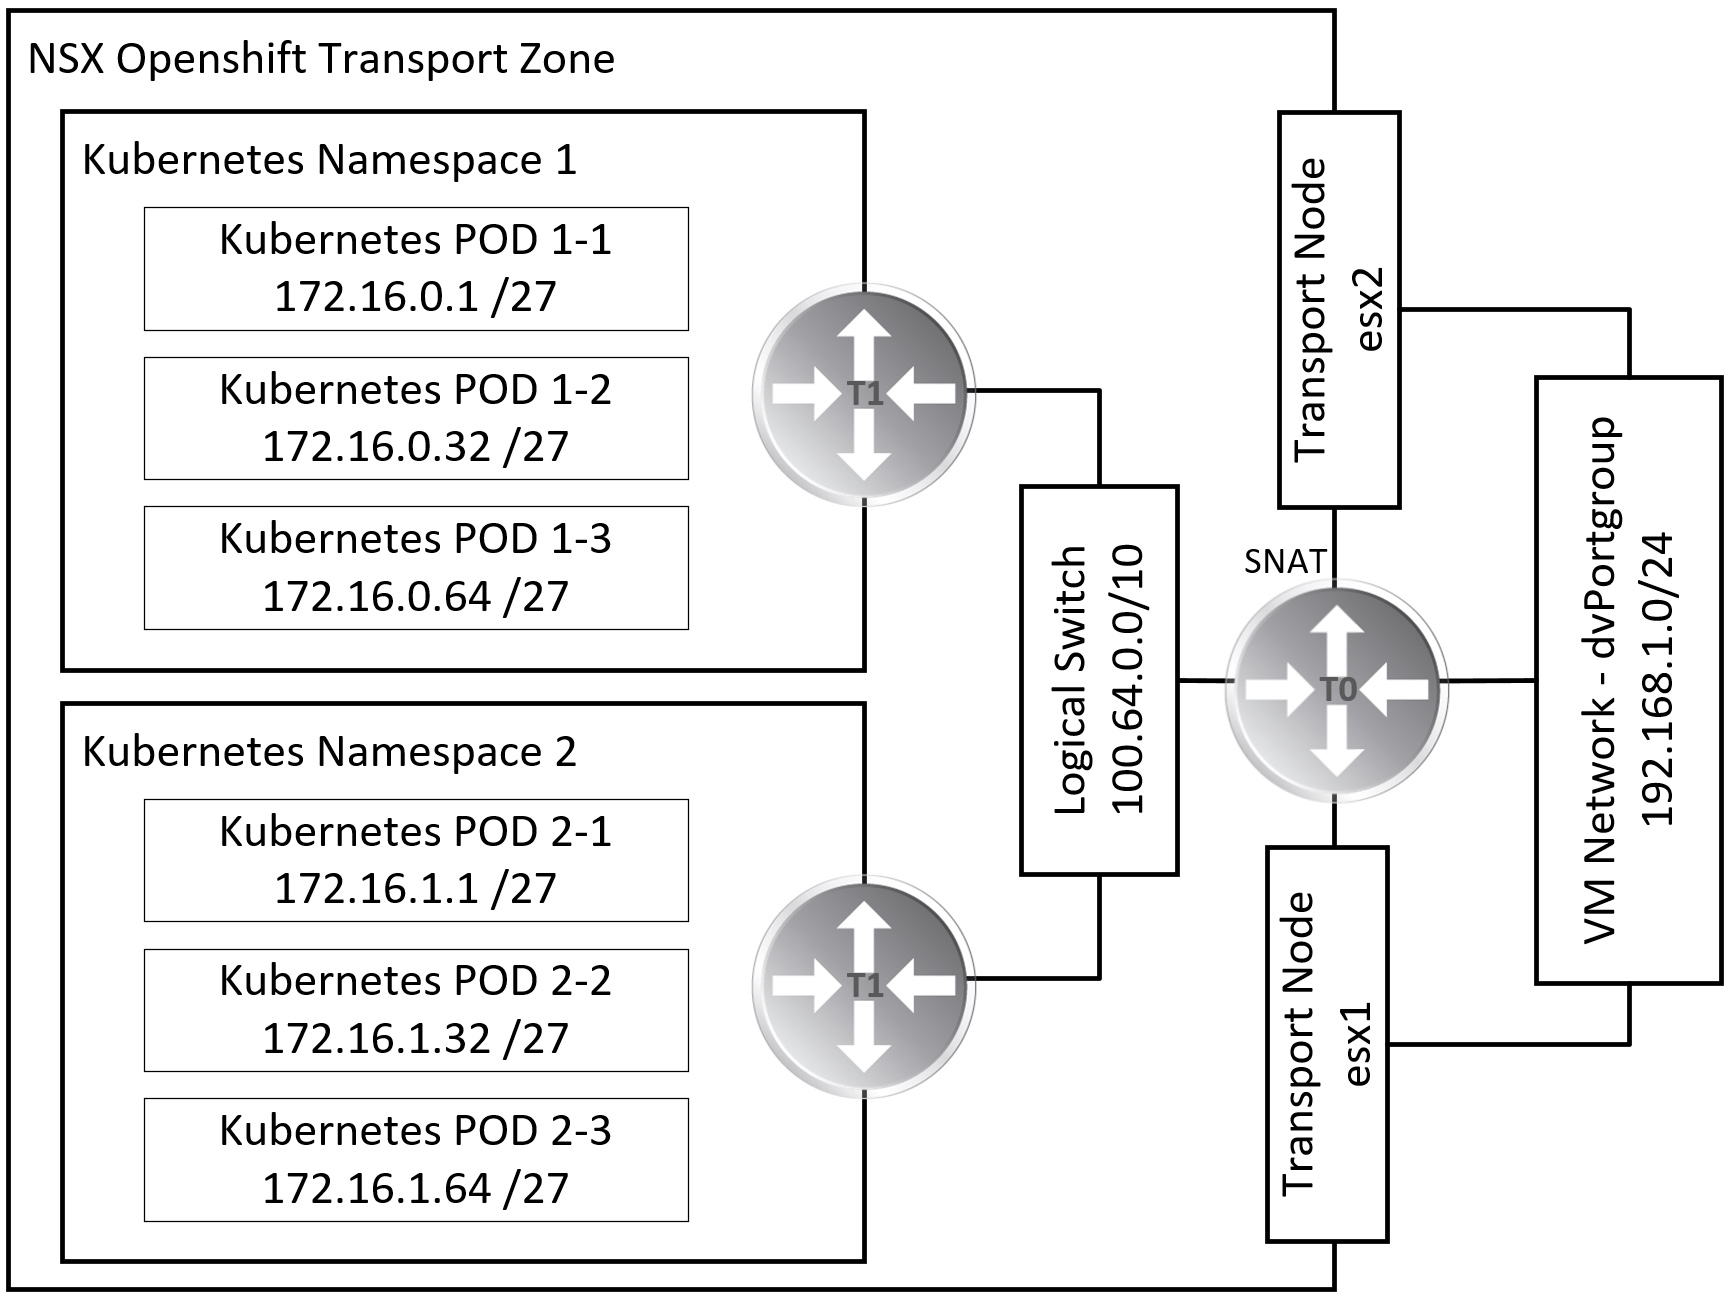
NSX implements a discreet network topology per Kubernetes namespace. NSX maps logical network elements like logical switches and distributed logical router to Kubernetes namespaces. Each of those network topologies can be directly routed, or privately addressed and behind NAT.
NSX For OpenShift Homelab
For the rest of this blog post I am aiming to create a NSX OpenShift integration. I aiming for two namespaces, each with a logical router and three subnets. The namespaces will use private address ranges and the tier-0 router will provide SNAT connectivity to the routed network.
Starting point homelab configuration
- 1GbE Switch (Layer 2 only)
- VLAN 0 - CIDR 192.168.1.0/24
- vSphere vCenter Appliance 6.7
- 3x vSphere ESXi 6.7 Update 1 hosts (Intel NUC - 3x 1.8GHz CPU & 32GB RAM)
- Onboard NIC is connected to a vSphere Standard Switch
- USB3 NIC is unused and will be used for NSX
- VSAN
The following resources are required
- Small NSX-T Manager is a VM sized 8GB vRAM, 2x vCPU and 140GB vHDD
- Small NSX Controller is a VM sized 8GB vRAM, 2x vCPU and 120GB vHDD
- Small NSX Edge is a VM sized 4GB vRAM, 2x vCPU and 120GB vHDD
NSX Management Plane
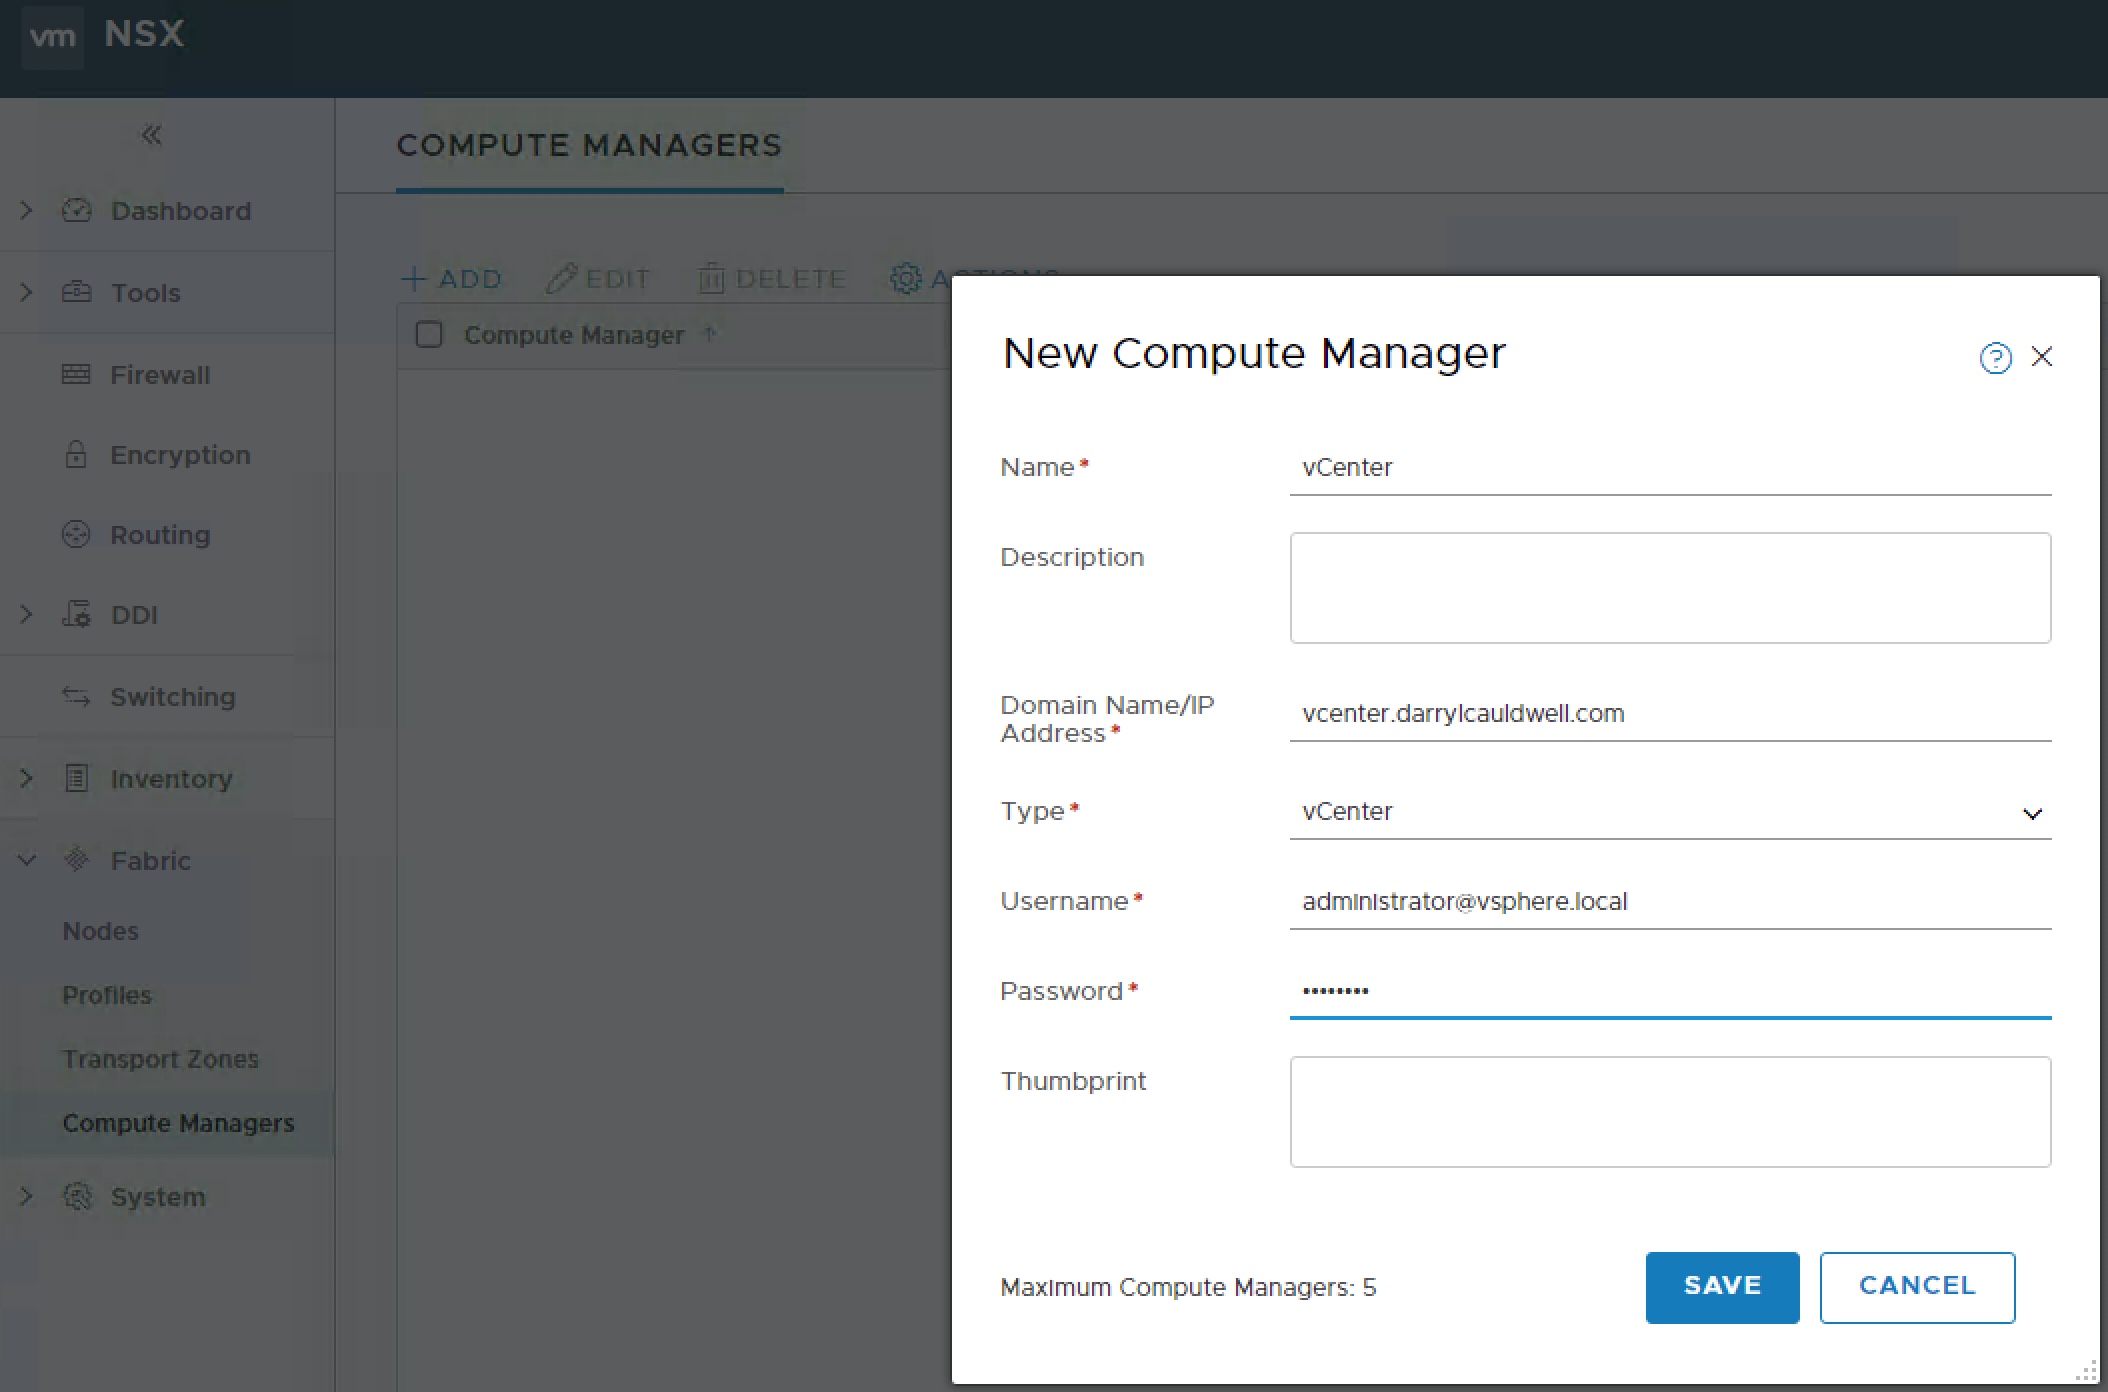
Deploy a small NSX unifed appliance specifying the nsx-manager role. Once deployed link this to vCenter, to do this add vCenter in ‘Fabric / Compute Manager’.
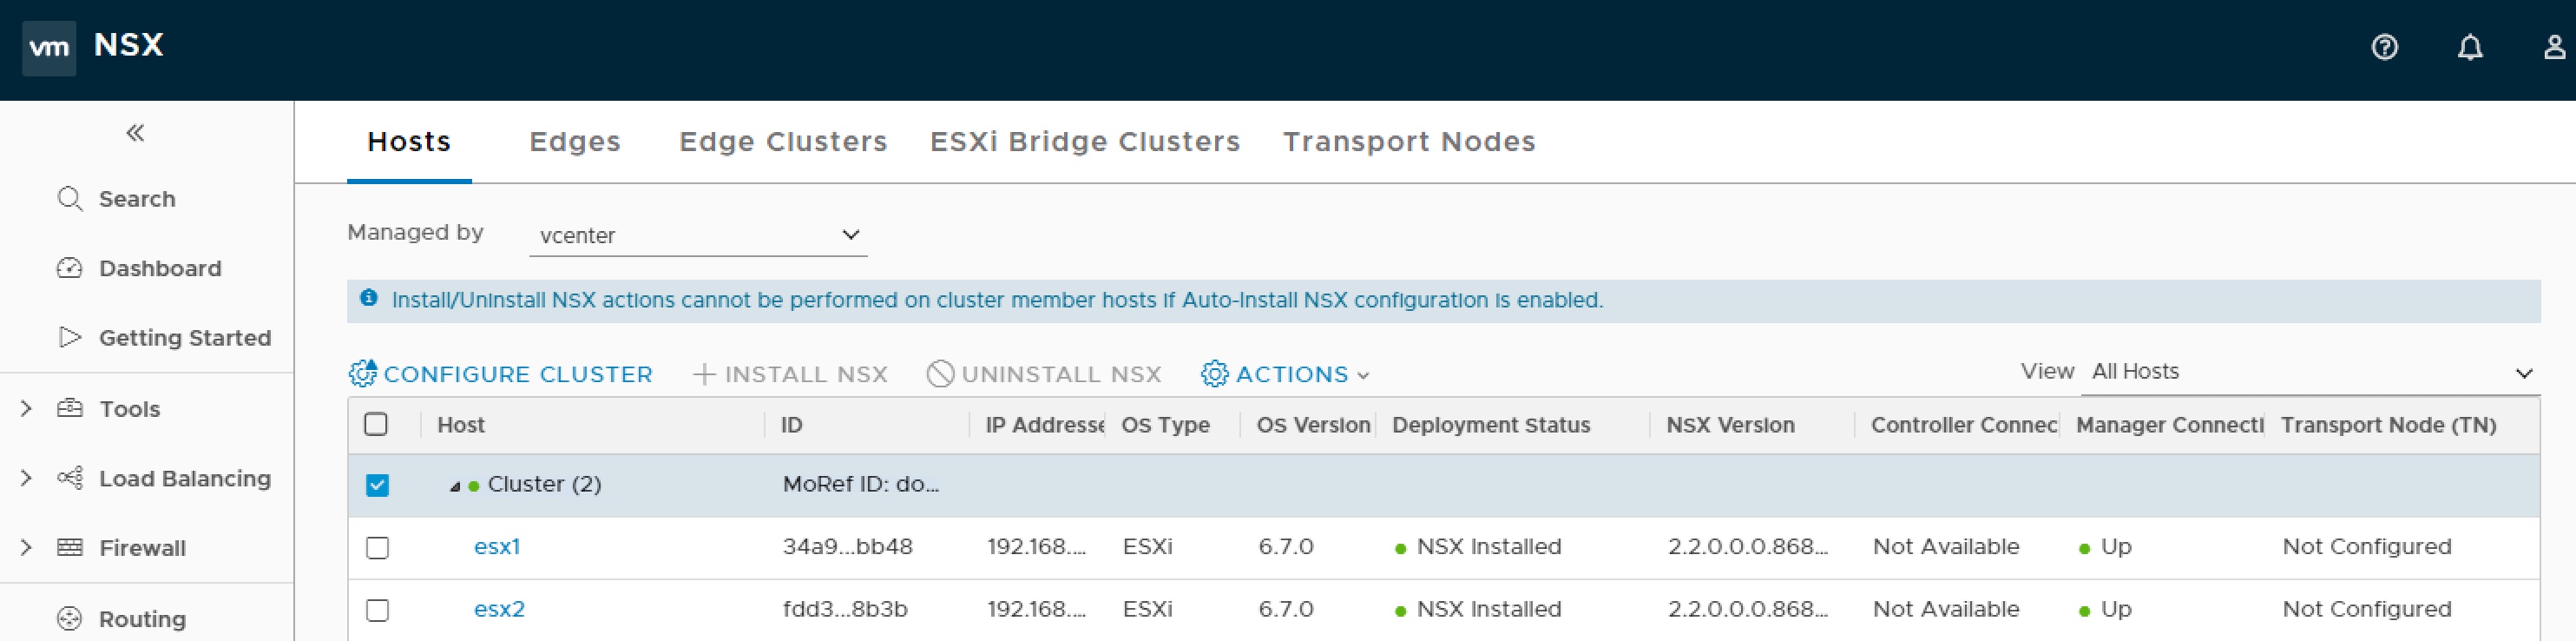
With the manager in place we now need to create the management plane, to do this we need to install the management plane agent (MPA) on each host so they are added as usable Fabric Nodes.
Tunnel Endpoint IP Pool
We create an IP pool one for the Transort Nodes to communicate for my scenario the three ESXi hosts and an edge will all participate so I create an IP Pool with four addresses. Navigate to Inventory > Groups > IP Pools and click add.
NSX Control Plane
In order to create an overlay network we need an NSX Controller to manage the hosts. NSX Controllers serve as the central control point got all hosts, logical switches, and logical routers.
While NSX Manager can deploy and configure NSX Controllers the size cannot be selected. As lab is resource constrained I only want a small NSX Controller, the ‘NSX Controller for VMware ESXi’ is a separate OVA download where size can be selected.
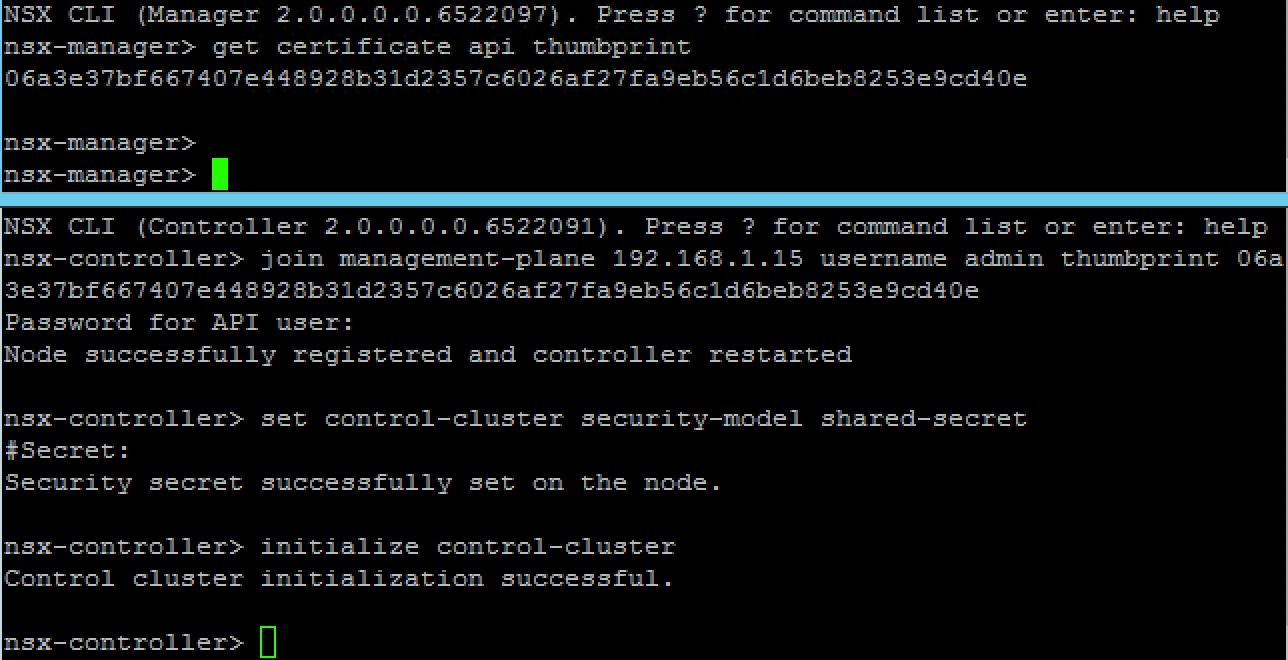
Once the controller appliance is deployed we need to facilitate communications between it and nsx manager. To do this open an SSH session with admin user to NSX Manager and run
get certificate api thumbprint
Open an SSH session to NSX Controller with admin user and run
join management-plane <NSX-Manager> username admin thumbprint <NSX-Managers-thumbprint>

set control-cluster security-model shared-secret

initialize control-cluster
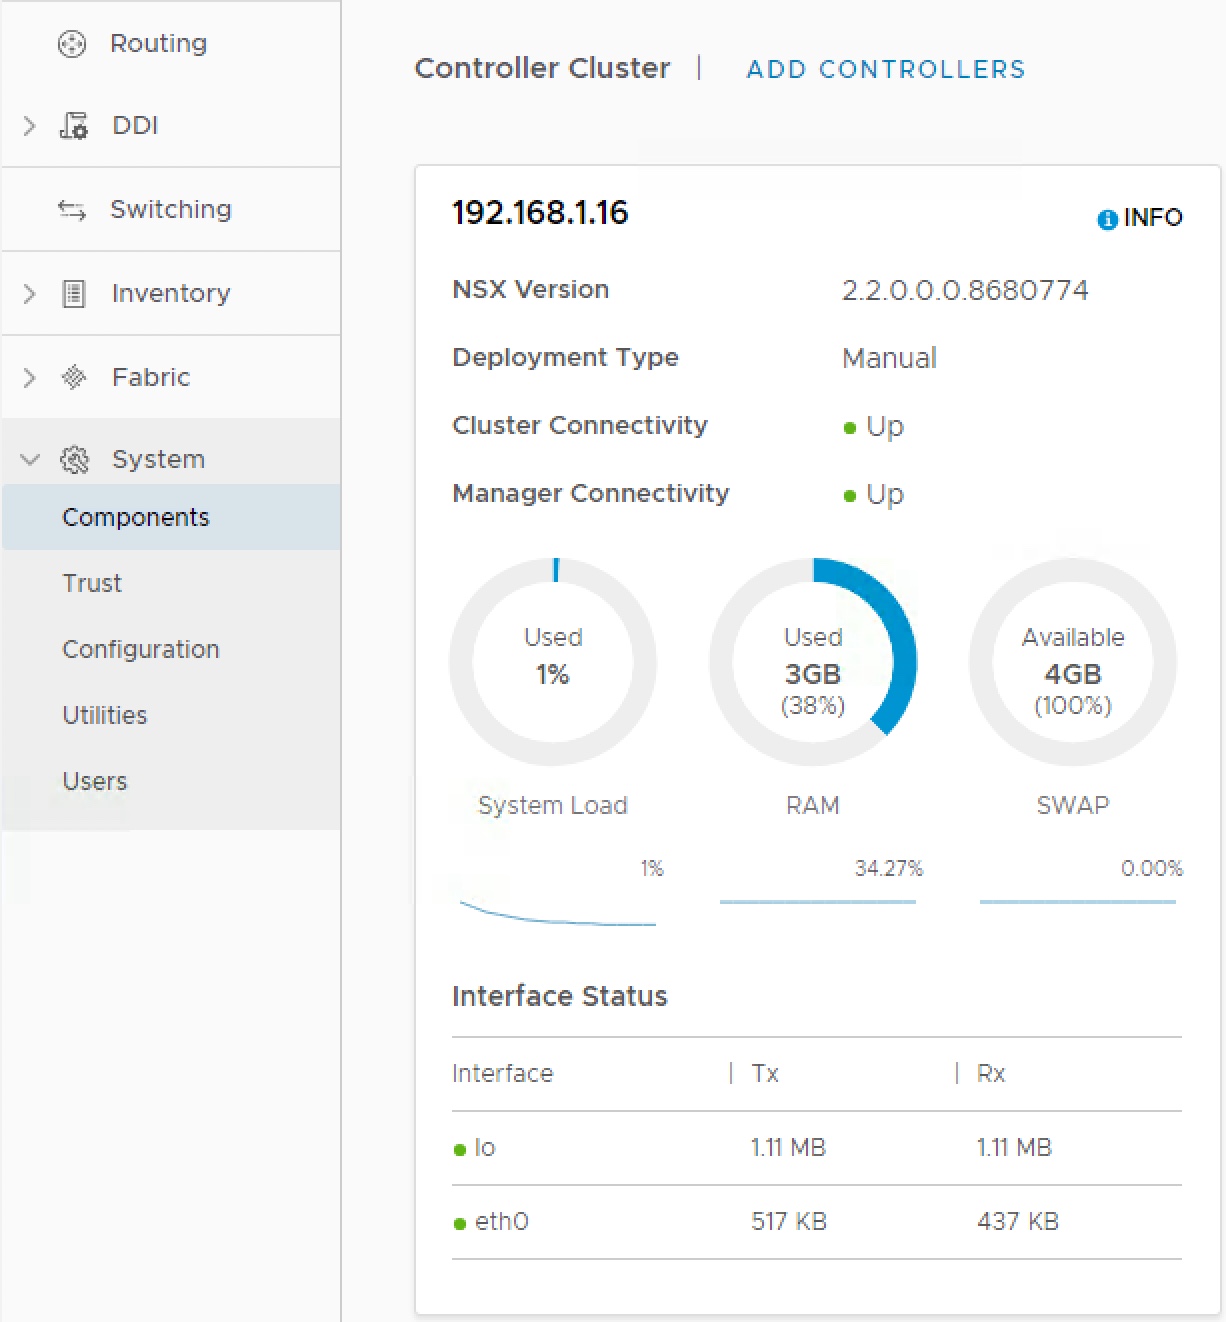
This should then be viewable in NSX Manager
Overlay Transport Zone
All the virtual network objects will need to communicate across an overlay network. To faciliate this the three esxi hosts and edges need to be part of an Overlay Transport Zone.

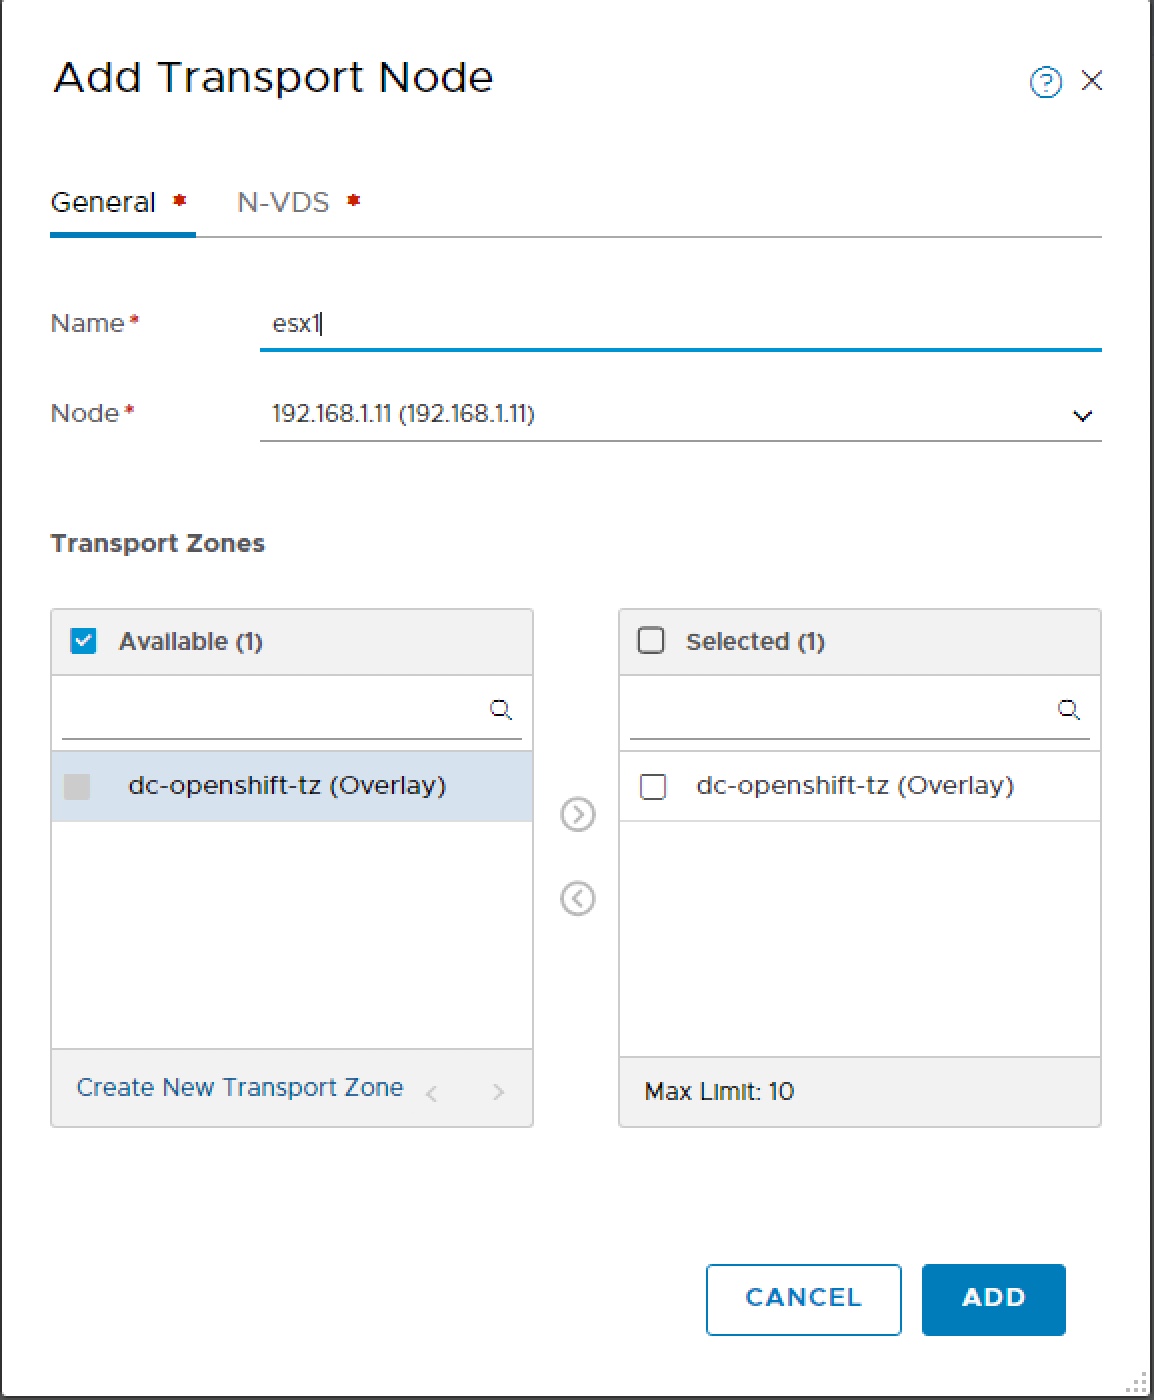
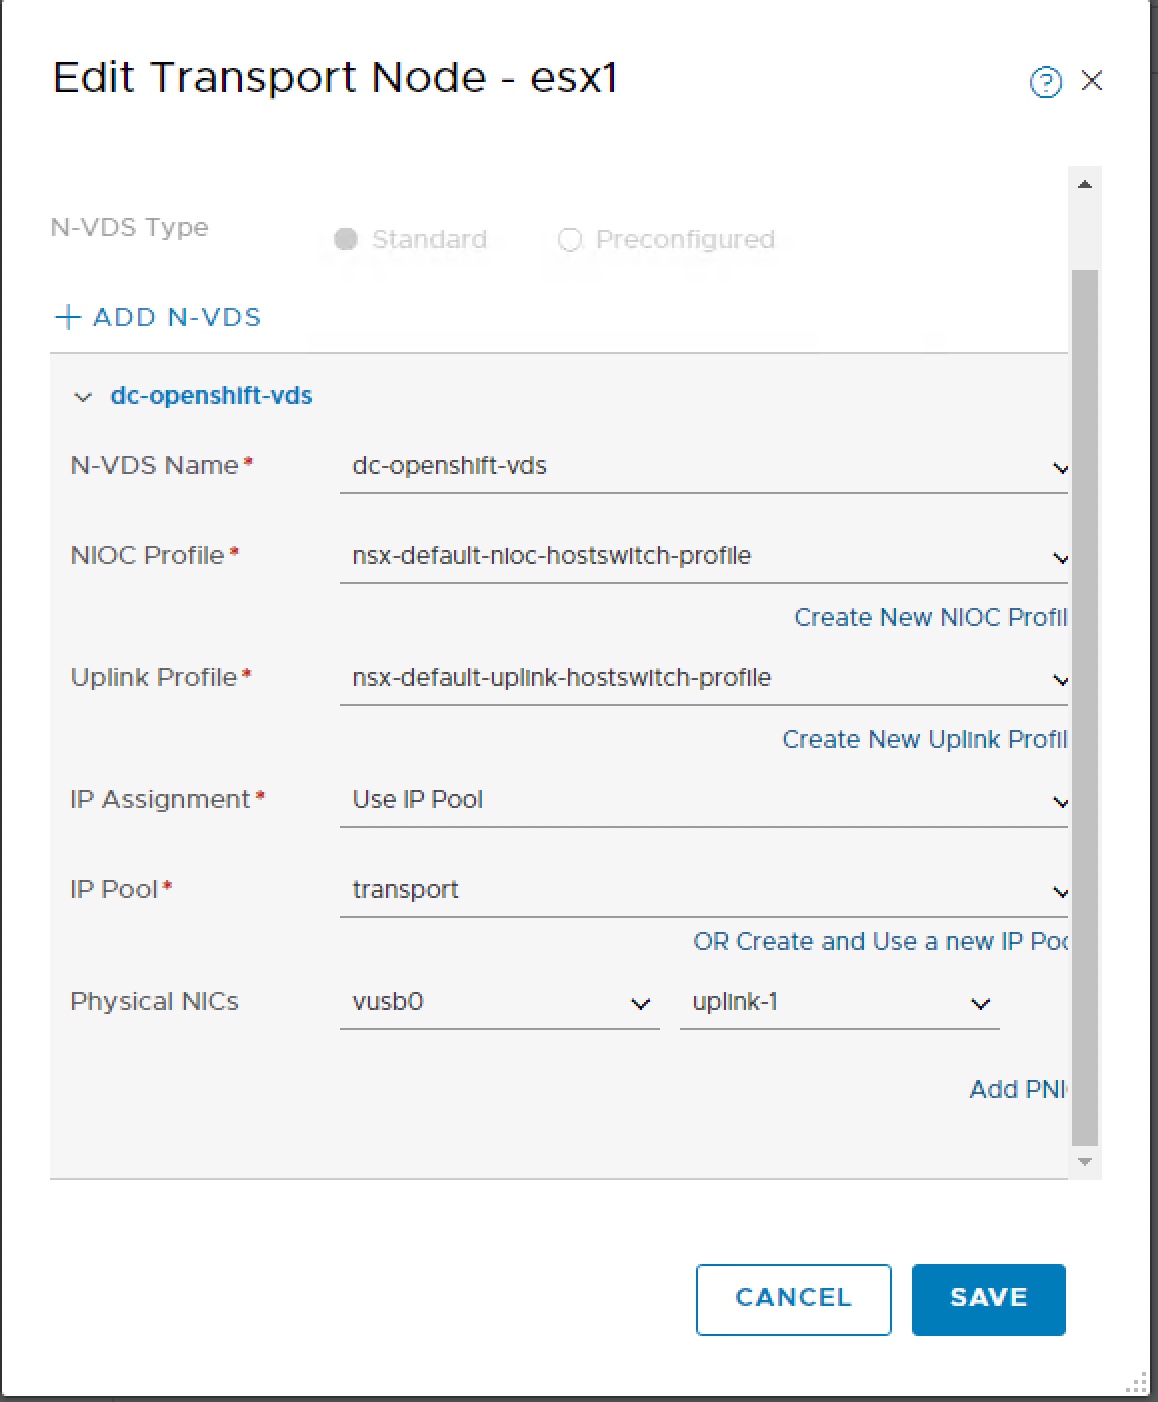
Once we have a Transport Zone we can add our NSX fabric nodes as transport nodes. Navigate menu to Select Fabric > Transport Nodes and click Add. A wizard will open on the general tab select first Node (host), give appropriate name for that host and select the openshift transport zone.
Change to N-VDS tab, create N-VDS for openshift, select default NIOC, select default hostswitch Uplink profile, select transport IP Pool and enter Physical NIC identifier for Uplink-1.
In order that the NSX Container Plugin can find the correct NSX objects all of the NSX objects created require a tag applying. For this lab build I am using tag dc-openshift. Navigate within NSX Manager to Fabric > Transport Zones, select overlay network then Actions > Manage Tags and apply tag.
Scope = ncp/cluster and Tag = dc-openshift

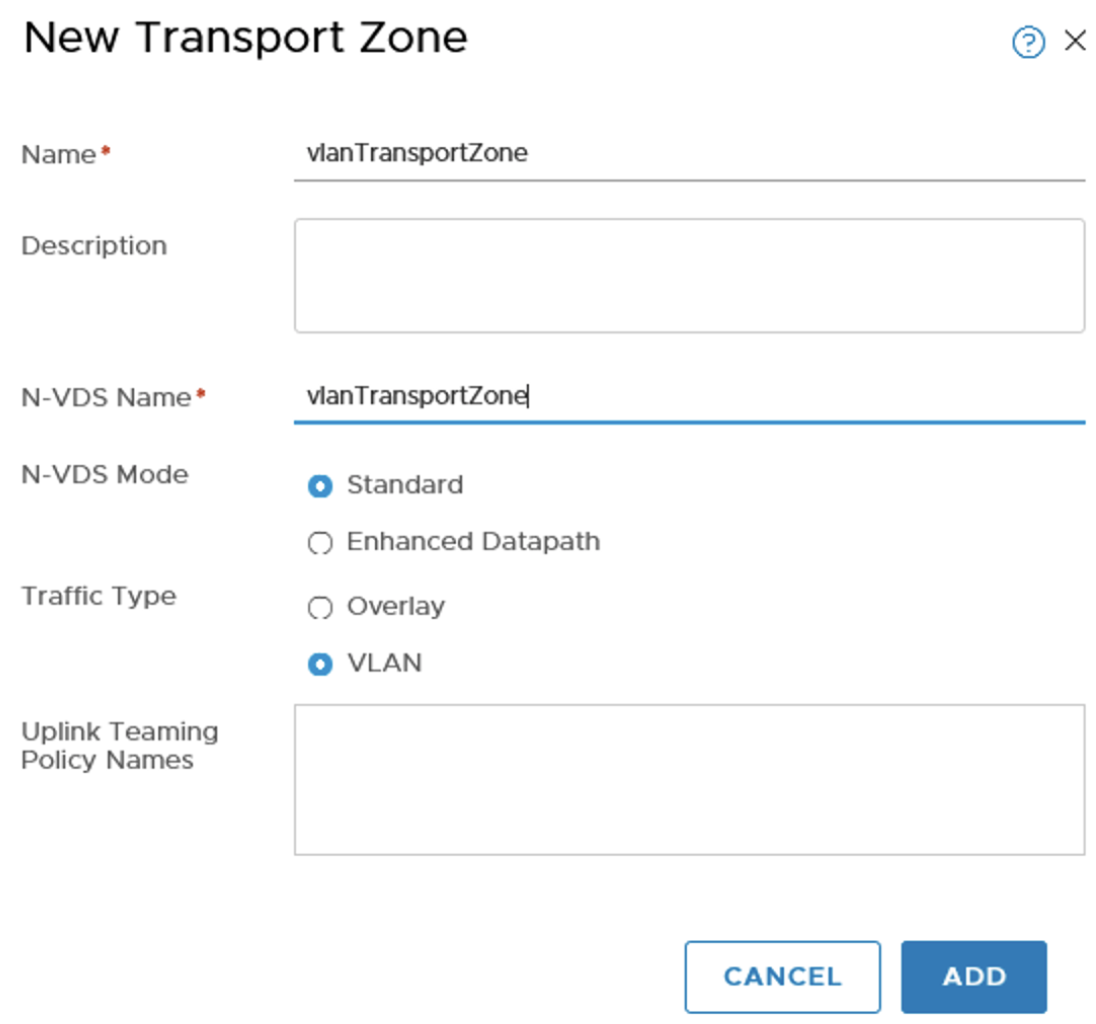
VLAN Transport Zone
As well as connecting to the overlay network the Edges running Tier-0 routing functions also needs to be able to connect to the physical network. This connectivity is achieved by using a Transport Zone of type VLAN.
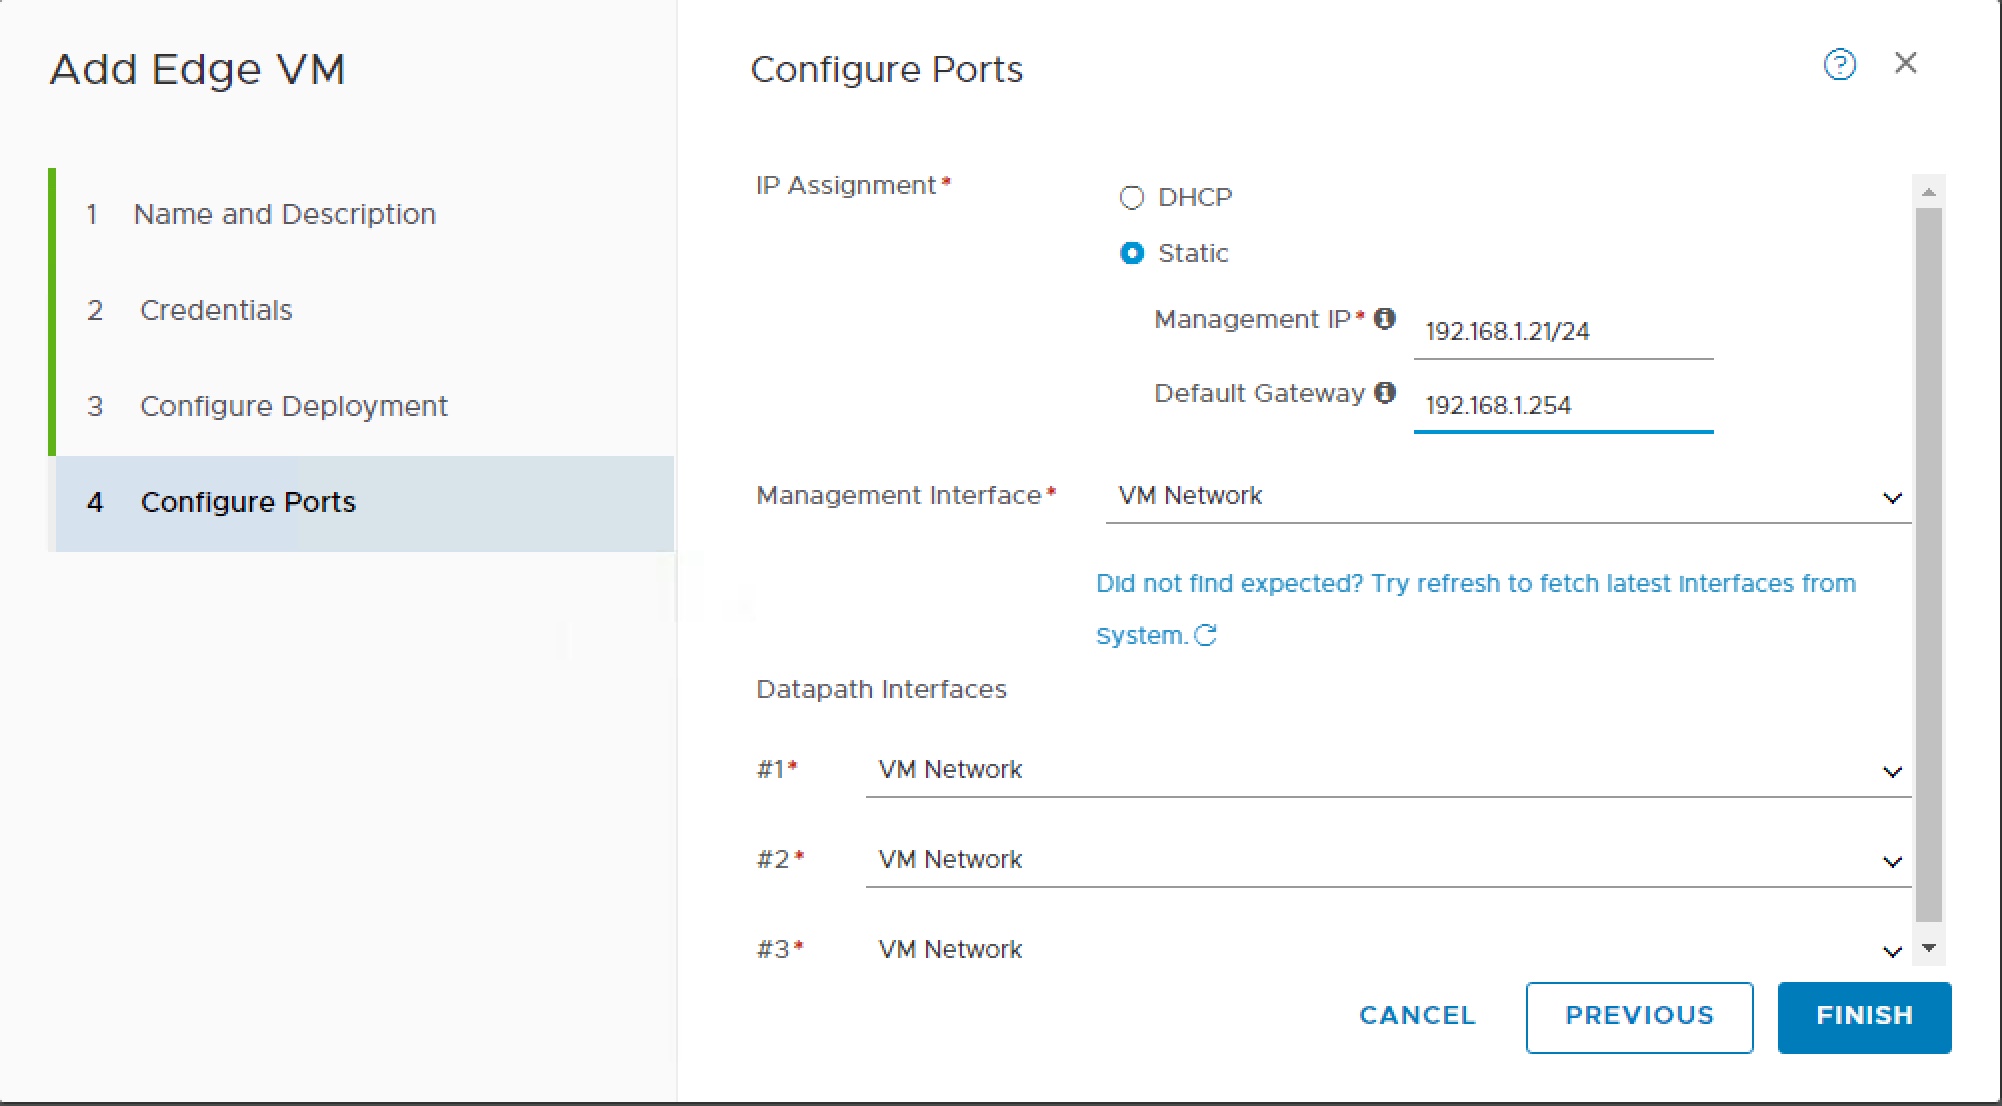
NSX Edge
We need some way for the logical container overlay network to communicate with the physical network. AN NSX Edge can host services which provide this connectivity.
The NSX Edge has 4 network adapters, the first is used by the management network, the other 3 interfaces (fp-eth0, fp-eth1 and fp-eth2) can then be used for connecting to overlay networks or for routing. Within my lab I have a single flat physical network so all NSX Edge interfaces connect to the same Port Group.
| GUI Reference | VM vNIC | NIC | Lab Function |
|---|---|---|---|
| Managewment | Network adapter 1 | eth0 | Management |
| Datapath #1 | Network adapter 2 | fp-eth0 | Overlay |
| Datapath #2 | Network adapter 3 | fp-eth1 | Uplink |
| Datapath #3 | Network adapter 4 | fp-eth2 | Unused |
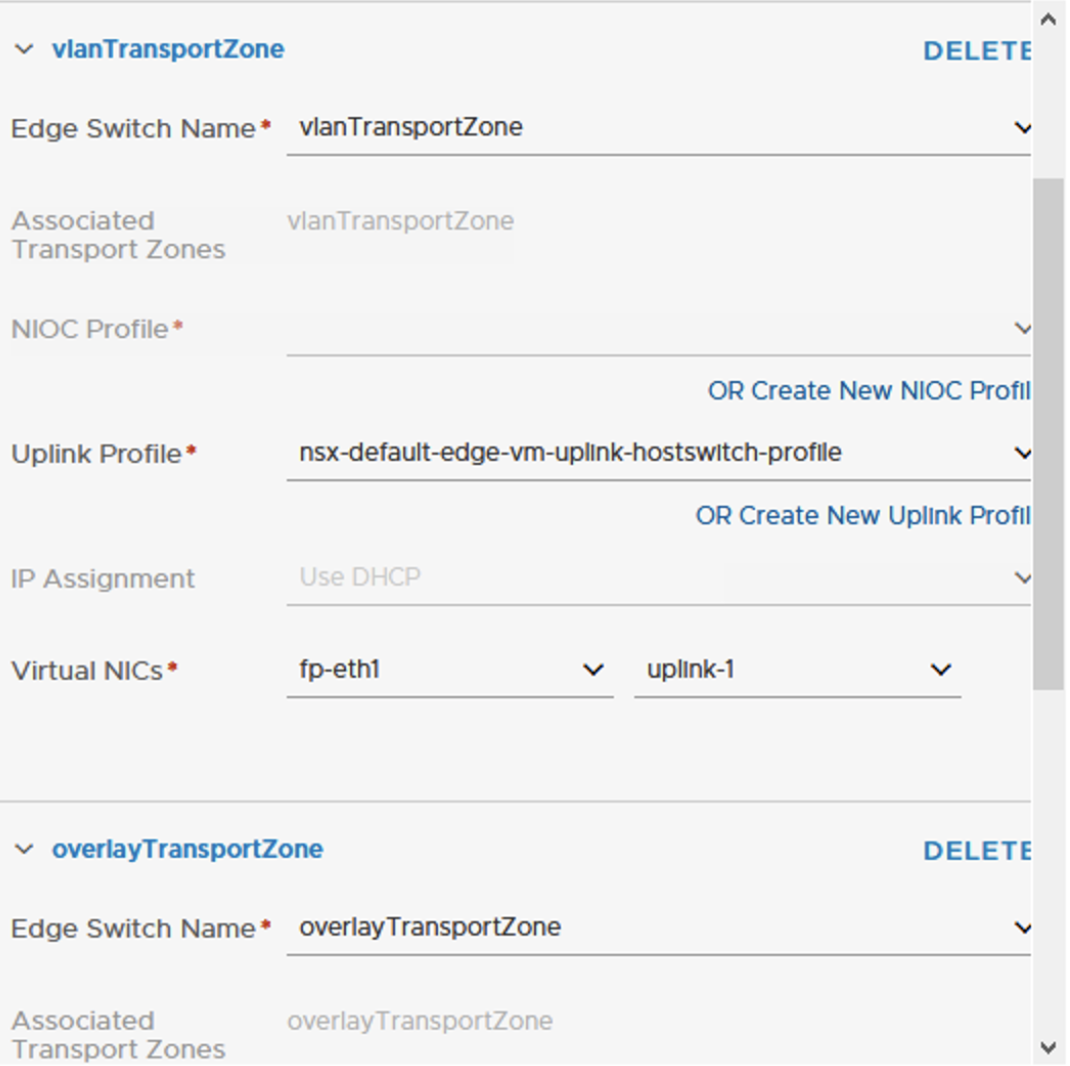
The NSX Edge needs to participate in the Overlay Transport Zone so we need to first configure this as Transport Node. This is very similar process to how we setup ESXi hosts as Transport Nodes except on N-VDS tab we add to both overlay and vlan transport zones, we use the edge-vm Uplink profile and for Virtual NIC select appropriate NIC as per table above.
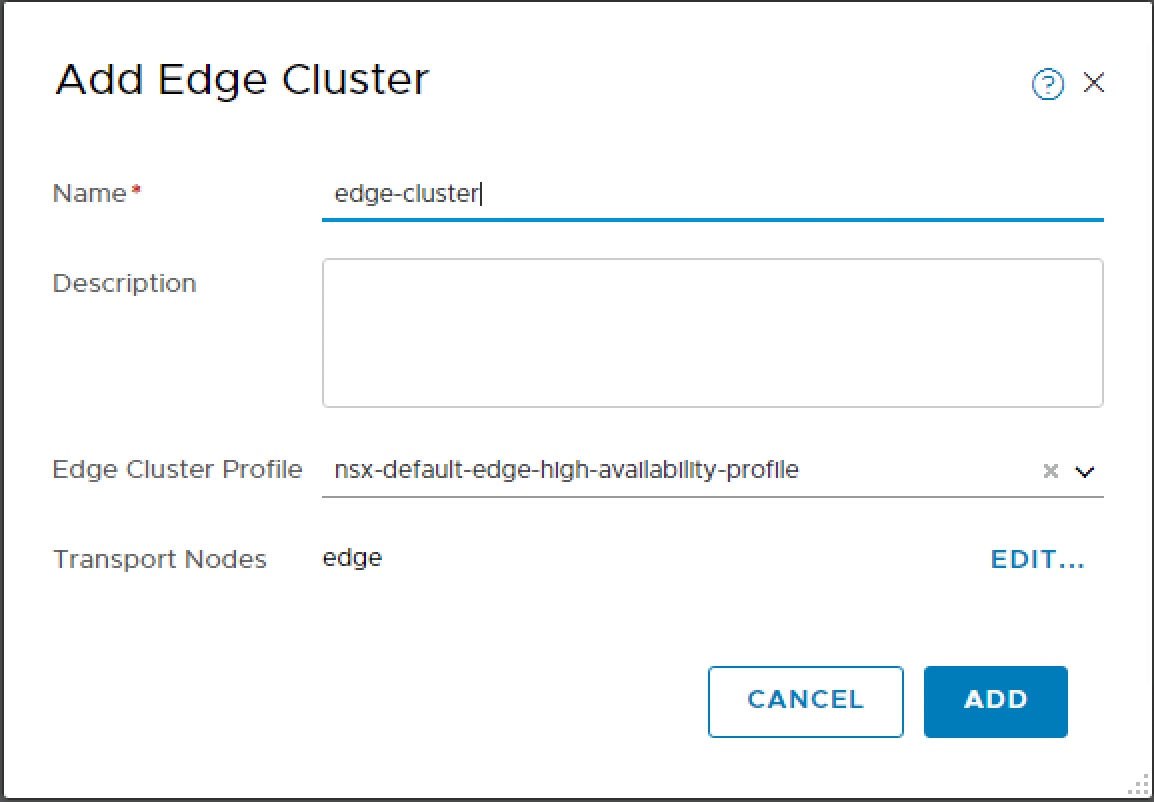
In order we can deploy Tier-0 router the Edge needs to be a member of an Edge Cluster.
Tier-0 Router
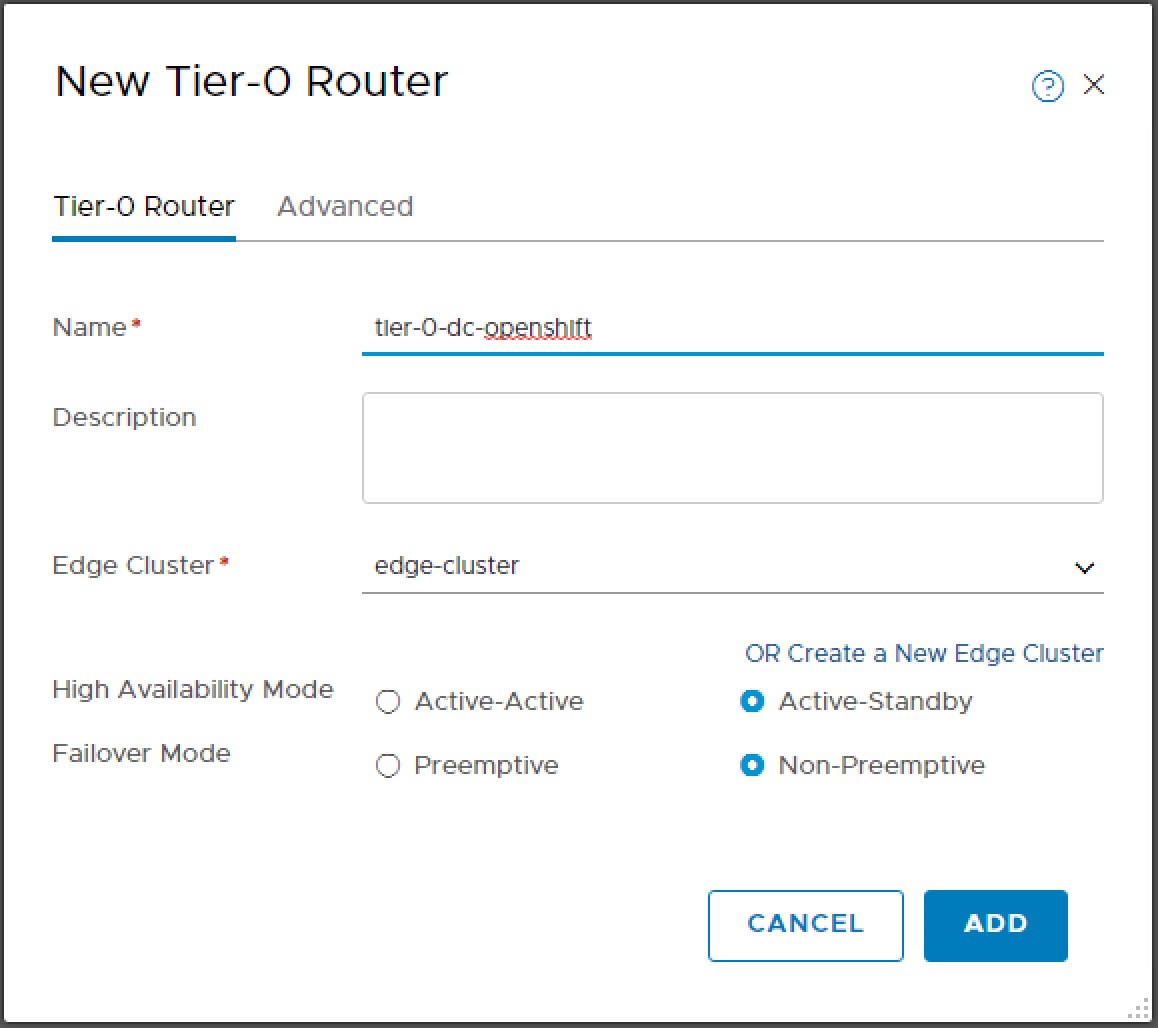
Once the Edge Cluster is created we can create the tier-0 router.
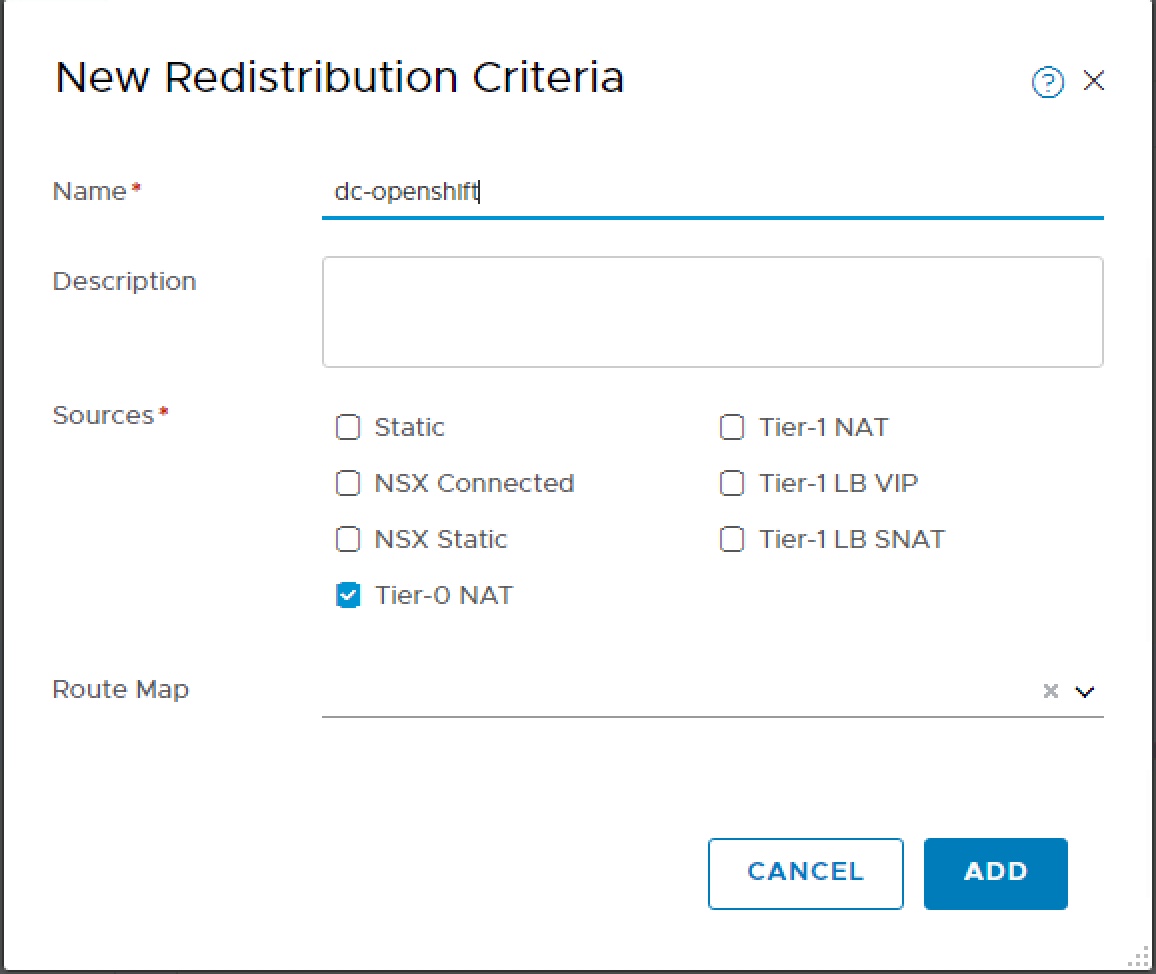
In my lab I have 192.168.1.0 /24 and will be using the 172.16.0.0 /16 address space for NSX. I would like to use network address translation (NAT) and allocate a separate SNAT IP on the 192.168.1.0 network for each OpenShift namespace on the 172.16.0.0 network. To achieve this I need to configure a redistribution criteria of type Tier-0 NAT.
The next step requires an NSX Logical Switch so we create that.
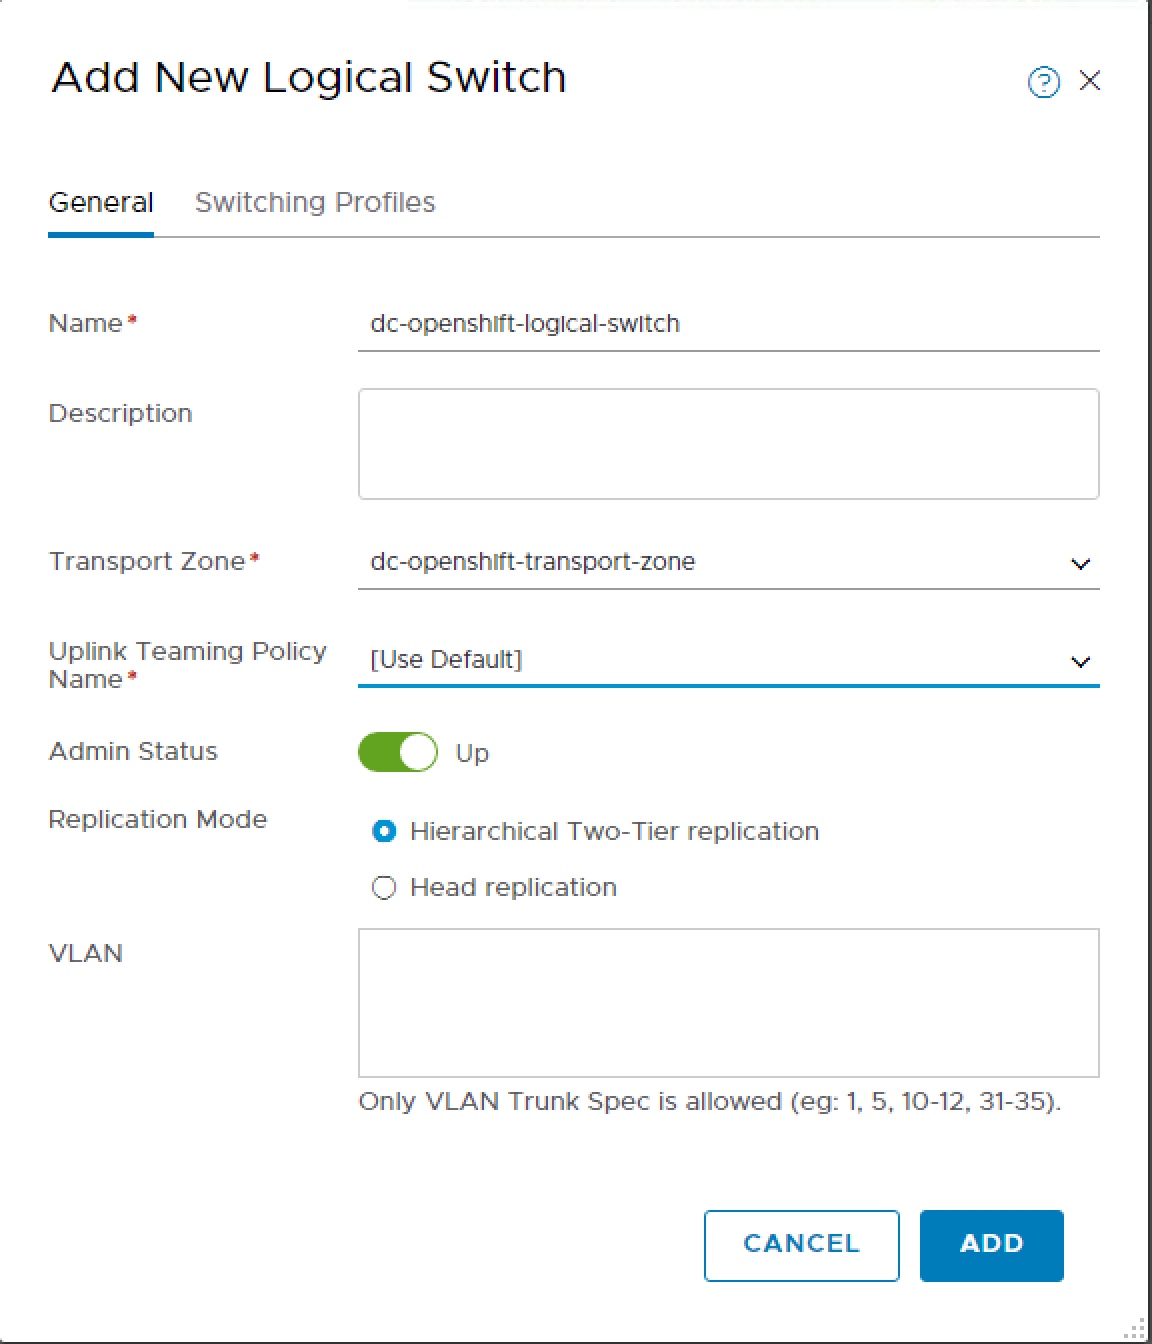
We can now configure the Router Port, selecting the Transport Node and Logical Switch.
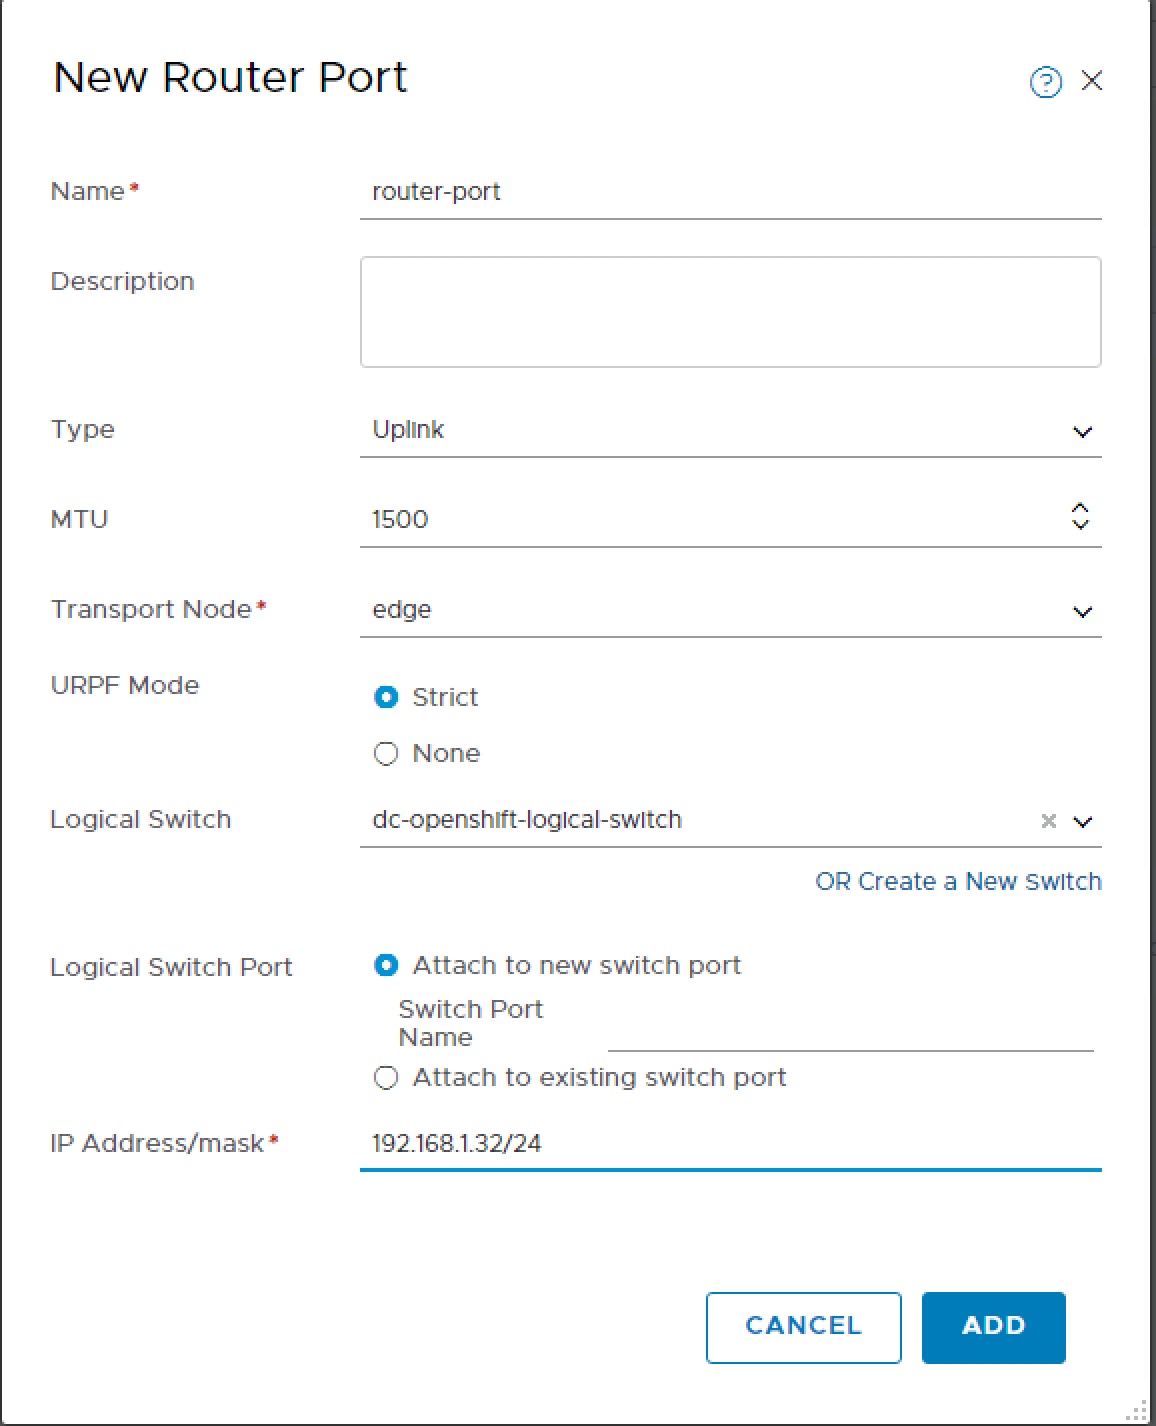
This will be used by OpenShift to once created navigate to Actions > Manage Tags and apply tag.
Scope = ncp/cluster and Tag = dc-openshift
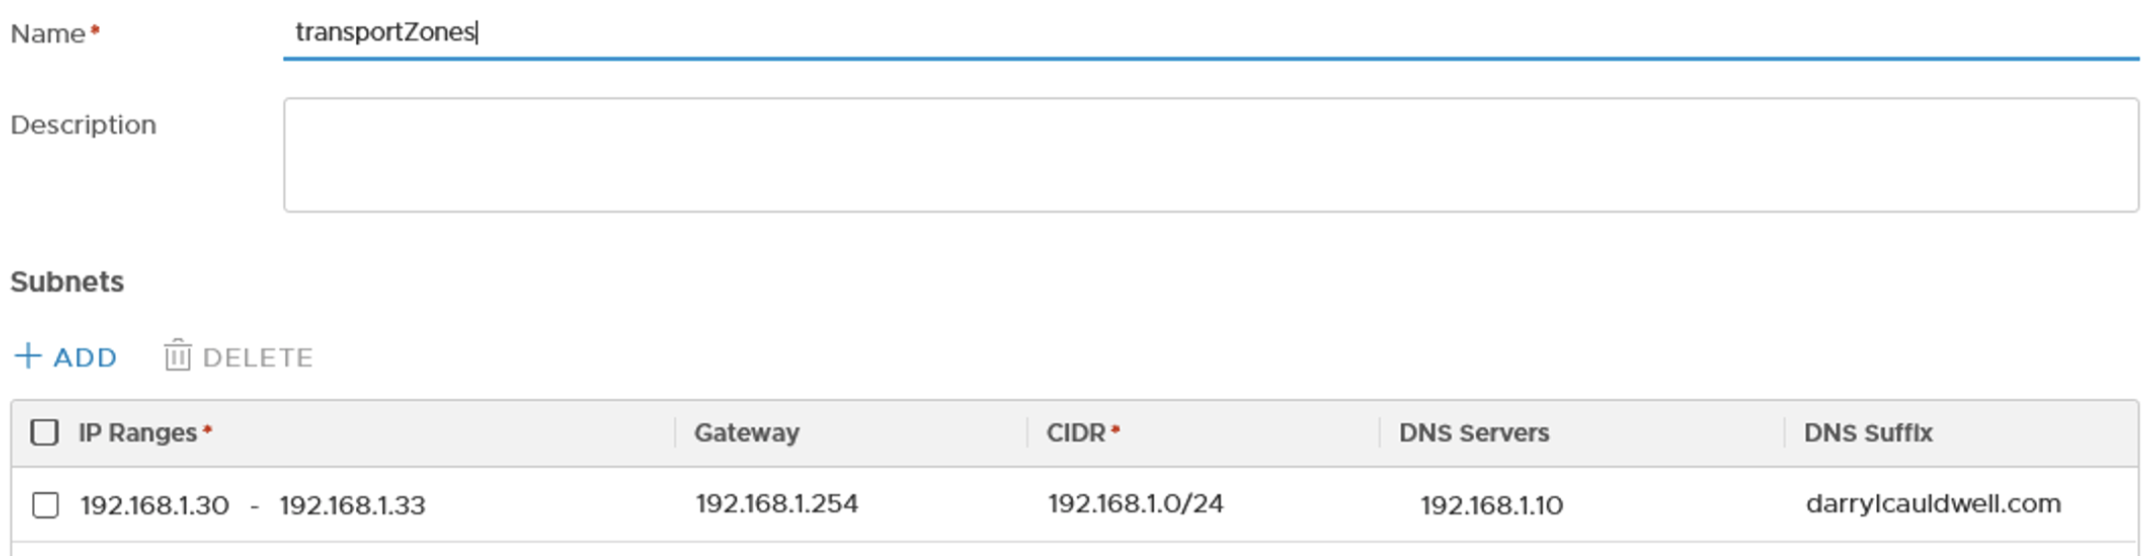
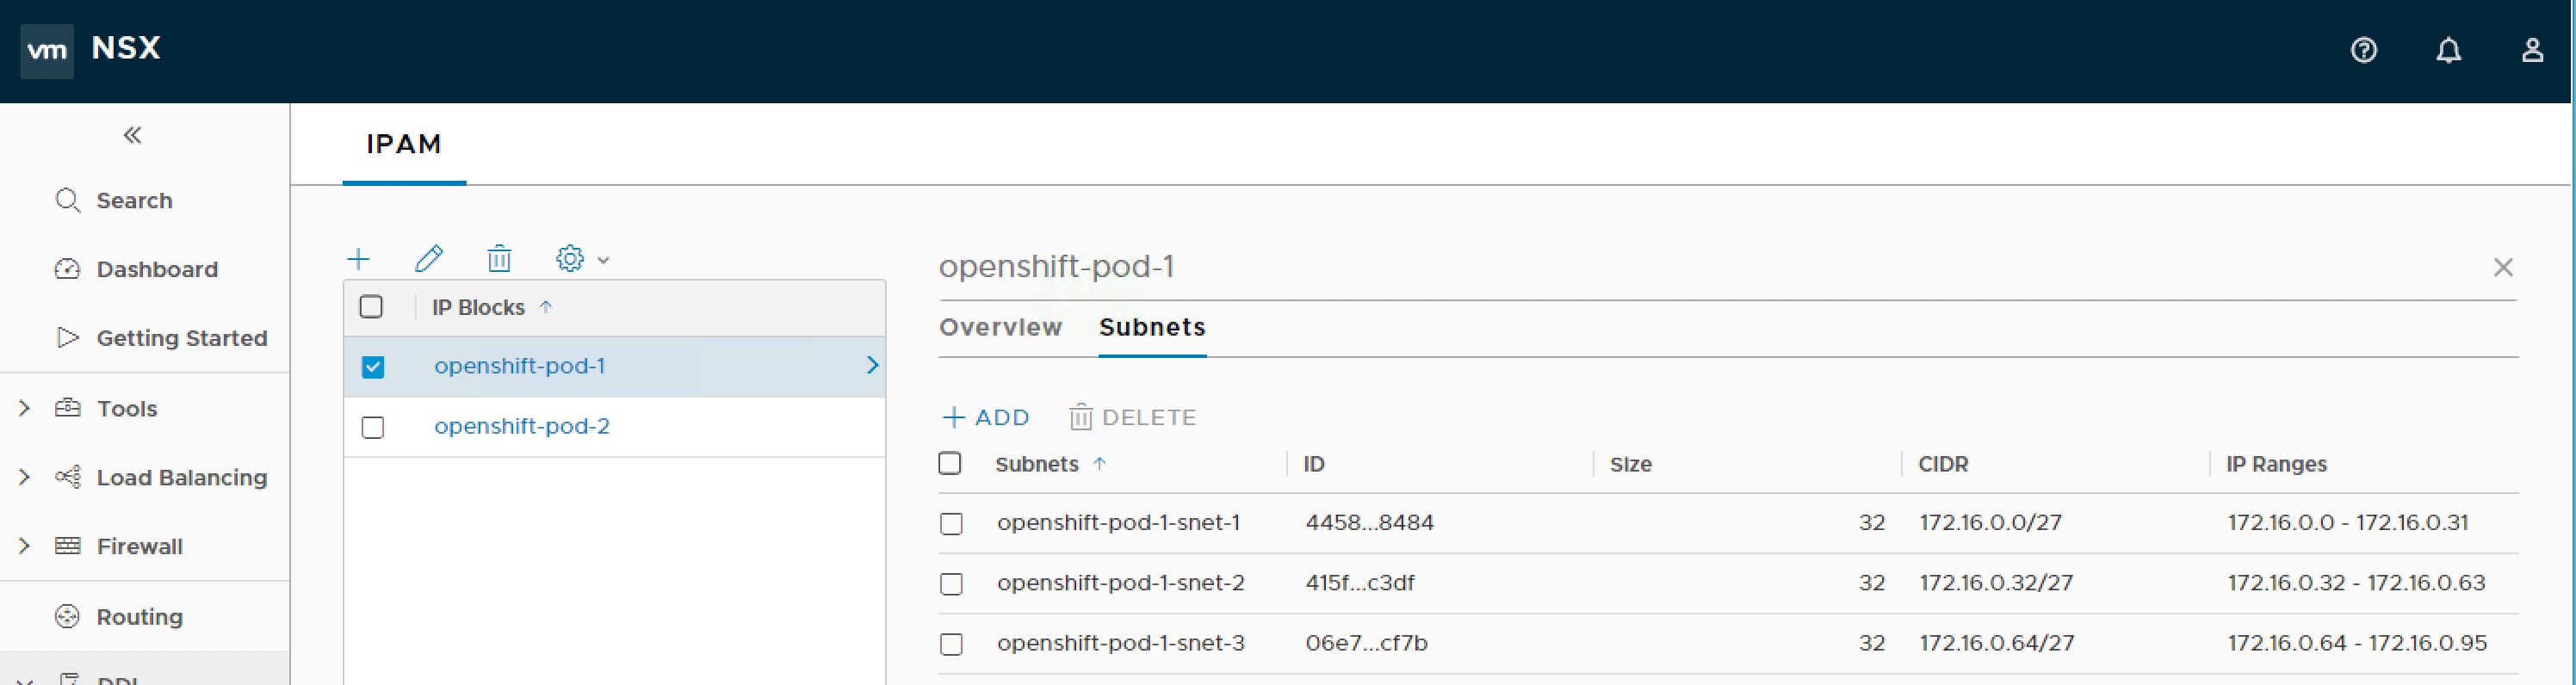
IP Block Kubernetes Pods
In order to create the topology we are aiming for we need to create an IP Blocks for each of our two namespaces. Within each IP Block we need to create the three subnets. In the end you should end up with something which looks like this, and all IP Block needs to have the ncp/cluster tag.
IP Pool SNAT
We create an IP pool for the tier-0 router to issue SNAT and provide external (floating) IPs to OpenShift.
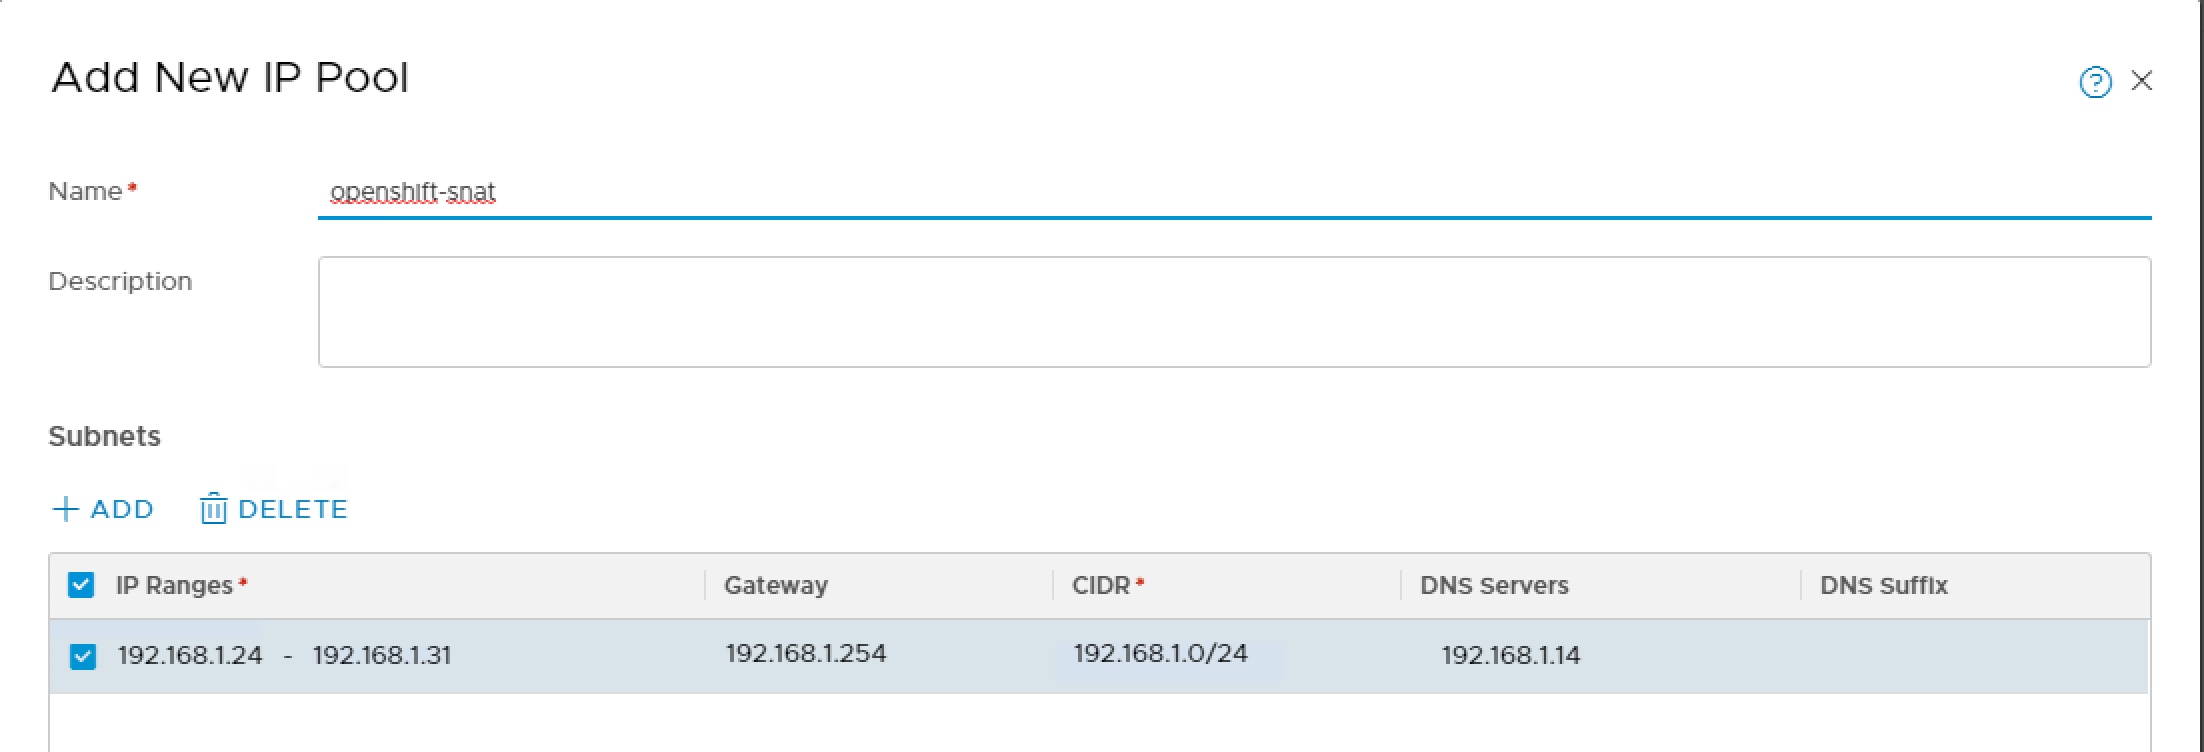
Once created add the following two tags,
Scope = ncp/cluster and Tag = dc-openshift
Scope = ncp/external and Tag = true
Red Hat OpenShift Origin
OpenShift Origin is a computer software product from Red Hat for container-based software deployment and management. It is a supported distribution of Kubernetes using Docker containers and DevOps tools for accelerated application development.
OpenShift Origin is the upstream community project used in OpenShift Online, OpenShift Dedicated, and OpenShift Container Platform (formerly known as OpenShift Enterprise).
VMware provides Red Hat Ansible playbooks for installing NSX-T for OpenShift Container Platform. However, OpenShift Container Platform is a licensed product and this deploys a scaled-out deployment. Neither of these lend itself to a home lab deployment, my goal for the rest of this blog post is to detail the steps I follow for a cutdown installation.
Create OpenShift Origin Base VM
The OpenShift Container Platform is Red Hat Enterprise Linux based, I don’t have a Red Hat Enterprise Linux subscription license. As such I created a CentOS 7 (64-bit) virtual machine, as the library versions are the same, so binaries that work on one will work on the other.
Each OpenShift node needs to be managed and also provide connectivity to NSX, it is possible to perform these two functions on same vNIC however, I give my VM two vNICs one for management on VLAN backed dvPortgroup and one for NSX on VXLAN backed dvPortgroup. I used the CentOS minimal installation ISO set static IP address on management vNIC, and create DNS A & PTR records for this.
Once built I run following commands to install Docker, some other basic tools and apply latest patches.
cat > /etc/yum.repos.d/docker.repo << '__EOF__'
[docker]
name=Docker Repository
baseurl=https://yum.dockerproject.org/repo/main/centos/7/
enabled=1
gpgcheck=1
gpgkey=https://yum.dockerproject.org/gpg
__EOF__
yum install -y https://dl.fedoraproject.org/pub/epel/epel-release-latest-7.noarch.rpm
yum install -y git open-vm-tools wget docker-engine net-tools python-pip
pip install docker-py
systemctl enable docker.service
yum update -y
Default Kubernetes Service Addresses
OpenShift leverages the Kubernetes concept of a pod, which is one or more containers deployed together on one host, and the smallest compute unit that can be defined, deployed, and managed. A Kubernetes service address serves as an internal load balancer. It identifies a set of replicated pods in order to proxy the connections it receives to them. Services are assigned an IP address and port pair that, when accessed, proxy to an appropriate backing pod. These service addresses are assigned and managed by OpenShift. By default they are assigned out of the 172.30.0.0/16 network.
To setup our environment we can configure the Docker daemon with an insecure registry parameter of 172.30.0.0/16.
systemctl start docker
touch /etc/docker/daemon.json
cat > /etc/docker/daemon.json << '__EOF__'
{
"insecure-registries": [
    "172.30.0.0/16"
    ]
}
__EOF__
systemctl daemon-reload
systemctl restart docker
Add OpenShift Client
The OpenShift client is used to manage the OpenShift installation and configuration it is supplied as a package. Download this, unpack and add to runtime path.
cd /tmp
wget https://github.com/openshift/origin/releases/download/v3.10.0-rc.0/openshift-origin-client-tools-v3.10.0-rc.0-c20e215-linux-64bit.tar.gz
tar -xvf /tmp/openshift-origin-client-tools-v3.10.0-rc.0-c20e215-linux-64bit.tar.gz -C /bin
mv /bin/openshift* /home/openshift
echo 'PATH=$PATH:/home/openshift' > /etc/profile.d/oc-path.sh
chmod +x /etc/profile.d/oc-path.sh
. /etc/profile
Start OpenShift Origin as all-in-one Cluster
For next steps we need a basic OpenShift stack. Rather than build something custom we can simply start a local OpenShift all-in-one cluster with a configured registry, router, image streams, and default templates, by running the following command (where openshift.darrylcauldwell.com is the FQDN which points to IP address of management interface of your VM),
oc cluster up --public-hostname=openshift.darrylcauldwell.com
We should also be able to logon and see all of the OpenShift services listed
oc login -u system:admin
oc get services --all-namespaces
| NAMESPACE | NAME | TYPE | CLUSTER-IP | EXTERNAL-IP | PORT(S) | AGE |
|---|---|---|---|---|---|---|
| default | docker-registry | ClusterIP | 172.30.1.1 | none | 5000/TCP | 9m |
| default | kubernetes | ClusterIP | 172.30.0.1 | none | 443/TCP,53/UDP,53/TCP | 10m |
| default | router | ClusterIP | 172.30.88.3 | none | 80/TCP,443/TCP,1936/TCP | 9m |
| kube-dns | kube-dns | ClusterIP | 172.30.0.2 | none | 53/UDP,53/TCP | 10m |
| openshift-apiserver | api | ClusterIP | 172.30.85.121 | none | 443/TCP | 10m |
| openshift-web-console | webconsole | ClusterIP | 172.30.83.178 | none | 443/TCP | 9m |
We should also be able to see all of the OpenShift pods listed
oc get pod --all-namespaces
| NAMESPACE | NAME | READY | STATUS | RESTARTS | AGE |
|---|---|---|---|---|---|
| default | docker-registry-1-4l59n | 1/1 | Running | 0 | 10m |
| default | persistent-volume-setup-grm9s | 0/1 | Completed | 0 | 10m |
| default | router-1-5xtqg | 1/1 | Running | 0 | 10m |
| kube-dns | kube-dns-bj5cq | 1/1 | Running | 0 | 11m |
| kube-proxy | kube-proxy-9l8ql | 1/1 | Running | 0 | 11m |
| kube-system | kube-controller-manager-localhost | 1/1 | Running | 0 | 10m |
| kube-system | kube-scheduler-localhost | 1/1 | Running | 0 | 10m |
| kube-system | master-api-localhost | 1/1 | Running | 1 | 10m |
| kube-system | master-etcd-localhost | 1/1 | Running | 0 | 11m |
| openshift-apiserver | openshift-apiserver-ptk5j | 1/1 | Running | 0 | 11m |
| openshift-controller-manager | openshift-controller-manager-vg7gm | 1/1 | Running | 0 | 10m |
| openshift-core-operators | openshift-web-console-operator-78ddf7cbb7-r8dhd | 1/1 | Running | 0 | 10m |
| openshift-web-console | webconsole-847bc4ccc4-hgsv4 | 1/1 | Running | 0 | 10m |
Once running we can open browser to OpenShift Origin
https://openshift.darrylcauldwell.com:8443/console/catalog
Default credentials username ‘system’ password ‘admin’
NSX-T Open vSwitch
The NSX-T Container Plug-in (NCP) relies on Open vSwitch (OVS) providing a bridge to the NSX Logical Switch. VMware provide an Open vSwitch (OVS) in the NSX Container Plugin 2.2.0, package. Download expand and copy to OpenShift VM /tmp folder. Once uploaded install the following packages.
yum install -y /tmp/nsx-container-2.2.0.8740202/OpenvSwitch/rhel74_x86_64/kmod-openvswitch-2.9.1.8614397.rhel74-1.el7.x86_64.rpm
yum install -y /tmp/nsx-container-2.2.0.8740202/OpenvSwitch/rhel74_x86_64/openvswitch-2.9.1.8614397.rhel74-1.x86_64.rpm
yum install -y /tmp/nsx-container-2.2.0.8740202/OpenvSwitch/rhel74_x86_64/openvswitch-kmod-2.9.1.8614397.rhel74-1.el7.x86_64.rpm
Once installed start the Open vSwitch
service openvswitch start
Once the Open vSwitch is running we can create a bridge network interface, and then connect this to the VM network interface located on the NSX-T Logical Switch. You can do this by running the following command (where eno33559296 is the devicename of NIC on NSX Logical Switch),
ovs-vsctl add-br br-int
ovs-vsctl add-port br-int eno33559296 -- set Interface eno33559296 ofport_request=1
These connections are created with link state DOWN in order to use them we need to set link status is up for both,
ip link set br-int up
ip link set eno33559296 up
Update the network configuration file to ensure that the network interface is up after a reboot.
vi /etc/sysconfig/network-scripts/ifcfg-eno33559296
Ensure has a line reading,
ONBOOT=yes
NSX-T Container Network Interface (CNI)
The NSX-T Container Plug-in (NCP) provides integration between NSX-T and container orchestrators such as Kubernetes. The installation files are in same package as the NSX Open vSwitch (OVS). Install using command.
yum install -y /tmp/nsx-container-2.2.0.8740202/Kubernetes/rhel_x86_64/nsx-cni-2.2.0.8740202-1.x86_64.rpm
NSX-T Container Plug-in (NCP) ReplicationController (RC)
There are a few accounts used for rights assignments, the project, users and roles are defined in NCP RBAC file. To create the users within the project run,
oc login -u system:admin
oc create -f /tmp/nsx-container-2.2.0.8740202/nsx-ncp-rbac.yml
The RBAC creates two service account users, the tokens for these are required by NCP in folder /etc/nsx-ujo. This gets mounted as config-volume and these tokens used for authentication.
oc project nsx-system
mkdir -p /etc/nsx-ujo
SVC_TOKEN_NAME="$(oc get serviceaccount ncp-svc-account -o yaml | grep -A1 secrets | tail -n1 | awk {'print $3'})"
oc get secret $SVC_TOKEN_NAME -o yaml | grep 'token:' | awk {'print $2'} | base64 -d > /etc/nsx-ujo/ncp_token
NODE_TOKEN_NAME="$(oc get serviceaccount nsx-node-agent-svc-account -o yaml | grep -A1 secrets | tail -n1 | awk {'print $3'})"
oc get secret $NOD_TOKEN_NAME -o yaml | grep 'token:' | awk {'print $2'} | base64 -d > /etc/nsx-ujo/node_agent_token
The pods which NSX-T Container Plug-in (NCP) ReplicationController (RC) run in need to use the host networking so we need to allow then this right by loading the NCP Security Context Constraints for NCP and NSX Node Agent.
oc apply -f /tmp/nsx-container-2.2.0.8740202/Kubernetes/rhel_x86_64/ncp-os-scc.yml
oc adm policy add-scc-to-user ncp-scc -z ncp-svc-account
oc adm policy add-scc-to-user ncp-scc -z nsx-node-agent-svc-account
Edit the ReplicationController (RC) YML file,
vi /tmp/nsx-container-2.2.0.8740202/Kubernetes/ncp-rc.yml
Ensure the following lines are configured thus,
serviceAccountName: ncp-svc-account
apiserver_host_port = 8443
apiserver_host_ip = 192.168.1.20
nsx_api_managers = 192.168.1.15
insecure = True
nsx_api_user = admin
nsx_api_password = VMware1!
cluster = dc-openshift
adaptor = openshift
enable_snat = True
tier0_router = 0d772616-4c44-47ae-ac9e-06f3c0222211
overlay_tz = 5eeefd4c-bd7d-4871-9eba-d7ed02394dec
container_ip_blocks = 562c85de-8675-4bb2-b211-3f95a6342e0e, f225d518-2fe3-4f8d-a476-a4697bff3ea6
external_ip_pools = d5095d53-c7f8-4fcd-9fad-3032afd080a4
The NSX-T Container Plug-in (NCP) is a docker image which we import into the local registry. The image is referenced by later script by different tag name so we add an additional tag.
docker load -i /tmp/nsx-container-2.2.0.8740202/Kubernetes/nsx-ncp-rhel-2.2.0.8740202.tar
docker image tag registry.local/2.2.0.8740202/nsx-ncp-rhel nsx-ncp
Then we can create NSX ReplicationController
oc project nsx-system
oc create -f /tmp/nsx-container-2.2.0.8740202/Kubernetes/ncp-rc.yml
oc describe rc/nsx-ncp
We should now see the container running within pod namespace nsx-system.
oc get pod --all-namespaces
If all has gone well we can now connect to the NCP container and use the nsxcli.
oc exec -it nsx-ncp-6k5t2 nsxcli
get ncp-nsx status
NSX-T Container Plug-in (NCP) Node Agent DaemonSet (DS)
Edit the nsx-node-agent-ds.yml file,
vi /tmp/nsx-container-2.2.0.8740202/Kubernetes/rhel_x86_64/nsx-node-agent-ds.yml
Ensure the following is set,
serviceAccountName: nsx-node-agent-svc-account
cluster = dc-openshift
apiserver_host_port = 8443
apiserver_host_ip = 192.168.1.20
Once updated create the Node Agent Daemonset (DS),
oc login -u system:admin
oc apply -f /tmp/nsx-container-2.2.0.8740202/Kubernetes/rhel_x86_64/nsx-node-agent-ds.yml
Check the Node Agent Daemonset is there,
oc describe daemonset.apps/nsx-node-agent
We should also be able to see all of the OpenShift pods listed including our two NSX ones.
oc get pod --all-namespaces
| NAMESPACE | NAME | READY | STATUS | RESTARTS | AGE |
|---|---|---|---|---|---|
| default | docker-registry-1-4l59n | 1/1 | Running | 0 | 1h |
| default | persistent-volume-setup-grm9s | 0/1 | Completed | 0 | 1h |
| default | router-1-5xtqg | 1/1 | Running | 0 | 1h |
| kube-dns | kube-dns-bj5cq | 1/1 | Running | 0 | 1h |
| kube-proxy | kube-proxy-9l8ql | 1/1 | Running | 0 | 1h |
| kube-system | kube-controller-manager-localhost | 1/1 | Running | 0 | 1h |
| kube-system | kube-scheduler-localhost | 1/1 | Running | 0 | 1h |
| kube-system | master-api-localhost | 1/1 | Running | 1 | 1h |
| kube-system | master-etcd-localhost | 1/1 | Running | 0 | 1h |
| nsx-system | nsx-ncp-9m2jl | 1/1 | Running | 0 | 10m |
| nsx-system | nsx-node-agent-jlt5t | 2/2 | Running | 0 | 4m |
| openshift-apiserver | openshift-apiserver-ptk5j | 1/1 | Running | 0 | 1h |
| openshift-controller-manager | openshift-controller-manager-vg7gm | 1/1 | Running | 0 | 1h |
| openshift-core-operators | openshift-web-console-operator-78ddf7cbb7-r8dhd | 1/1 | Running | 0 | 1h |
| openshift-web-console | webconsole-847bc4ccc4-hgsv4 | 1/1 | Running | 0 | 1h |
Testing
oc create namespace my-first
oc logs nsx-ncp-9m2jl | grep ERROR
nsx_ujo.k8s.ns_watcher Failed to create NSX topology for project my-first: Unexpected error from backend manager ([‘192.168.1.15’]) for Allocate subnet from IP block
more commands for working OpenShift here