NSX-V Load Balancer As A Service LBaaS
As part of study for VCIX-NV I’ve given myself task of exploring in my homelab all parts of NSX which I don’t use at work. One of these things is NSX Load Balancer as a Service (LBaaS), to investigate this I came up with a test scenario and then worked through the steps to achieve a solution to meet the design.
Load Balancer Scenario Design
I started by reading the NSX Administration Guide section covering load balancer configuration.
Here is what I plan to achieve my client and browser will sit on the 192.168.1.0/24 out of band network. I’ll create a new WEB VLAN 1000 to host 192.168.2.0/24 network, the Edge Gateway will serve this network with DHCP and DHCP will issue gateway IP to be its own address, two web server VMs will be assigned to this network.
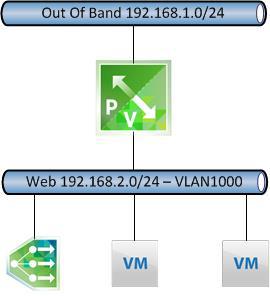
A destination network address translation (DNAT) rule will be configured to pass this OOB network IP address to the load balancerd address on the WEB network. The load balancer will round robin traffic between the two web servers. Port 80 will be monitored on web servers and when apache is stopped on one server all traffic should direct to the active server. The Edge firewall will be configured to block all traffic except for HTTP to the web servers.
Configure Underlay
Create VLAN 1000 on physical switch and ensure this is allowed in the trunk presented to the virtual distributed switch ports.
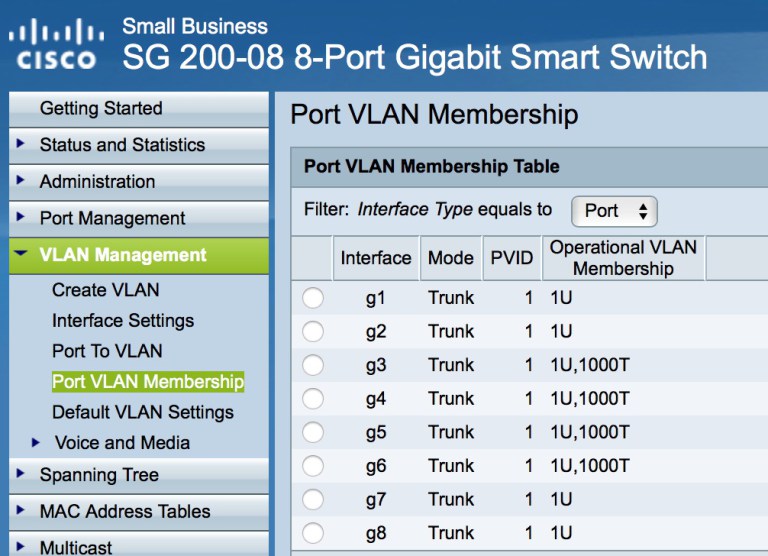
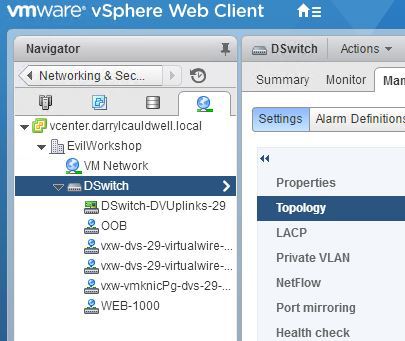
Create a distributed portgroup for VLAN1000 and OOB.
Deploy Edge Gateway
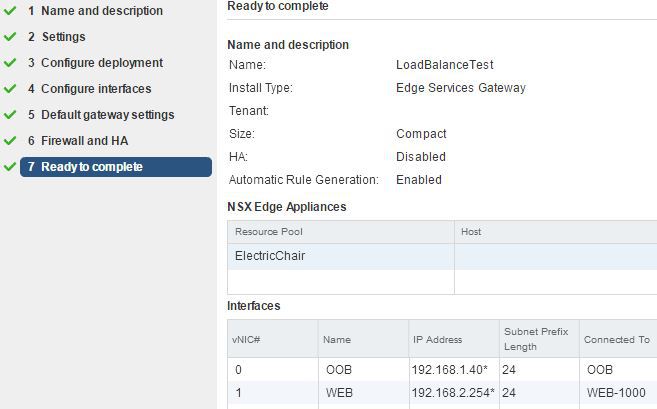
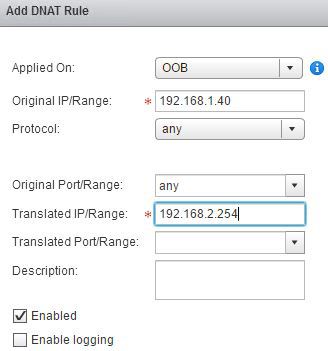
Create a Compact NSX Edge Gateway with an Uplink interface on the OOB with IP address 192.168.1.40 and Internal interface on the WEB - VLAN1000 with IP address 192.168.2.254 . Specify 192.168.1.254 as default gateway on the OOB interface. Ensure firewall is set to accept as default policy.
Create DNAT Rule
As 192.168.2.0/24 is not a network my home router is aware of I must create a Destination NAT rule on 192.168.1.0/24 network to map to the 192.168.2.0/24 address.
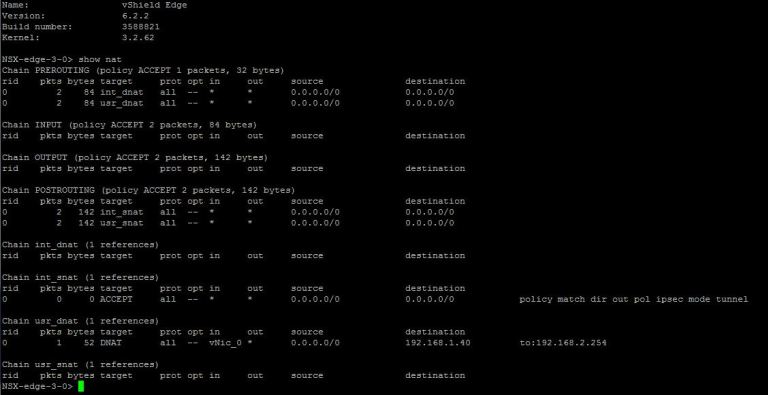
Ensure this is created by connecting SSH session to the Edge and viewing the NAT configuration by running
show nat
Configure Web Server DHCP
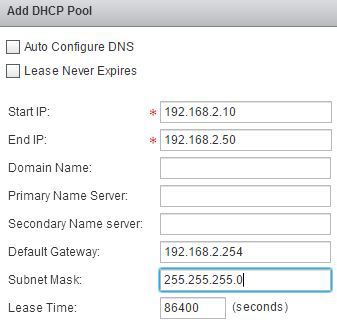
Enable DHCP and create a DHCP scope 192.168.2.10-192.168.2.50.
Create Web Servers
I’ll look to create two test web servers each will host a single web page with its actual IP address on. When I connect to load balanced IP the page contents returned will flip between the two servers.
I created a CentOS 7 VM template previously in lab and so for this test scenario I provisioned two new VMs from this named web1 and web2. I left both as DHCP and setup the web server using following commands.
yum install httpd -y
service httpd start
ifconfig | grep "inet" > /var/www/html/test.html
Configure Load Balancer
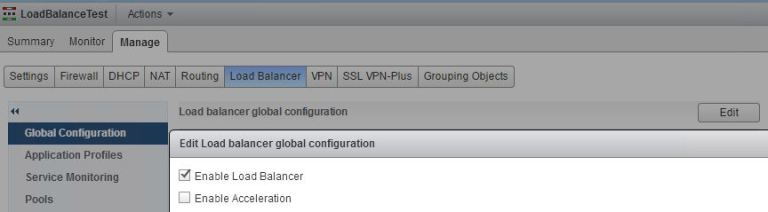
Enable the load balance function on the Edge.
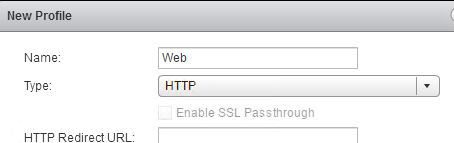
Create a load balancer application profile called Web and mark is for HTTP traffic.
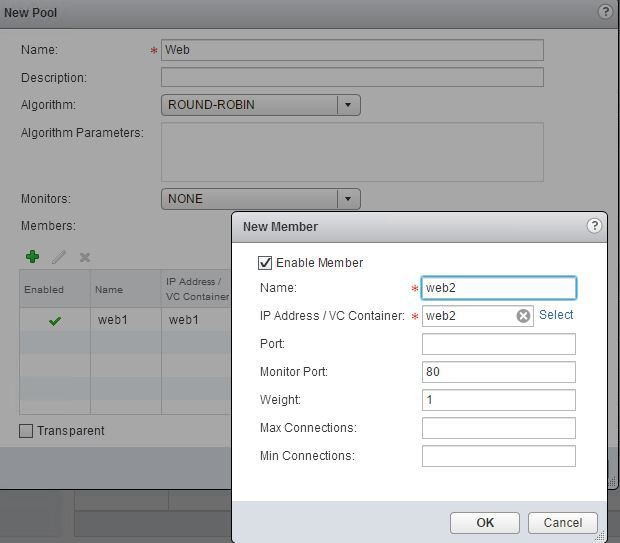
Add web1 and web2 virtual machines to a load balancer pool with monitor port 80. If adding as VM object as per screenshot then you might have IPv6 issue see section below for solution, alternatively enter IP address.
Create a load balancer virtual server to link all the parts into a VIP.
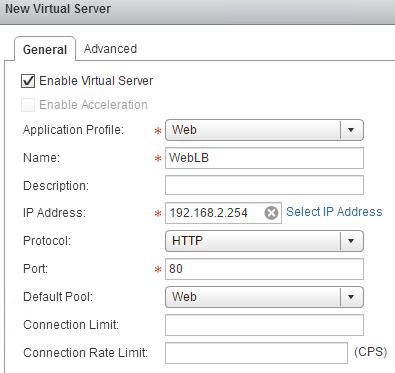
Once this is created you will be able to browse to http://192.168.1.40/test.html on the OOB network this will return a web page displaying IP address. Refreshing the page will display a similar page but with alternate VM IP address.
NSX LoadBalancer IPv6 Issue
I found when I configured this initially by selecting VM objects in the Virtual Server the loadbalancer tried to configure all IP addresses including the IPv6 addresses which are present by default in Centos7. This caused a error in LoadBalancer and wouldn’t allow me to proceed.

I disabled IPv6 on both CentOS7 VMs by adding the following to /etc/sysctl.conf:
net.ipv6.conf.all.disable_ipv6 = 1
net.ipv6.conf.default.disable_ipv6 = 1
Then run the following to commit the changes. When VMs had only IPv4 addresses the process works without error.
sysctl -p
Secure Solution
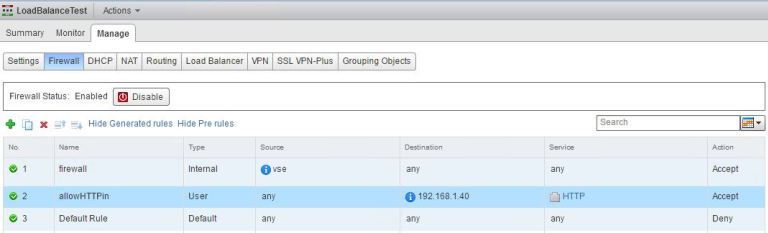
Up to now we have had the Edge firewall default rule set to allow, one of the first tasks we would want to do once web load balancing is working is to secure the solution.
To do this we create a new rule explicitly allowing HTTP traffic to the IP address it will enter the Edge on, and once in place change default rule to Deny.
Once in place test you still have access to the web page.
Load Balance Monitoring
When creating the Loadbalance configuration we specified to monitor port 80 was available in order to include the server in the balanced set. Before proceeding here ensure that when you connect to 192.168.1.40 and refresh load balancing is working correctly and returning IP addresses alternately.
We then stop the apache service on one of the VMs using:
service httpd stop

If we now go back to browser and refresh a few times it will direct all traffic to one server IP address. If we restart apache using
service httpd start
and refresh the browser we find load balancing is returned and refreshes alternate the IP addresses.