Introduction To Kubernetes Cluster Networking with NSX-T
When developing a cloud native application using Docker containers she soon needs to understand how Docker containers communicate. In previous post I looked at how Docker containers communicate on a single host. When the developer wants to scaleout capacity of the hosting across multiple hosts or increase abailability she might look at deploying this on a Kubernetes cluster. The move from single Docker host to multiple hosts managed as Kubernetes Cluster introduces changes to the container networking model. The four distinct networking problems a Kubernetes Cluster needs to address:
- Highly-coupled container-to-container communications
- Pod-to-Pod communications
- Pod-to-Service communications
- External-to-Service communications: this is covered by services
What Is A Kubernetes Pod
A Docker container is great for deploying a single atomic unit of software. This model can become a bit cumbersome when you want to run multiple pieces of software together. You often see this when developers create Docker images that use supervisord as an entrypoint to start and manage multiple processes. Many have found that it is instead more useful to deploy those applications in groups of containers that are partially isolated and partially share an environment. It is possible to configure Docker to control the level of sharing between groups of containers by creating a parent container and manage the lifetime of those containers, however this is administratively complex. Kubernetes provides an abstraction called Pods for just this use case.
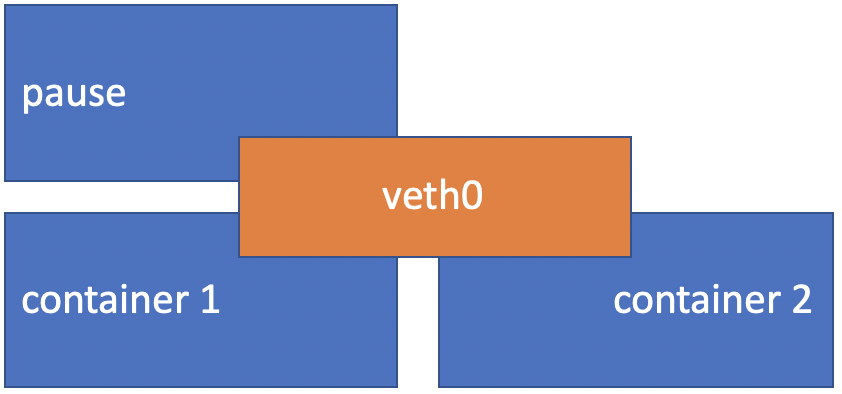
A Kubernetes Pod implements a ‘pause’ container as the managing parent container, the Pod also contains one or more of application containers. The ‘pause’ container serves as the basis of Linux namespace sharing in the Pod the other containers are starterd within that namespace. Sharing a namespace includes sharing network stack and other resources such as volumes. Sharing a network namespace means containers within a Pod share an IP address and all containers within a Pod can all reach each other’s ports on localhost.
What Is A Kubernetes Service
Typically a Kubernetes Deployment is used to When a Kubernetes Pod is deployed Pods. A Deployment describes a desired state it can create and destroy Pods dynamically. While each Pod gets its own IP address, the set of Pods running can change. A Kubernetes Service (sometimes called a micro-service) is an abstraction which defines a logical set of Pods. The Kubernetes API provides Service discovery to Pods, it also offers a method of exposing Services via network port or load balancer to external systems.
What Is Container Networking Interface (CNI)
Container-centric infrastructure needs a network and this network must be dynamic. Container networking is designed to be plugable, the Container Networking Interface is a defined specification. Various open source projects and vendors provide CNI compliant plugins which provide dynamic networking solution for containers.
What Is NSX-T Container Plugin (NCP)
The NSX-T Container Plug-in (NCP) provides a CNI plugin and an integration with container orchestrators such as Kubernetes and OpenShift.
NSX-T bring advanced features which can enrich Kubernetes cluster networking including:
- Fine-grained traffic control and monitoring
- Fine-grained security policy (firewall rules)
- Automated creation of network topology
- Integration with enterprise networking
The main component of NCP runs in a container and communicates with NSX Manager and with the Kubernetes control plane. NCP monitors changes to containers and other resources and manages networking resources such as logical ports, switches, routers, and security groups for the containers by calling the NSX API.
NSX-T Container Plug-in Release 2.5
I looked at the NCP initially for integration with OpenShift in mid-2018. I am revisiting this now to refresh my understanding and explore some of the new features introduced with the 2.5 release including:
Policy API Object Support
Prior to the 2.5 release all NSX objects which the NCP interacted with had to be created via the Advanced Networking & Security tab in the UI or the old imperative APIs. The imperative API was harder than it could have been to control programatically so with the NSX-T 2.4 release VMware introduced a new intent-based Policy API and corresponding Simplified UI. The NCP now supports either the imperative or the intent-based API, to use the intent-based API a new parameter in the NCP configmap (ncp.ini) policy_nsxapi needs to be set to True.
Simplified Installation
Another change I am interested in exploring is the simplified installation. In the past, an admin had to login to every k8s node and perform multiple steps to bootstrap it. She had to install the NSX CNI Plug-in and OpenVSwitch, to create OVS bridge and to add one vNic to the bridge. The 2.5 release introduces a second DaemonSet nsx-ncp-bootstrap Pod this now handles the deployment and lifecycle management of these components and we don’t need to login to every node. This should make it easier to scale out a cluster with additional nodes.
Lab Hardware Configuration
To explore Kubernetes networking and the NCP I am using my homelab. My homelab has a very simple physical network namely a single subnet (192.168.1.0/24) with DHCP enabled and which has default route to the internet. Connected to the physical network are three Intel NUCs each has two 1G NIC an onboard and an additional 1G USB3 NIC.
Lab vSphere Configuration
The hosts run vSphere 6.7 Update 3 and have the onboard NIC configure as a vSphere Standard Switch hosting Management and vSAN VMkernels and the USB3 NIC is unused. The hosts are added to a vCenter appliance (192.168.1.13) and formed into a VSAN enabled cluster. The cluster also hosts a Windows 2019 Server VM running Active Directory (192.168.1.10) this also acts as DNS server and NTP source for lab.
Lab NSX-T Configuration
An extra-small NSX Manager appliance (192.168.1.14) is deployed. All esxi hosts are configured as Transport Nodes using vusb0 interface to Transport Zone named ‘overlayTransport’. A medium sized NSX Edge called ’nsxEdge’ is deployed which is a member of ‘overlayTransport’ and ‘vlanTransport’ Transport Zones. A Edge Cluster named ’edgeCluster’ and add ’nsxEdge’ is a member.
Kubernetes IP Address Space
A Kubernetes Cluster requires all Pods on a node to communicate with all Pods on all nodes in the cluster without NAT these are refered to as CluterIP. To support this a range of IP addresses must be defined to be issued to Pods and Services within a cluster. Even though the range is used for both Pods and Services, it is called the Pod address range. The last /20 of the Pod address range is used for Services. A /20 range has 212 = 4096 addresses. So 4096 addresses are used for Services, and the rest of the range is used for Pods.
The address range I will be using to issue ClusterIP for this lab cluster is 10.0.0.0/16.
As well as internal communicatins using ClusterIP some parts of your application may need to be exposed as a Service to be accessible on an externally routable IP address. There are two methods for exposing Service onto an externally routable IP address, NodePort and LoadBalancer. Source NAT is used for translating private ClusterIP address to a public routable address.
The external address range I will be using to issue ExternalIP for this lab cluster is 172.16.0.0/16.
NCP - NSX Object Identification
There can be many objects deployed within NSX-T, the NCP needs to understand which of these objects to interact with. The NSX objects which the NCP needs to interact with include:
- Overlay transport zone
- Tier-0 logical router
- Logical switch to connect the node VMs
- IP Block for internal ClusterIP addressing
- IP Pool for ExternalIP addressing
The NCP configuration is stored in ncp.ini file. It is possible to put the UUID of NSX objects in the ncp.ini but this an administrative pain. The mapping of which NSX objects for NCP to interact with is better achieved by applying tags to the appropriate NSX objects.
An NSX-T instance can support multiple Kubernetes clusters to ensure correct object mapping a cluster name is used. The cluster name is specified in NCP configuration and the appopriate NSX objects must have tag of same name applied.
For this lab environment I am configuring with cluster name ‘pandora’.
Deploy and Configure Tier-0
The NCP deploys application centric network topology at the top of that topology is a Tier-0 router which provides uplink to the physical network.
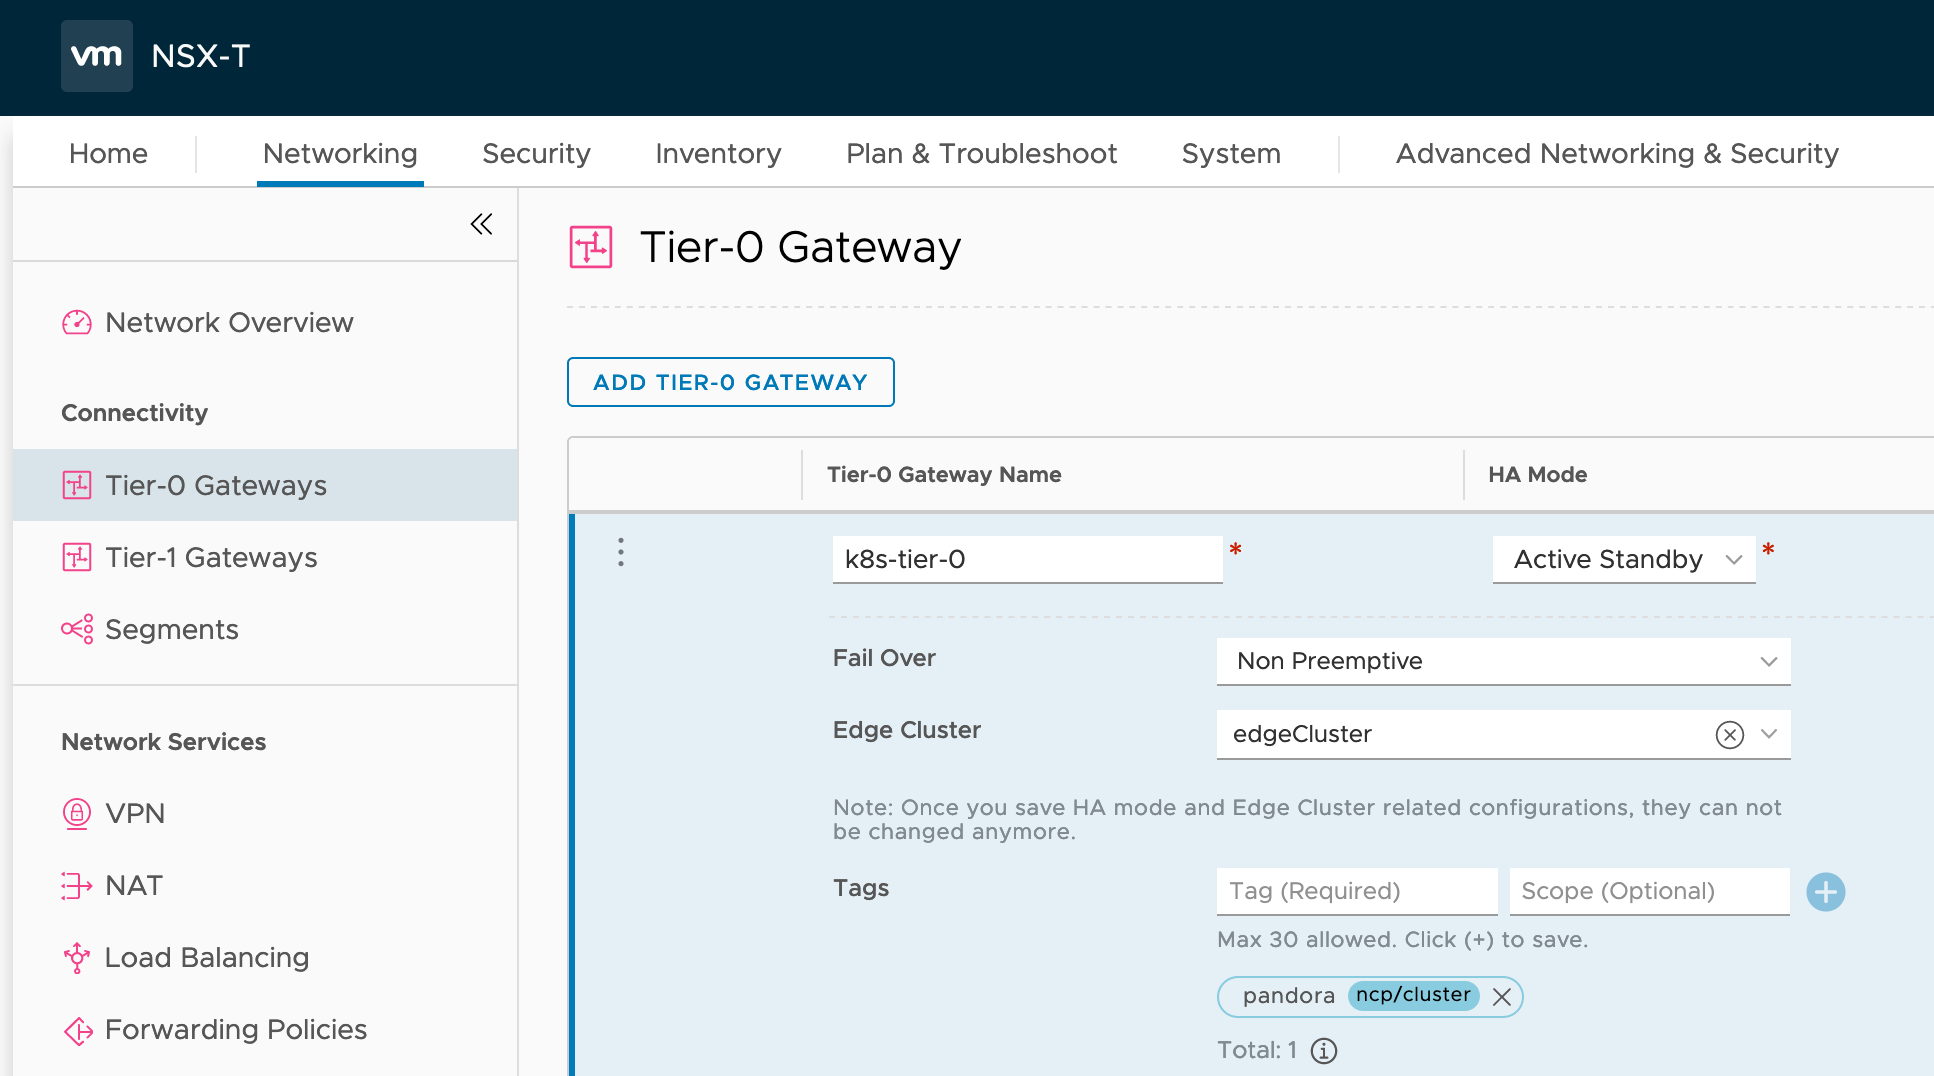
Use the Policy UI to deploy a Tier-0 Logical Router with High-Availability mode Active-Passive. In order the NCP knows the correct Tier-0 Logical Router a tag like this needs to be applied:
| Tag | Scope |
|---|---|
| pandora | ncp/cluster |
When applied it should look like:
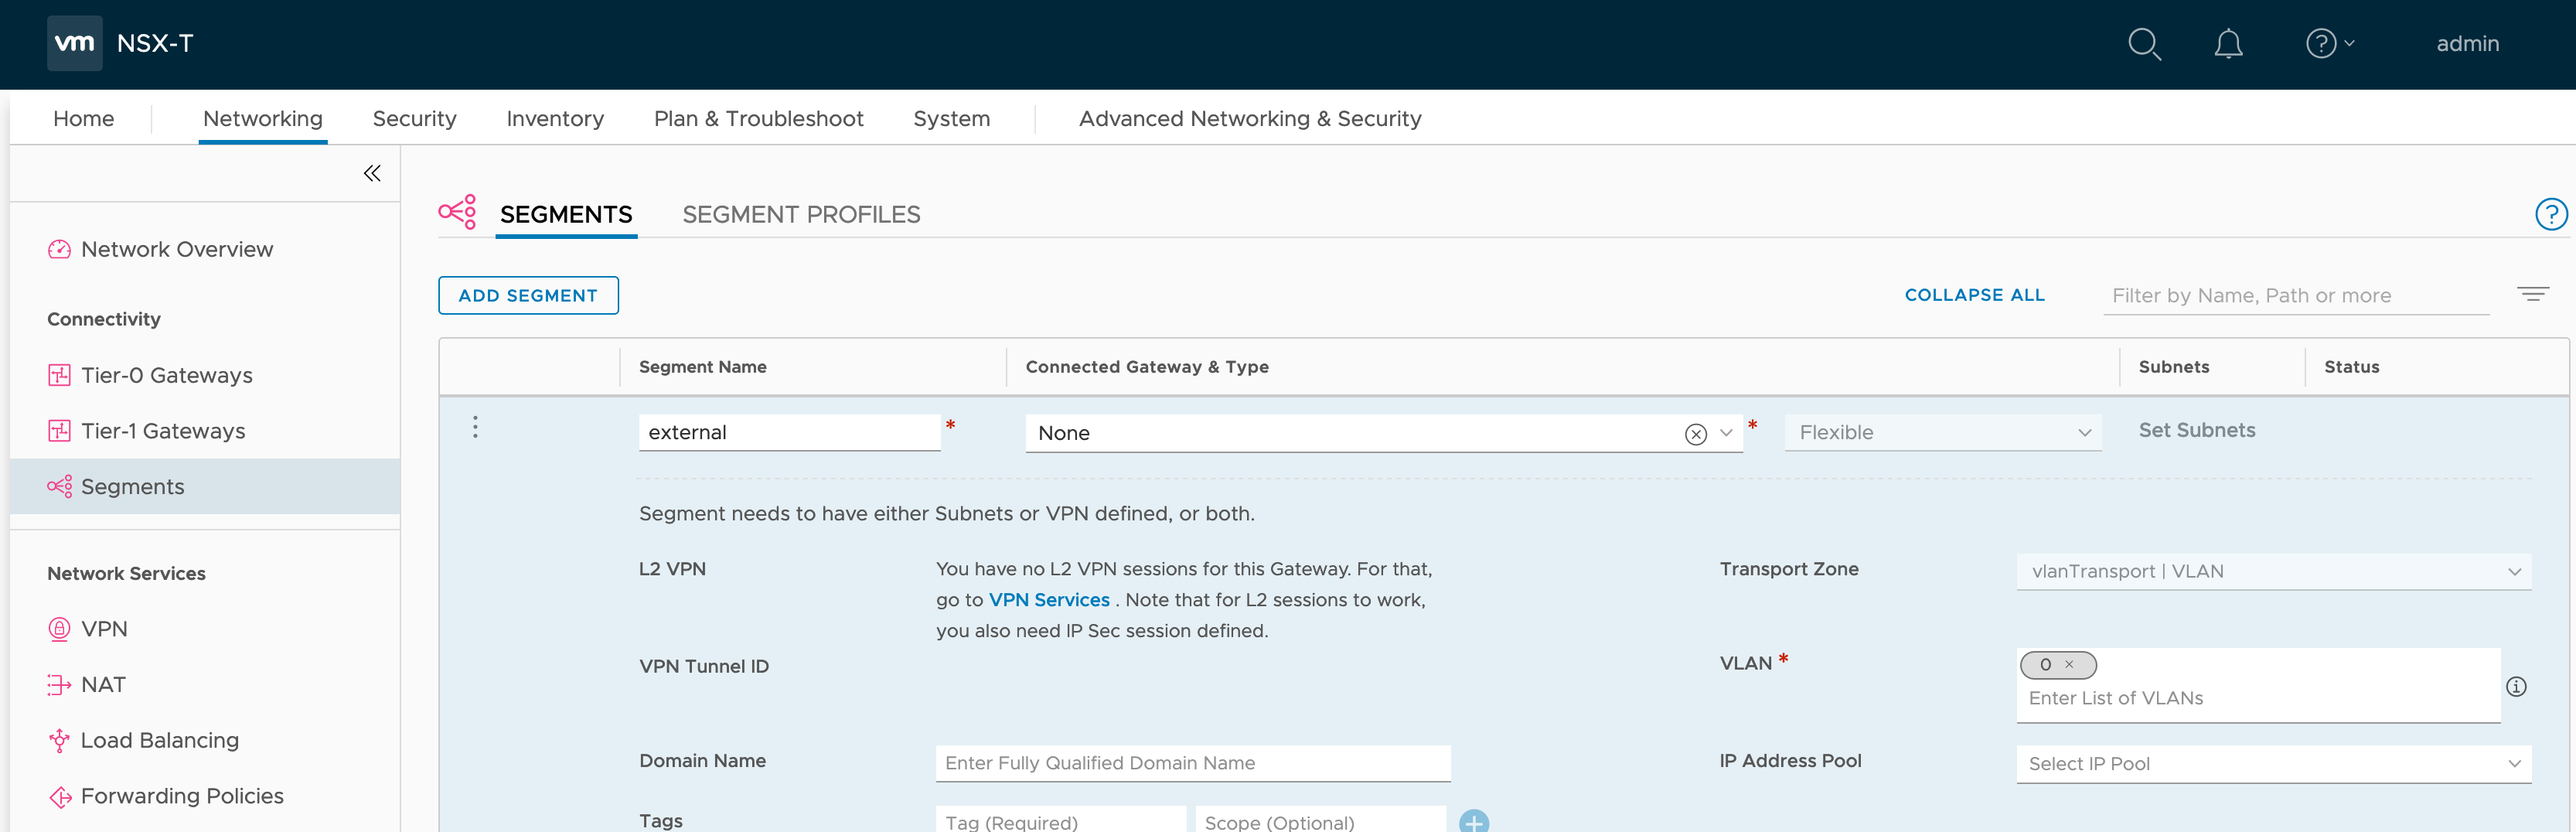
To communicate with the physical network the Tier-0 requires an uplink IP address. In order to add uplink IP address we require creating a network segment backed by VLAN.
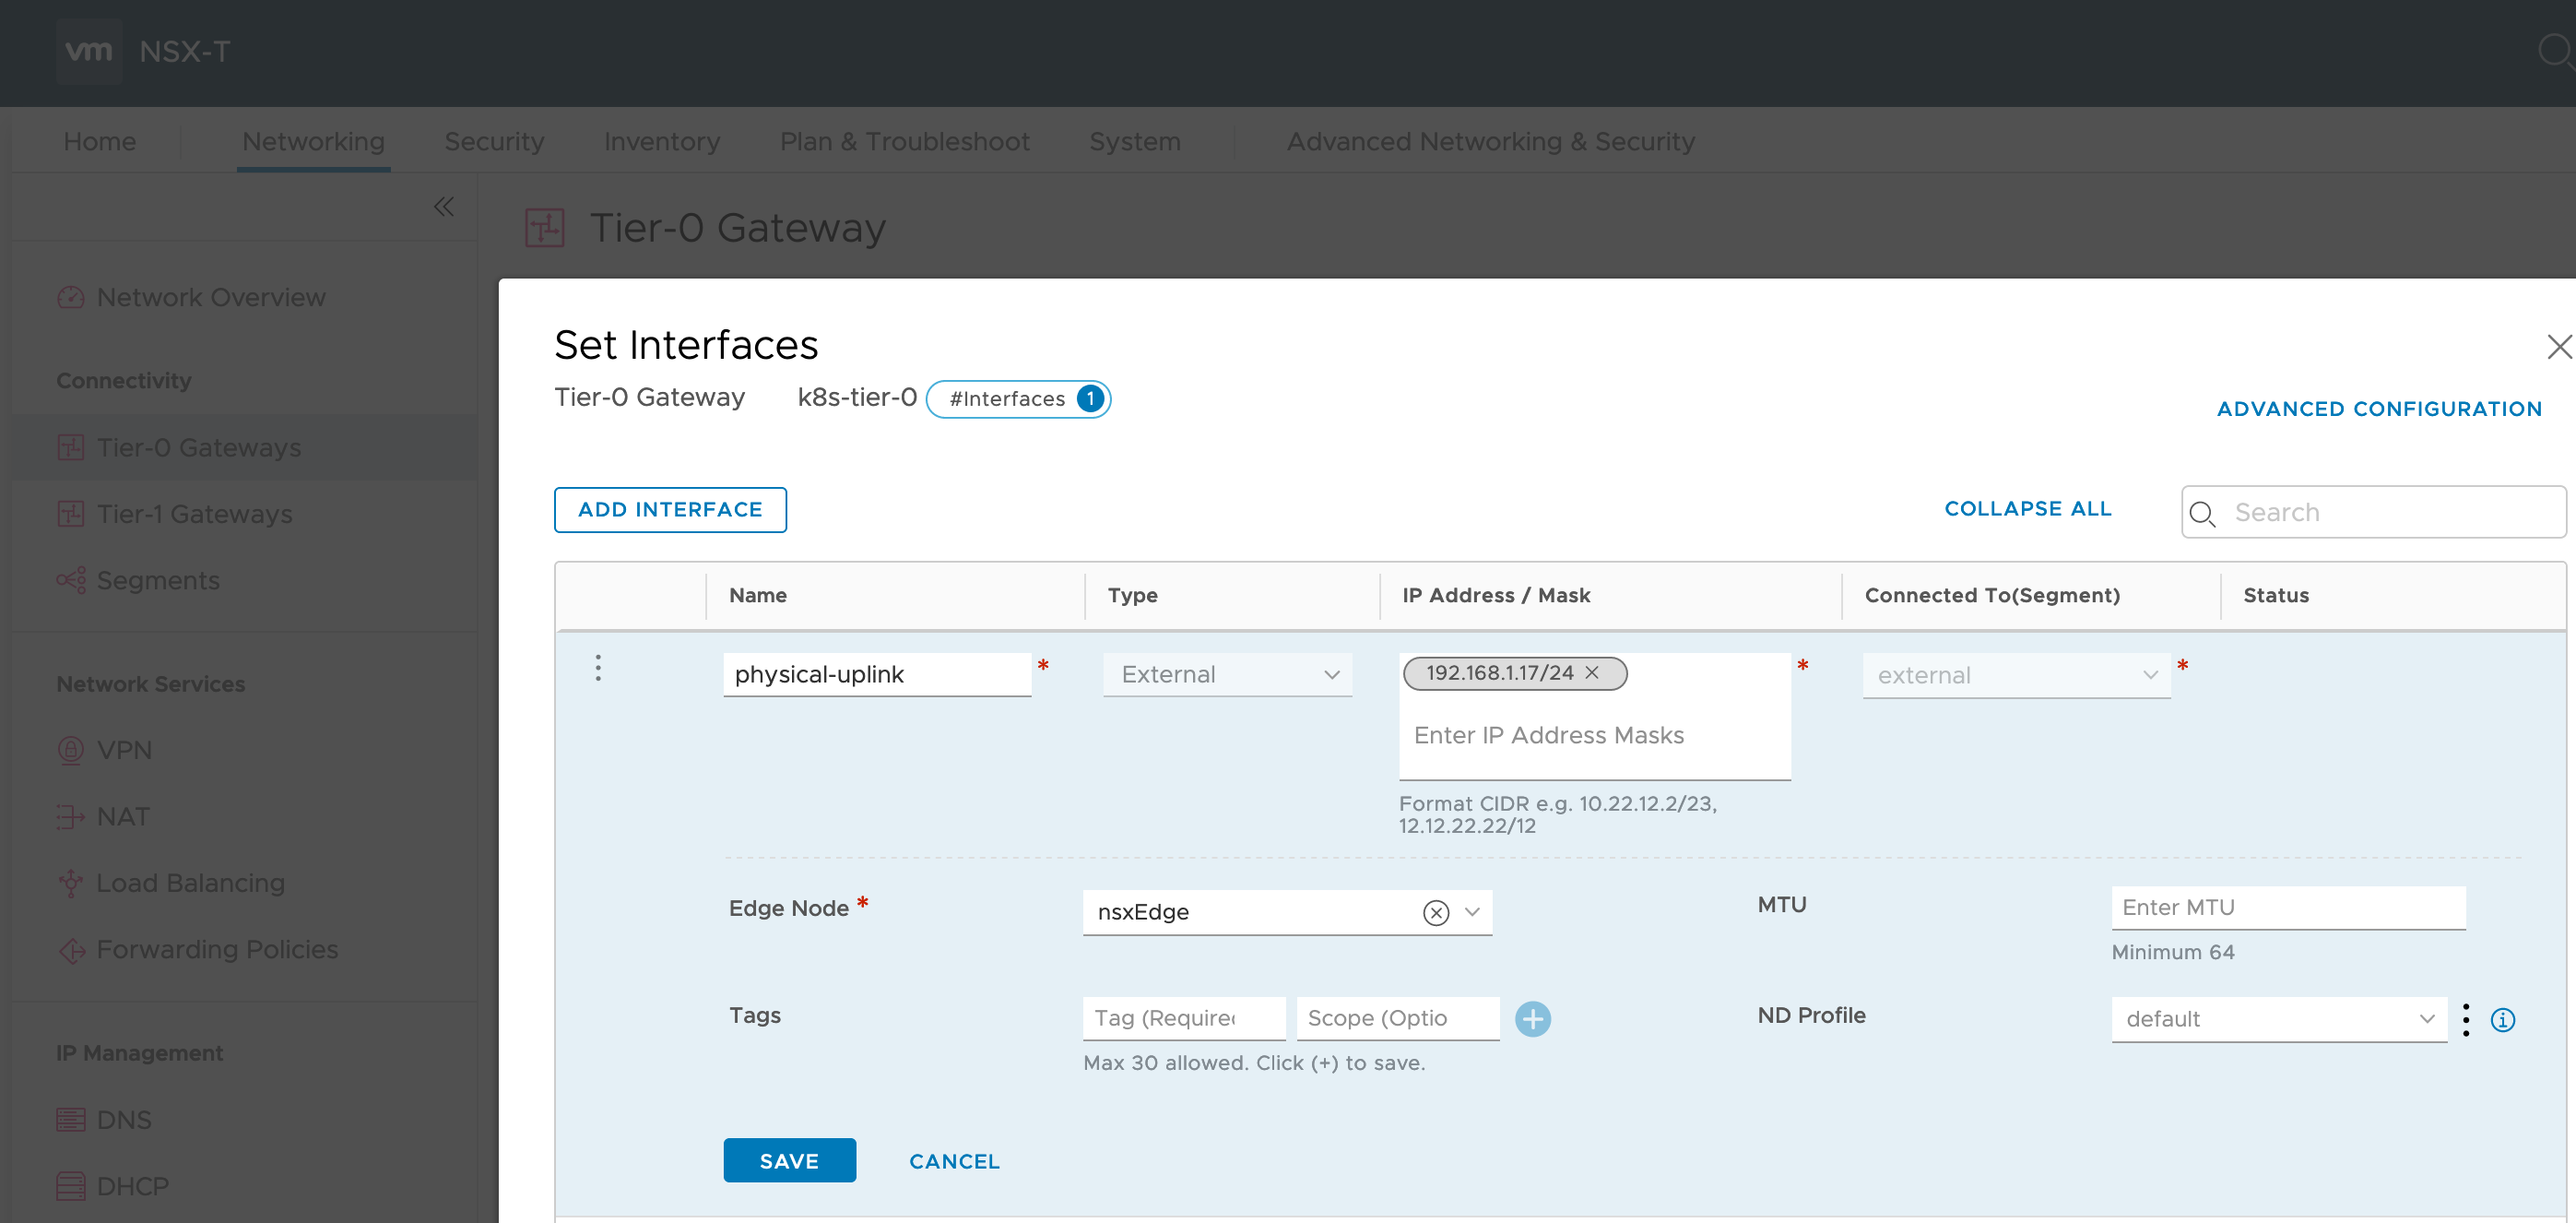
We can now configure an interface on the Tier-0 with IP address 192.168.1.17.
To enable ExternalIP routing from physical network add a static route to physical router directing 172.16.0.0/16 to 192.168.1.17.
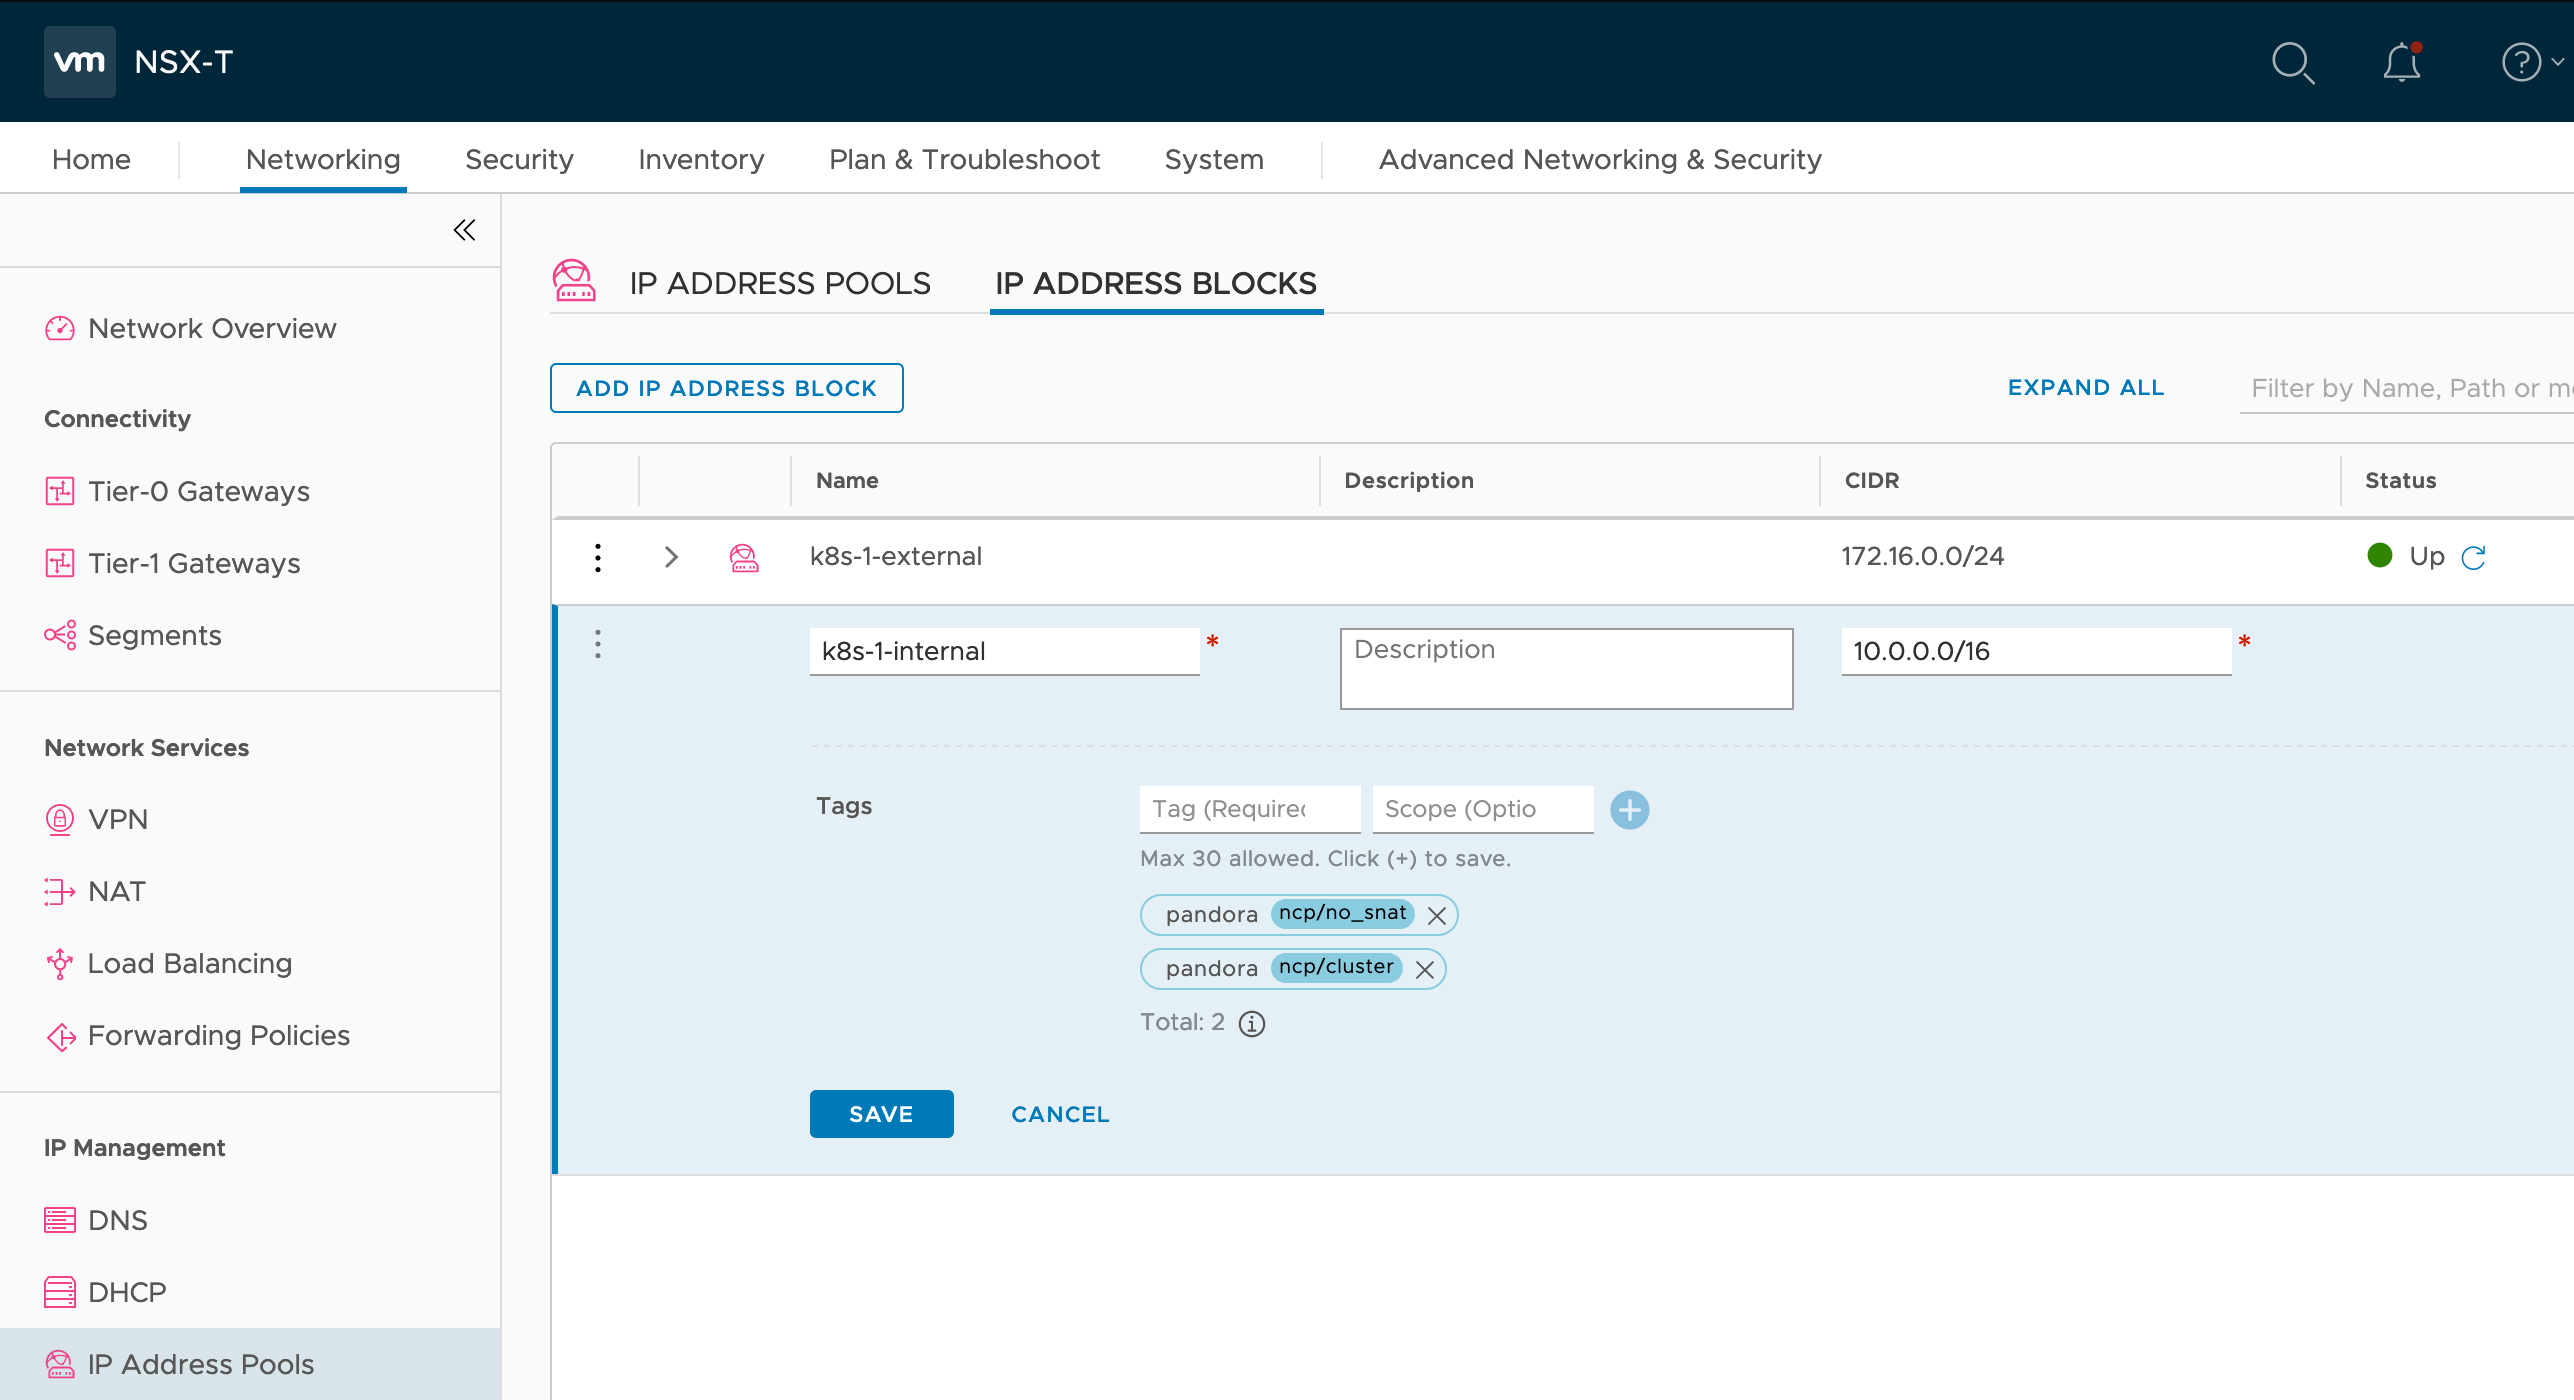
NSX IP Block for internal ClusterIP
NSX-T has an inbuilt capability for IP Management, in which we can allocate blocks of IP Addresses and create IP Pools.
The NCP requires an IP Block for issuing internal ClusterIP. Create the 10.0.0.0/16 IP address block named ‘k8s-1-internal’ with tags applied like this:
| Tag | Scope |
|---|---|
| pandora | ncp/no_snat |
| pandora | ncp/cluster |
When applied it should look like:
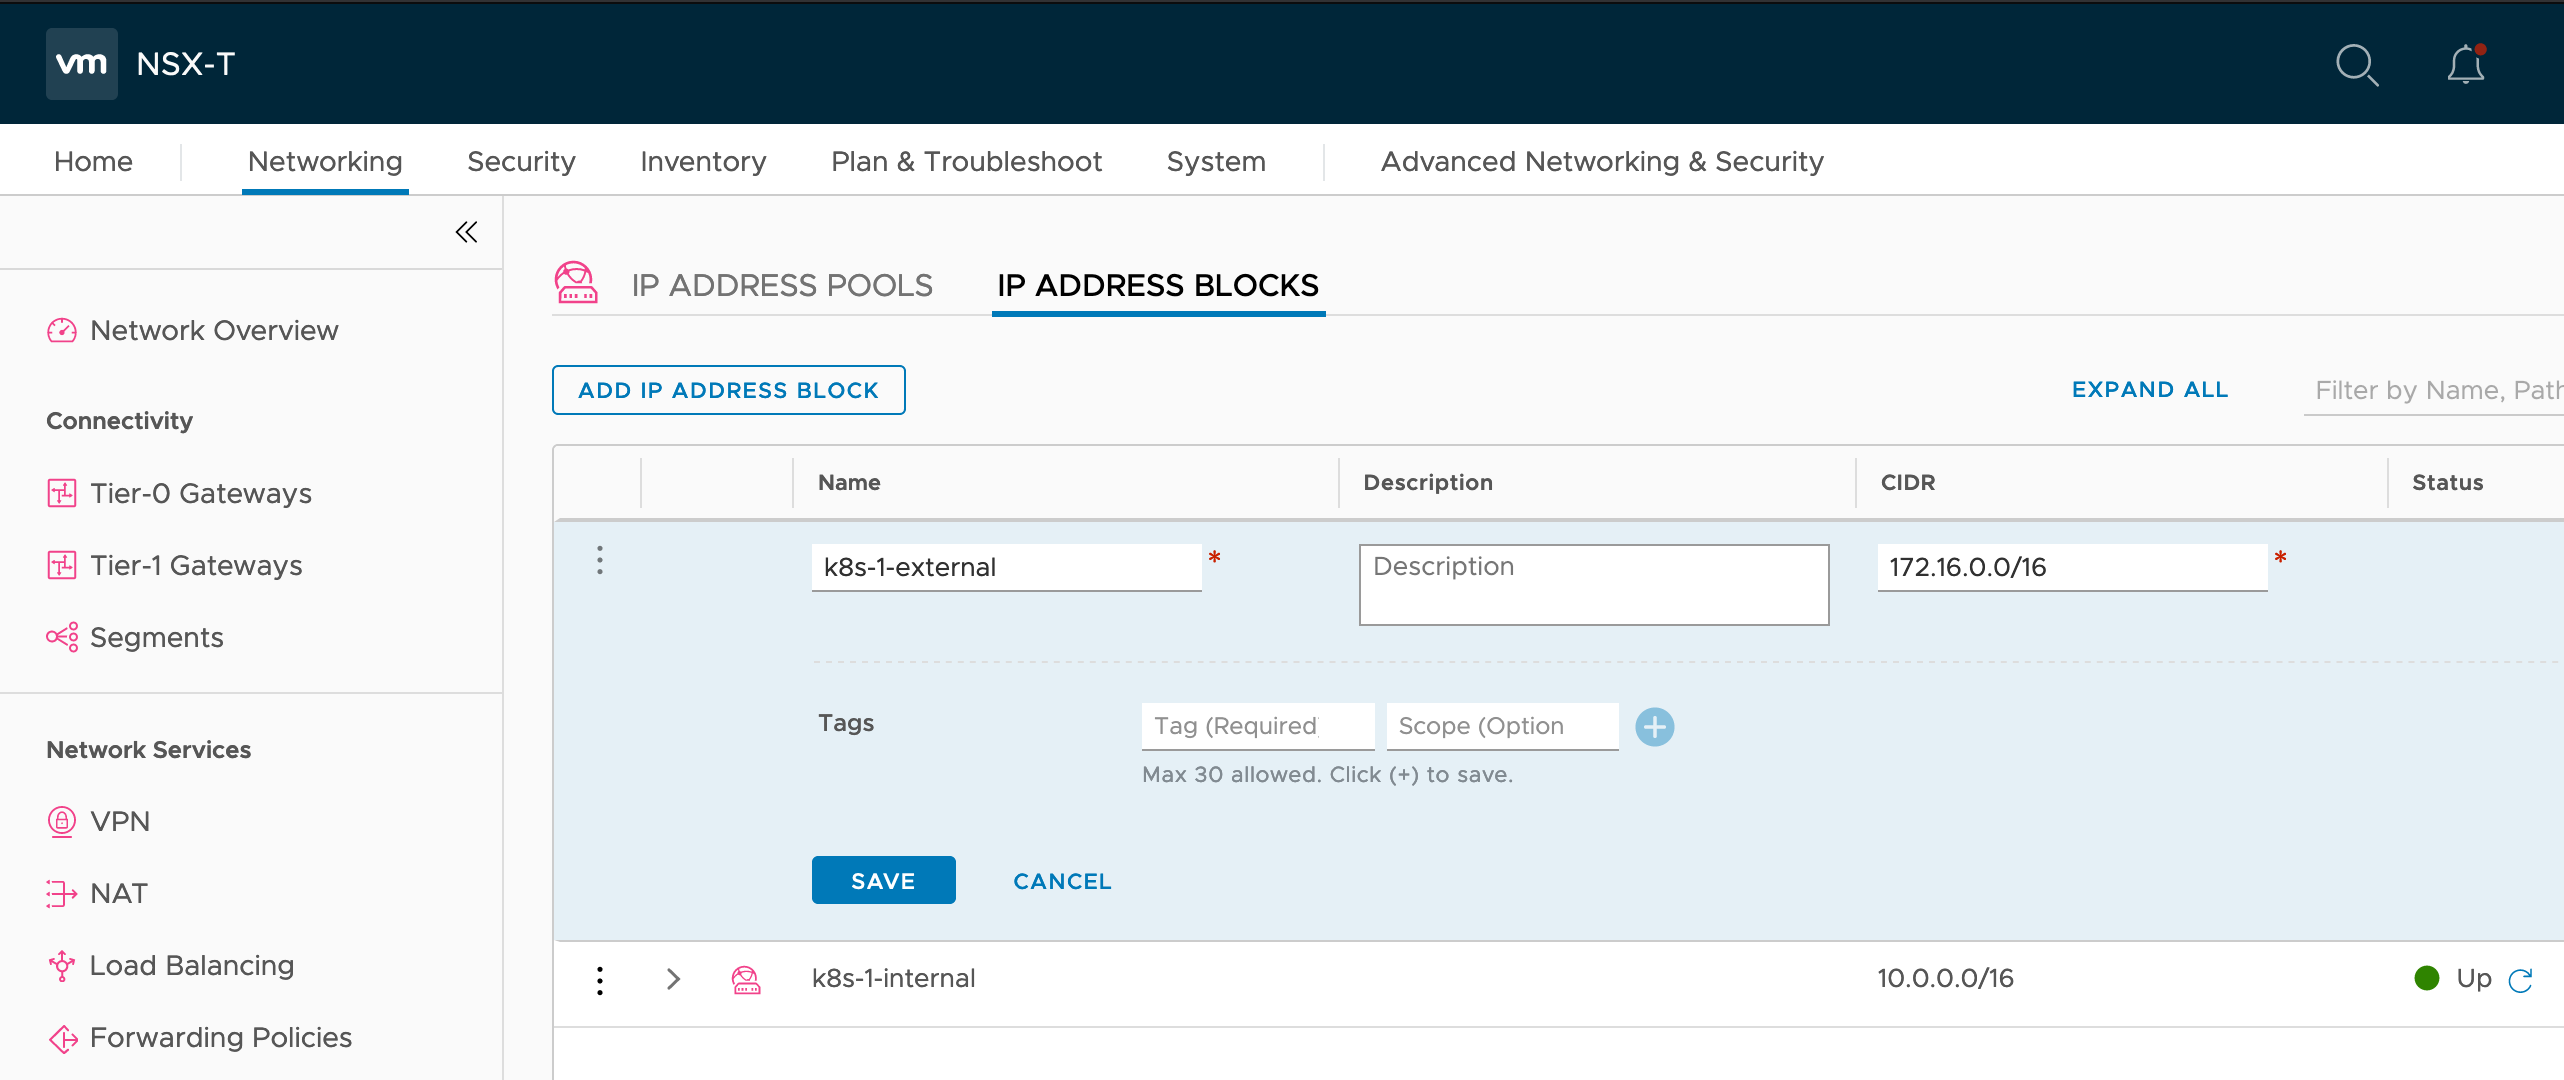
NSX IP Pool for ExternalIP
The NCP requires an IP Pool for issuing internal ExternalIP. First create an IP Block named ‘k8s-1-external’ with CIDR 172.16.0.0/16. This IP Block is not accessed directly by NCP so does not need any tags.
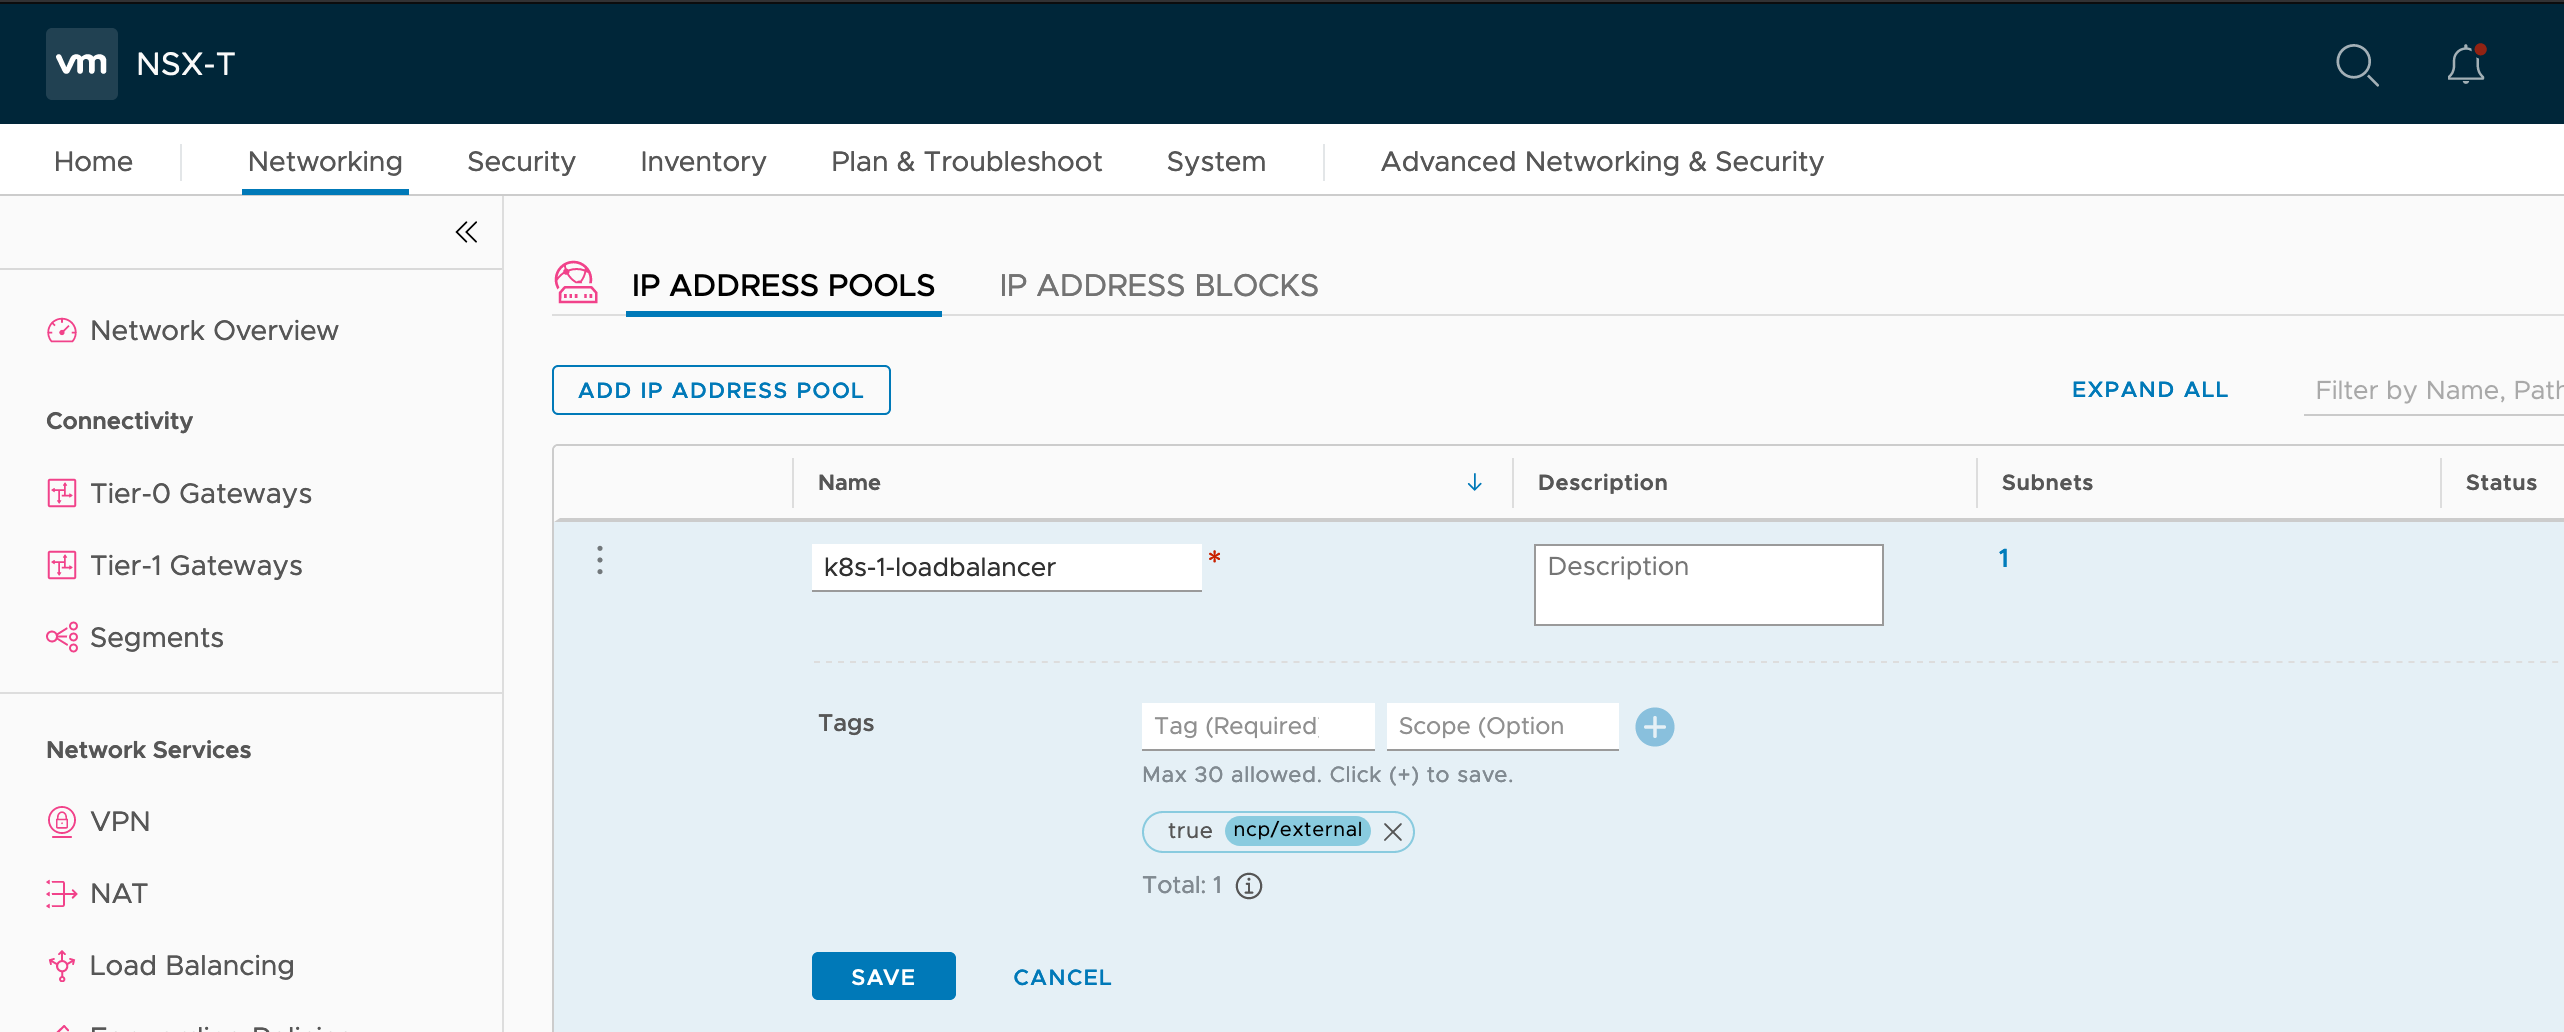
Once the IP Block is in place create an IP Pool named ‘k8s-1-loadbalancer’ which has a subnet issued from IP Block ‘k8s-1-external’ which is sized at 128 the IP Pool. The External IP Pool can be shared but should at least have tag applied like this:
| Tag | Scope |
|---|---|
| true | ncp/external |
When applied it should look like:
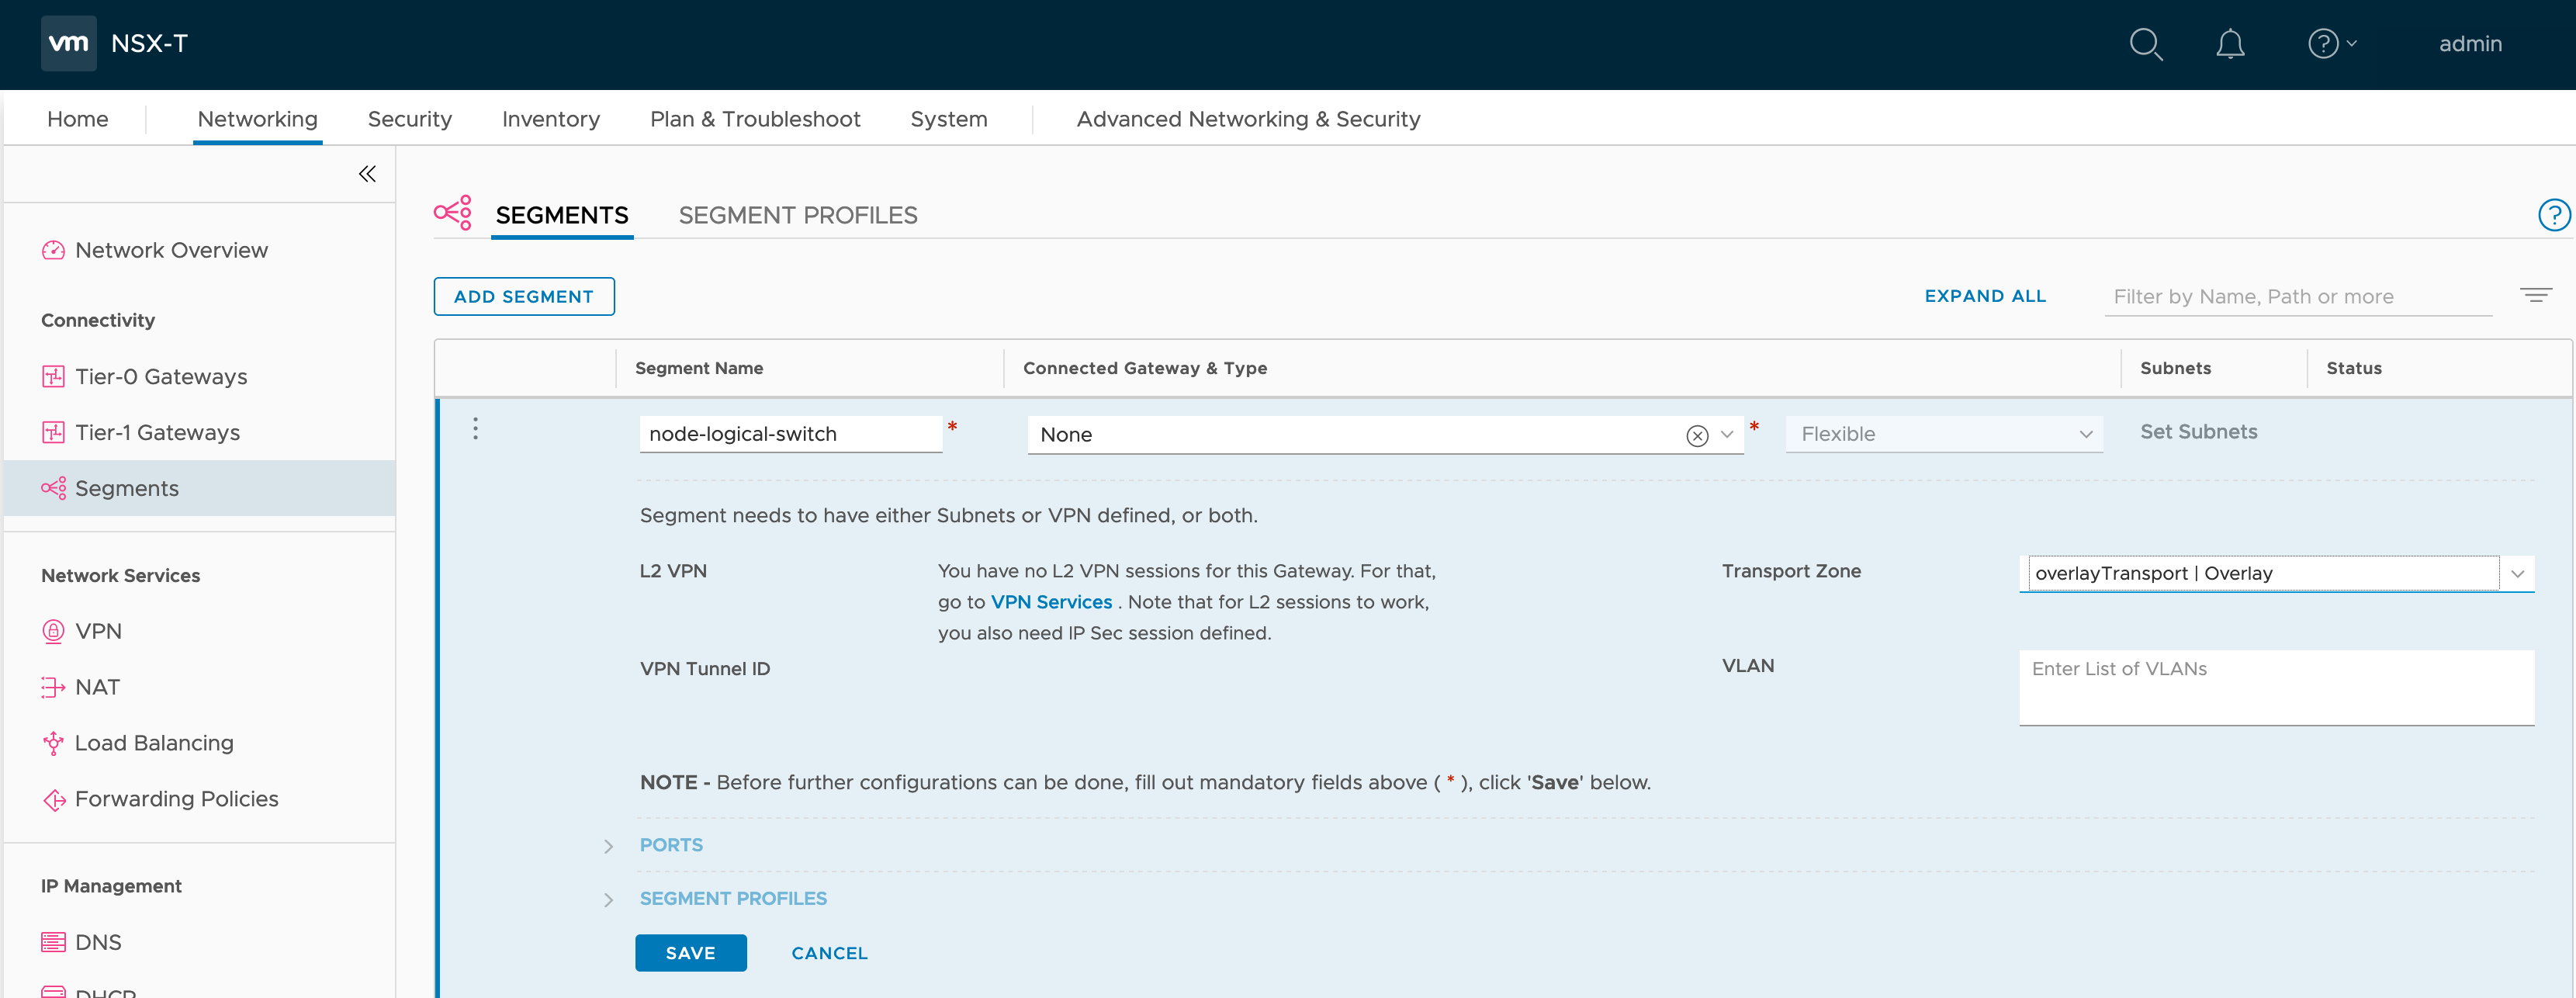
Node Logical Switch
Network connectivity to the containers running in Kubernetes is provided by a NSX-T logical switch segment which is often referred to as the node logical switch. For this create a new segment called ’node-logical-switch’ within the ‘overlayTransportZone’ connected to no gateway.
Kubernetes Master VM
Create a Ubuntu 18.04 VM with 2x CPU, 4GB RAM and 50GB vHDD named ‘k8s-master’. The VM should have two vNIC one which is used to communicate with NSX API and which will host Kubernetes API. The second connected to the node logical switch which will have the Open vSwitch (OVS) bridge configured to give connectivity to the Pods. In my lab first connected to ‘VM Network’ enumerates as ens160 and the scond connected to ’node-logical-switch’ enumerates as ens192.
cat /etc/netplan/01-netcfg.yaml

network:
  version: 2
  renderer: networkd
  ethernets:
    ens160:
      addresses:
      - 192.168.1.27/24
      gateway4: 192.168.1.254
      nameservers:
          search:
          - darrylcauldwell.com
          addresses:
          - 192.168.1.10
    ens192: {}
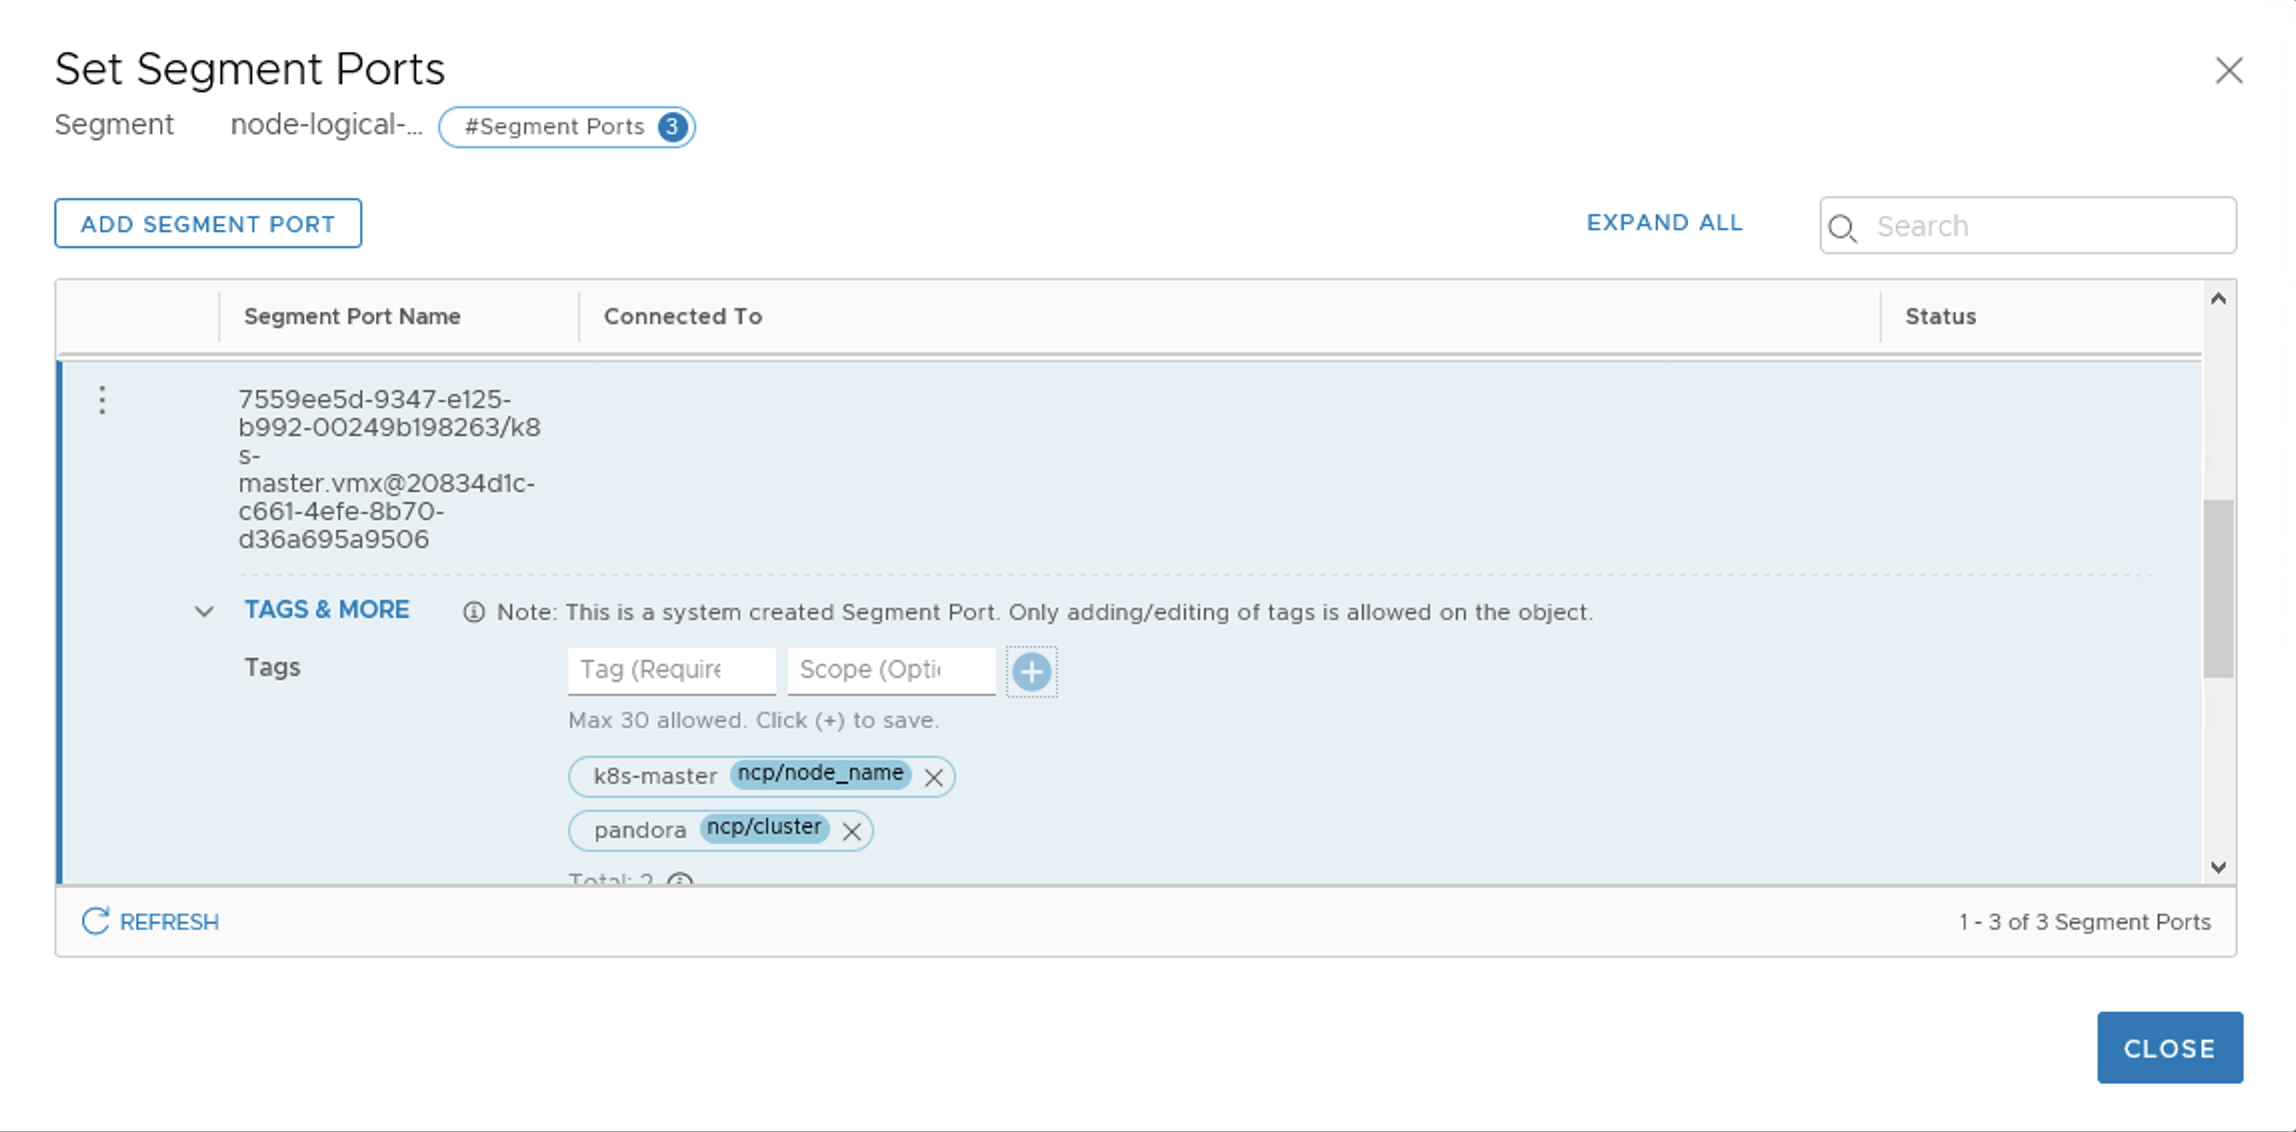
In order the NCP know which vNIC to configure the VM vNIC connected ’node-logical-switch’ creates a segment port object in NSX-T this port must have tag applied like this:
| Tag | Scope |
|---|---|
| k8s-master | ncp/node_name |
| pandora | ncp/cluster |
When applied it should look like:
Install and Configure Kubernetes
Docker and Kubernetes require installation do this by running the following.
sudo apt update -y
sudo apt upgrade -y
sudo apt install docker.io python apt-transport-https -y
sudo gpasswd -a $USER docker
sudo systemctl start docker
sudo systemctl enable docker
curl -s https://packages.cloud.google.com/apt/doc/apt-key.gpg | sudo apt-key add -
sudo apt-add-repository "deb http://apt.kubernetes.io/ kubernetes-xenial main"
sudo apt-get update
sudo swapoff -a
sudo sed -i '/ swap / s/^\(.*\)$/#\1/g' /etc/fstab
sudo apt-get install -y kubelet=1.16.4-00 kubeadm=1.16.4-00 kubectl=1.16.4-00
Initialize the Kubernetes cluster by running the following:
sudo kubeadm init
In order to easily run kubectl as a user we need to copy the cluster configuration to the user profile, do this by running the following.
mkdir -p $HOME/.kube
sudo cp -i /etc/kubernetes/admin.conf $HOME/.kube/config
sudo chown $(id -u):$(id -g) $HOME/.kube/config
We can now connect to cluster and check the state of the nodes, do this by running the following on the Master node.
kubectl get nodes

The status of each Node will show ‘NotReady’, we can get more details of why it is in this state by running the following on the Master node.
kubectl describe nodes k8s-master | grep Conditions -A9

With this we can see this reason for the error is ‘NetworkPluginNotReady’ that the cni plugin is not initiated.
Install and Configure NSX Container Plug-in (NCP)
The NSX Container Plug-in (NCP) provides integration between NSX-T and Kubernetes, it is a containerised application which manages communicates between NSX Manager and the Kubernetes control plane. The NSX Container Plug-in (NCP) application runs in Kubernetes it is supplied as .zip download. The configuration of the NCP applications is maintained in a Kubernetes manifest file.
The NCP application ships a container image file we could deploy this to a container registry but here we will just upload the image file to VM and import the image to the local docker repository. The default container image name specified in the manifest is nsx-ncp so we can apply that as tag on the image.
sudo docker load -i /home/ubuntu/nsx-ncp-ubuntu-2.5.1.15287458.tar
sudo docker image tag registry.local/2.5.1.15287458/nsx-ncp-ubuntu nsx-ncp
sudo docker images | grep ncp
Prior to the 2.5 release there were multiple manifest files each targetting a specific area of configuration. These are now merged into a single manifest file with multiple sections with multiple resource specifications the sections can be identified by the separator ---. The resources are created in the order they appear in the file.
| Resource Kind | Resource Name | Comments |
|---|---|---|
| CustomResourceDefinition | nsxerrors.nsx.vmware.com | |
| CustomResourceDefinition | nsxlocks.nsx.vmware.com | |
| Namespace | nsx-system | |
| ServiceAccount | ncp-svc-account | |
| ClusterRole | ncp-cluster-role | |
| ClusterRole | ncp-patch-role | |
| ClusterRoleBinding | ncp-cluster-role-binding | |
| ClusterRoleBinding | ncp-patch-role-binding | |
| ServiceAccount | nsx-node-agent-svc-account | |
| ClusterRole | nsx-node-agent-cluster-role | |
| ClusterRoleBinding | nsx-node-agent-cluster-role-binding | |
| ConfigMap | nsx-ncp-config | Must update Kubernetes API and NSX API parameters |
| Deployment | nsx-ncp | |
| ConfigMap | nsx-node-agent-config | Must update Kubernetes API and NSX API parameters |
| DaemonSet | nsx-ncp-bootstrap | |
| DaemonSet | nsx-node-agent |
For this lab I will use mostly default configuration from the supplied manifest file template. The settings I change from what is in template are the environment specifics such as details for connecting to NSX API including whether to use imperative API or intent-based API, the ‘cluster’ name and the Node vNIC on which the OVS bridge gets created on.
[nsx_v3]
policy_nsxapi = True

nsx_api_managers = 192.168.1.14
nsx_api_user = admin
nsx_api_password = VMware1!

insecure = True

[coe]
cluster = pandora

[k8s]
apiserver_host_ip = 192.168.1.27
apiserver_host_port = 6443

[nsx_kube_proxy]
ovs_uplink_port = ens192
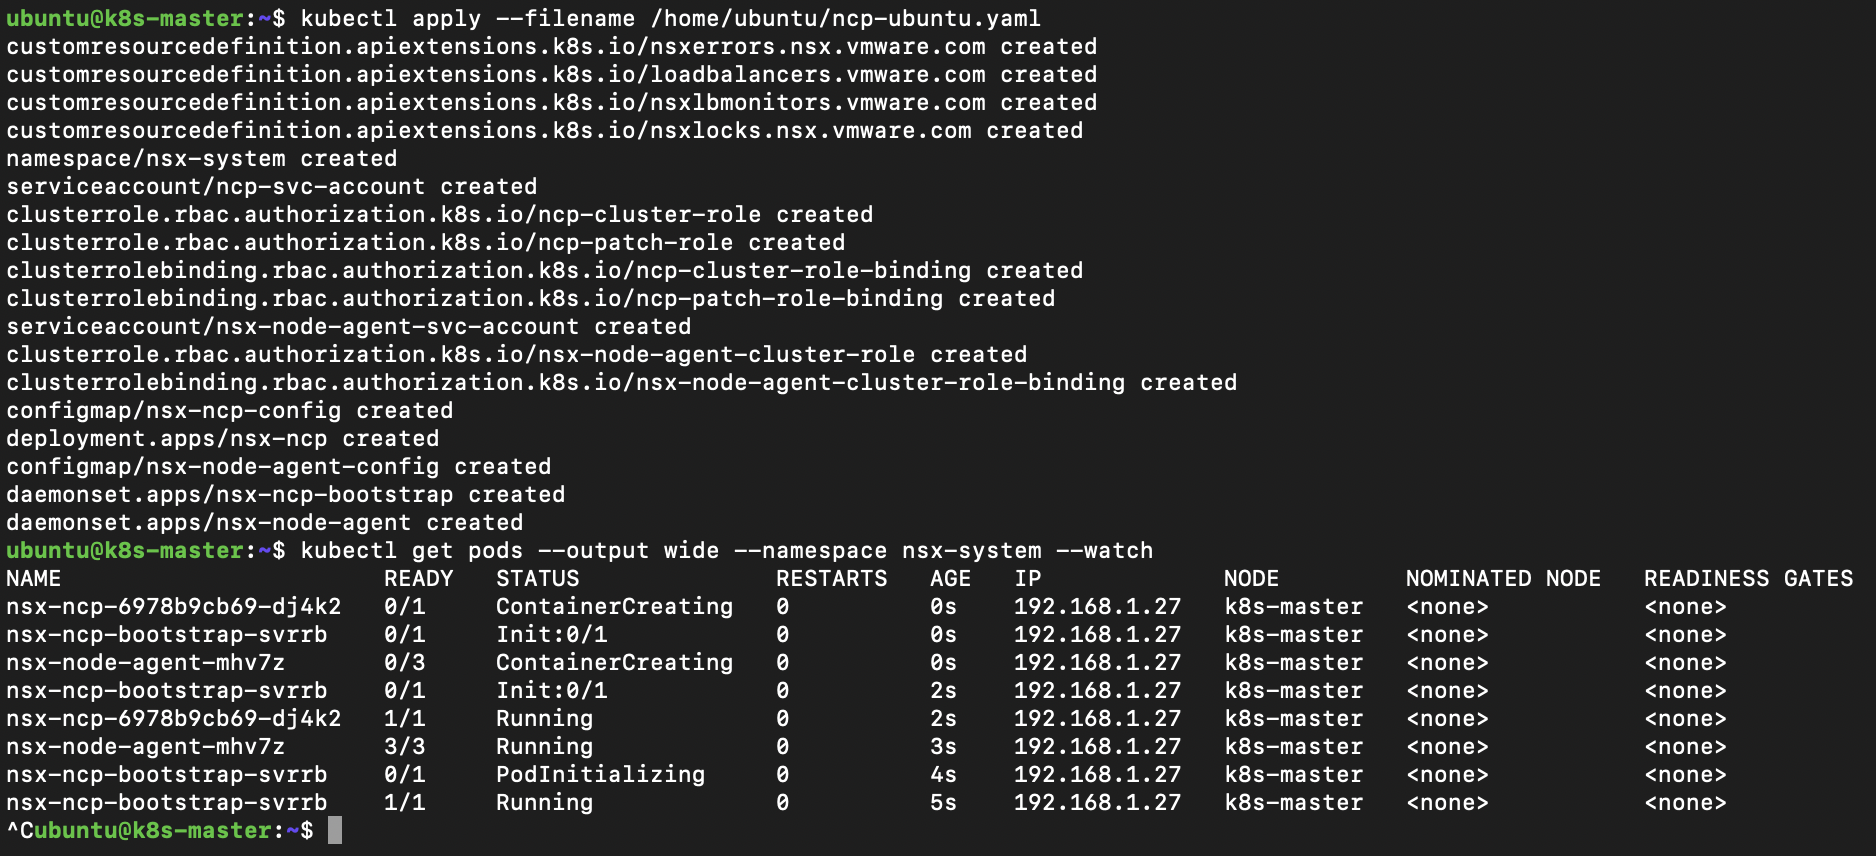
Once the manifest file is updated and docker image in local registry we can apply the NCP manifest. Applying the manifest takes a couple of minutes while as it creates various Pods we can watch their creation to view progress.
kubectl apply --filename /home/ubuntu/ncp-ubuntu.yaml
kubectl get pods --output wide --namespace nsx-system --watch
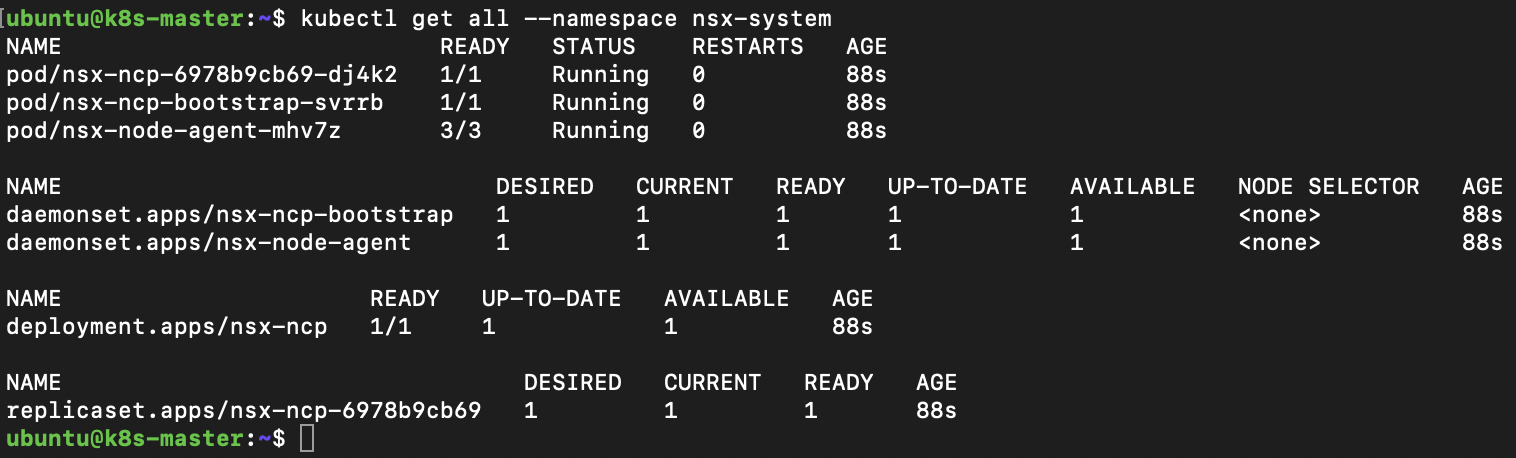
If all has gone well we can take a look at the objects created within the namespace.
kubectl get all --namespace nsx-system
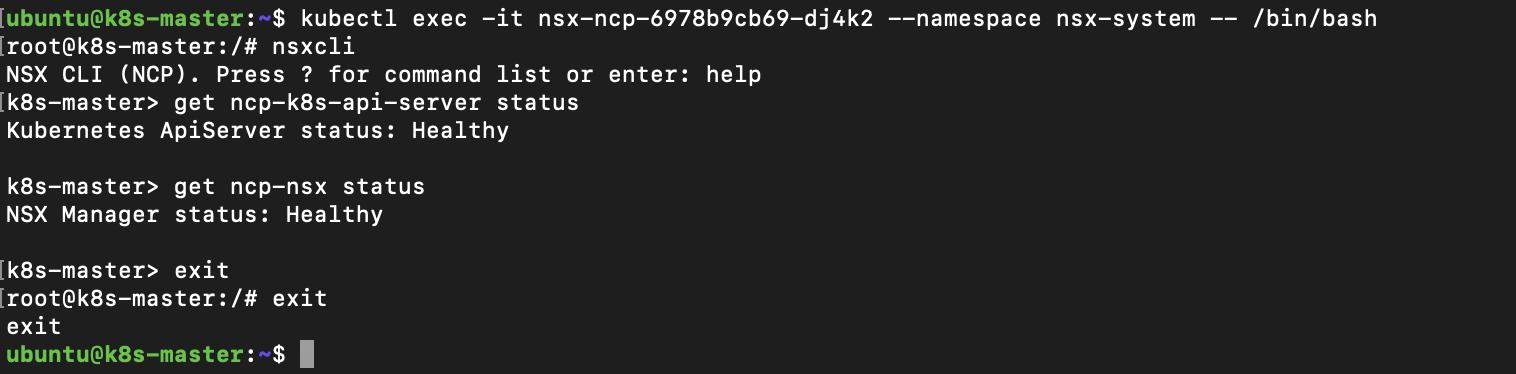
Now its running we can check health of the NCP, the NCP has a CLI where we can run various commands including health checks.
kubectl exec -it nsx-ncp-6978b9cb69-dj4k2 --namespace nsx-system -- /bin/bash
nsxcli
get ncp-k8s-api-server status
get ncp-nsx status
exit
exit
NSX Policy UI Object Creation
With NSX integration when we deploy a Kubernetes namespace the NCP creates a corresponding segment, IP Pool (from internet 10.0.0.0/8 range), subnet and Tier-1 router. If you open NSX Manager and view one of the object categories which should have objects created. Then create two Kubernetes namespaces one called development and one called production.
kubectl create --filename https://k8s.io/examples/admin/namespace-dev.json
kubectl create --filename https://k8s.io/examples/admin/namespace-prod.json
If you refresh view in NSX Manager you will see the new objects appear in the Policy UI.

We can then remove these two namespaces the NCP removes the corresponding segment, IP Pool (from internet 10.0.0.0/8 range), subnet and Tier-1 router.
kubectl delete -f https://k8s.io/examples/admin/namespace-dev.json
kubectl delete -f https://k8s.io/examples/admin/namespace-prod.json
NCP Bootstrap Scaleout Cluster
We started this lab with a single node cluster to look at the nsx-ncp-bootstrap Daemonset. When Nodes are added to the cluster this should install and configure the Node with NCP.
Create a second and third VM with same hardware configuration as k8s-master but name these k8s-worker-1 / k8s-worker-2 and give IPs 192.168.1.28 / 192.168.1.29. Ensure the NSX segment port attached to VMs is tagged correctly. Ensure the NCP docker image is uploaded, imported to local docker registry and has tag applied.
To add the additional Node to the cluster first step is to create a token on master.
kubeadm token create --print-join-command

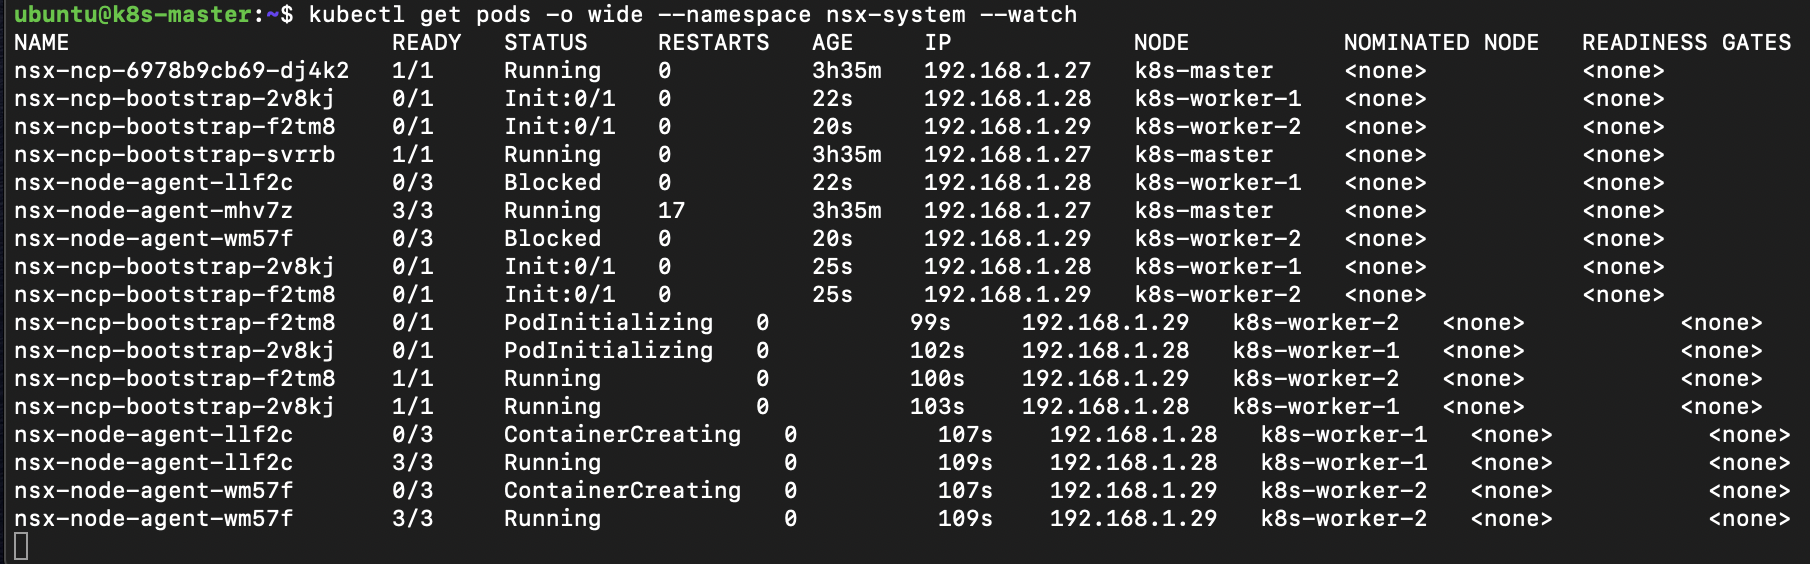
We use the output of command from the master to add the additional worker nodes to the cluster. The nsx-ncp-bootstap and nsx-node-agent are DaemonSets this ensures that all Nodes run a copy of a Pod. When we add the worker nodes to the cluster we can see the nsx-ncp-bootstrap Pods initialize and configure the Node and the nsx-node-agent Pods initialize.
kubectl get pods -o wide --namespace nsx-system --watch
IP Assignments
When a Pod is deployed it can be exposed as a Service, the service
If we deploy an simple stateless application example like guestbook.
kubectl create -f https://k8s.io/examples/admin/namespace-dev.json
kubectl config set-context --current --namespace=development
kubectl apply -f https://k8s.io/examples/application/guestbook/redis-master-deployment.yaml
kubectl apply -f https://k8s.io/examples/application/guestbook/redis-master-service.yaml
kubectl apply -f https://k8s.io/examples/application/guestbook/redis-slave-deployment.yaml
kubectl apply -f https://k8s.io/examples/application/guestbook/redis-slave-service.yaml
kubectl apply -f https://k8s.io/examples/application/guestbook/frontend-deployment.yaml
kubectl apply -f https://k8s.io/examples/application/guestbook/frontend-service.yaml
When we configures the lab we created NSX managed IP Block 10.0.0.0/16. When created the development namespace got allocated a /24 subnet from this block. If we view the Pods get IP in correct range.
kubectl get pods --output wide

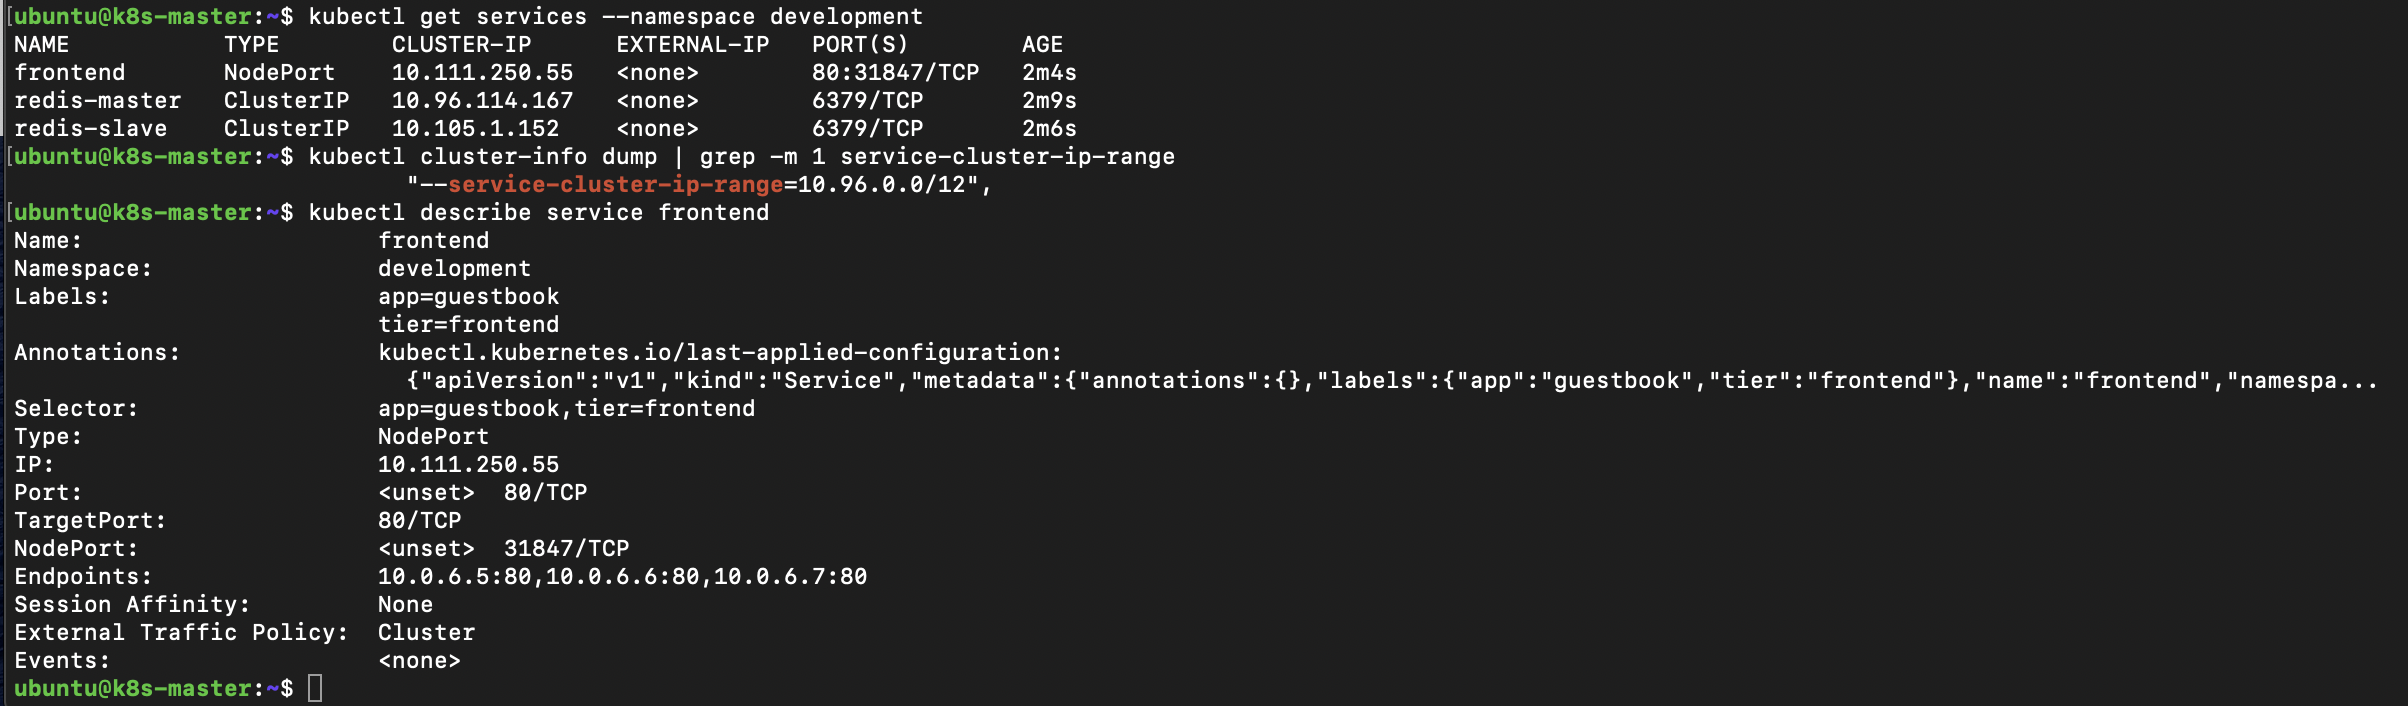
As well as Pod deployments the guestbook application installation also creates Service resources. A Service is an abstraction which defines a logical set of Pods. Our application runs three frontend pods and two Redis slaves the Service provides virtual IP. The kube-proxy is responsible for implementing the virtual IP for Services. We can see the ClusterIP are issued from the last /20 of the Pod address range. If we look in more detail at the Service resource we can see the three internal IP addresses behind it.
kubectl get services --namespace development
kubectl cluster-info dump | grep -m 1 service-cluster-ip-range
kubectl describe service frontend
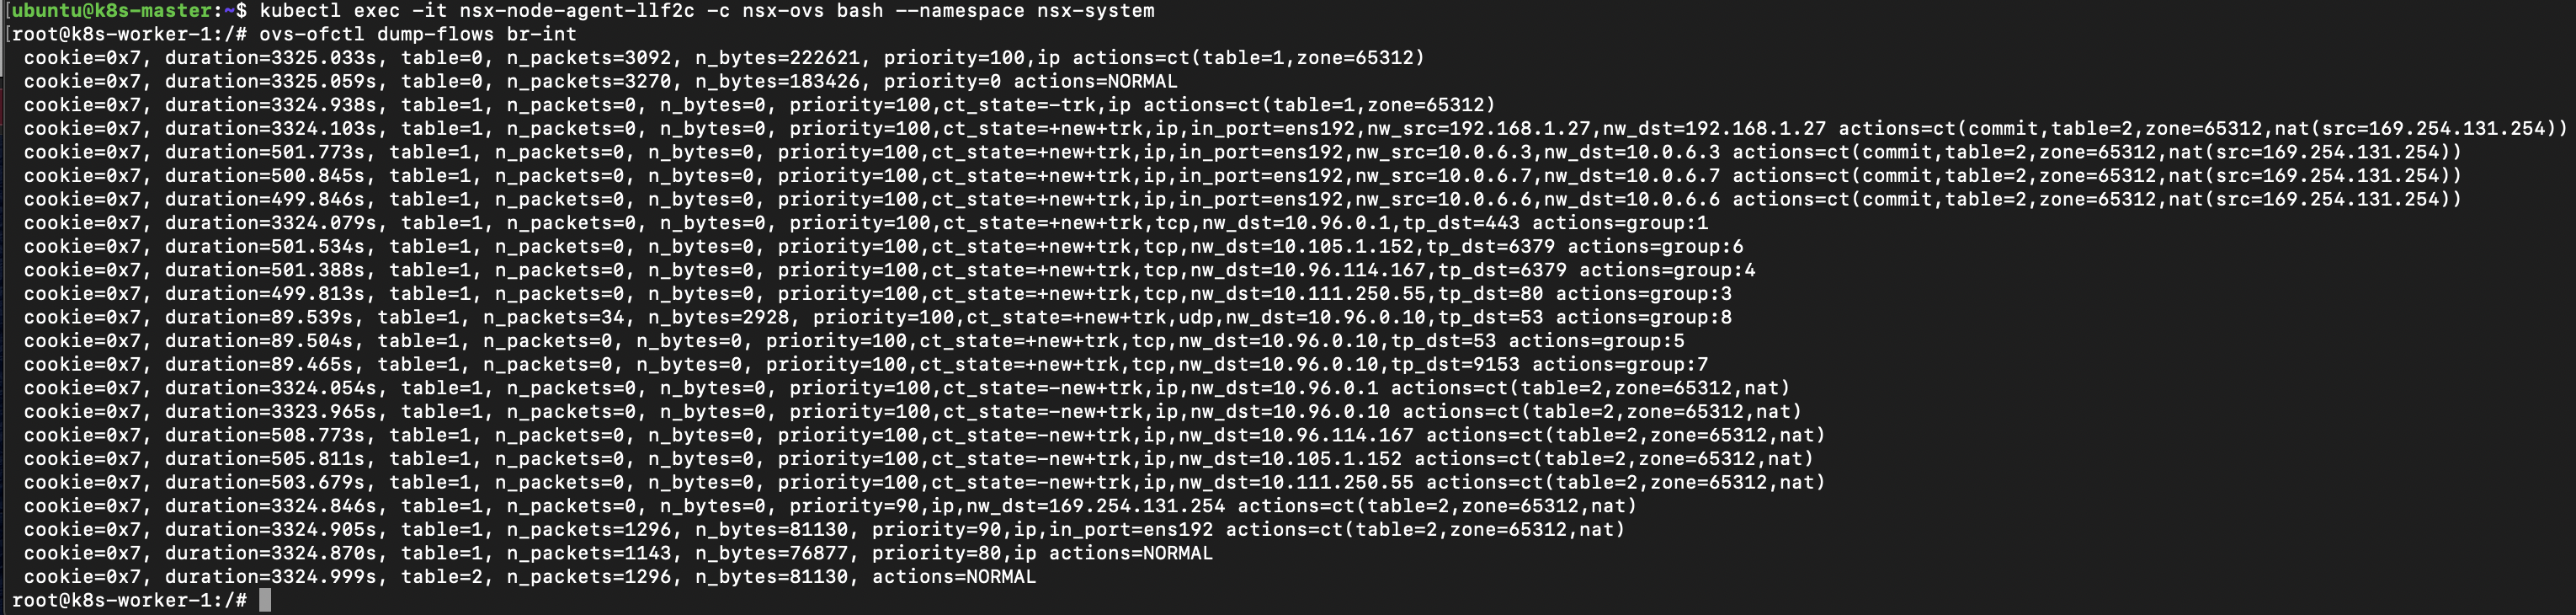
To facilitate communications between Pods the NCP is configuring the Open vSwitch on each Node. The Open vSwitch user space daemon runs on a container named nsx-ovs within the nsx-node-agent Pods. The Open vSwitch bridge name can be specified in the ncp.ini but defaults to br-int. If we connect to this container we can view the Open vSwitch flows .
kubectl exec -it nsx-node-agent-llf2c -c nsx-ovs bash --namespace nsx-system
ovs-ofctl dump-flows br-int
We can then remove the namespace and all objects within.
kubectl delete -f https://k8s.io/examples/admin/namespace-dev.json
NSX Loadbalancer
NSX provides an load balancer capability to Kubernetes we can use this by creating service resource with type LoadBalancer. If we create a simple replicaset of five pods and expose this we can see it gets issued with IP Address from the IP Pool tagged with ncp/external = True. We can also see this in NSX Loadbalancer configuration.
kubectl create -f https://k8s.io/examples/admin/namespace-dev.json
kubectl config set-context --current --namespace=development
kubectl apply -f https://k8s.io/examples/service/load-balancer-example.yaml
kubectl get replicasets
kubectl expose deployment hello-world --type=LoadBalancer --name=hello-world-nsx-lb
kubectl get services hello-world-nsx-lb --watch

NAME                 TYPE           CLUSTER-IP      EXTERNAL-IP   PORT(S)          AGE
hello-world-nsx-lb   LoadBalancer   10.110.64.115   <pending>     8080:32091/TCP   7s
hello-world-nsx-lb   LoadBalancer   10.110.64.115   172.16.0.13   8080:32091/TCP   7s
We can then remove the namespace and all objects within.
kubectl delete -f https://k8s.io/examples/admin/namespace-dev.json
Kubernetes Pods Micro-Segmentation
One of the great usecases for NSX with vSphere has been the is the Distributed Firewall which protects VM workload at the Hypervisor layer. When we extend NSX into the Kubernetes container we also extend the Distributed Firewall capability. We can create firewall rules which contain members of groups, the groups can be dynamically populated by use of NSX tags. Kubernetes objects can have labels attached a label attached to a Pod is reflected in NSX as a tag on the segement port of the Pod.
A simple test might be to deploy a two tier app where frontend can talk to backend but frontend cannot talk to other frontend. If we create a NSX group called Web with membership criteria Segement Port, Tag, Equals web Scope secgroup. We then create a NSX DFW rule with Web as source and destination and action of drop.
With this in place we can ping test from one frontend pod to another frontend and backend and see this works. We can then apply the label to the three frontend web Pods so they become members of the NSX group and are affected by the firewall rule. With these in place we can retest ping from one frontend pod to another frontend and see that this is now blocked.
kubectl create -f https://k8s.io/examples/admin/namespace-dev.json
kubectl config set-context --current --namespace=development
kubectl apply -f https://k8s.io/examples/application/guestbook/redis-master-deployment.yaml
kubectl apply -f https://k8s.io/examples/application/guestbook/frontend-deployment.yaml
kubectl get pods --output wide --watch

NAME                            READY   STATUS    RESTARTS   AGE   IP         NODE           NOMINATED NODE   READINESS GATES
frontend-6cb7f8bd65-4mctt       1/1     Running   0          13m   10.0.6.4   k8s-worker-1   <none>           <none>
frontend-6cb7f8bd65-8wkhr       1/1     Running   0          13m   10.0.6.2   k8s-worker-1   <none>           <none>
frontend-6cb7f8bd65-rtgc9       1/1     Running   0          13m   10.0.6.3   k8s-worker-1   <none>           <none>
redis-master-7db7f6579f-zlx26   1/1     Running   0          3s    10.0.6.5   k8s-worker-1   <none>           <none>

kubectl exec -it frontend-6cb7f8bd65-4mctt ping 10.0.6.2
PING 10.0.6.2 (10.0.6.2): 56 data bytes
64 bytes from 10.0.6.2: icmp_seq=0 ttl=64 time=0.083 ms

kubectl exec -it frontend-6cb7f8bd65-4mctt ping 10.0.6.5
PING 10.0.6.5 (10.0.6.5): 56 data bytes
64 bytes from 10.0.6.5: icmp_seq=0 ttl=64 time=3.191 ms

kubectl label pod frontend-6cb7f8bd65-4mctt secgroup=web
kubectl label pod frontend-6cb7f8bd65-8wkhr secgroup=web
kubectl label pod frontend-6cb7f8bd65-rtgc9 secgroup=web

kubectl exec -it frontend-6cb7f8bd65-4mctt ping 10.0.6.2
PING 10.0.6.2 (10.0.6.2): 56 data bytes
^C--- 10.0.6.2 ping statistics ---
2 packets transmitted, 0 packets received, 100% packet loss
command terminated with exit code 1

kubectl exec -it frontend-6cb7f8bd65-4mctt ping 10.0.6.5
PING 10.0.6.5 (10.0.6.5): 56 data bytes
64 bytes from 10.0.6.5: icmp_seq=0 ttl=64 time=5.672 ms
We can then remove the namespace and all objects within.
kubectl delete -f https://k8s.io/examples/admin/namespace-dev.json