Get Up and Running With Aria Automation Config
What is SaltStack
SaltStack (also known as Salt) is an open-source configuration management and remote execution tool designed for managing and automating infrastructure. SaltStack enables desired state management by allowing administrators to define the intended configuration of systems declaratively through Salt states. The Salt master then works to enforce and maintain that desired state across the managed infrastructure.
SaltStack Architecture
SaltStack uses a master-minion architecture, where a central Salt master server controls multiple minion nodes. Salt supports clustering of masters for high availability and load balancing. Multiple masters can be can indeed be deployed across regions to improve resilience and disaster recovery sceanrios. Separate components like databases (e.g., PostgreSQL, Redis) can be used for persistent storage and caching.
What is Aria Automation Config
Aria Automation Config, is a configuration management tool that is part of the broader Aria Automation. It is built on SaltStack. Aria Automation Config enables in-guest desired state management of deployed and managed Aria Automation resources.
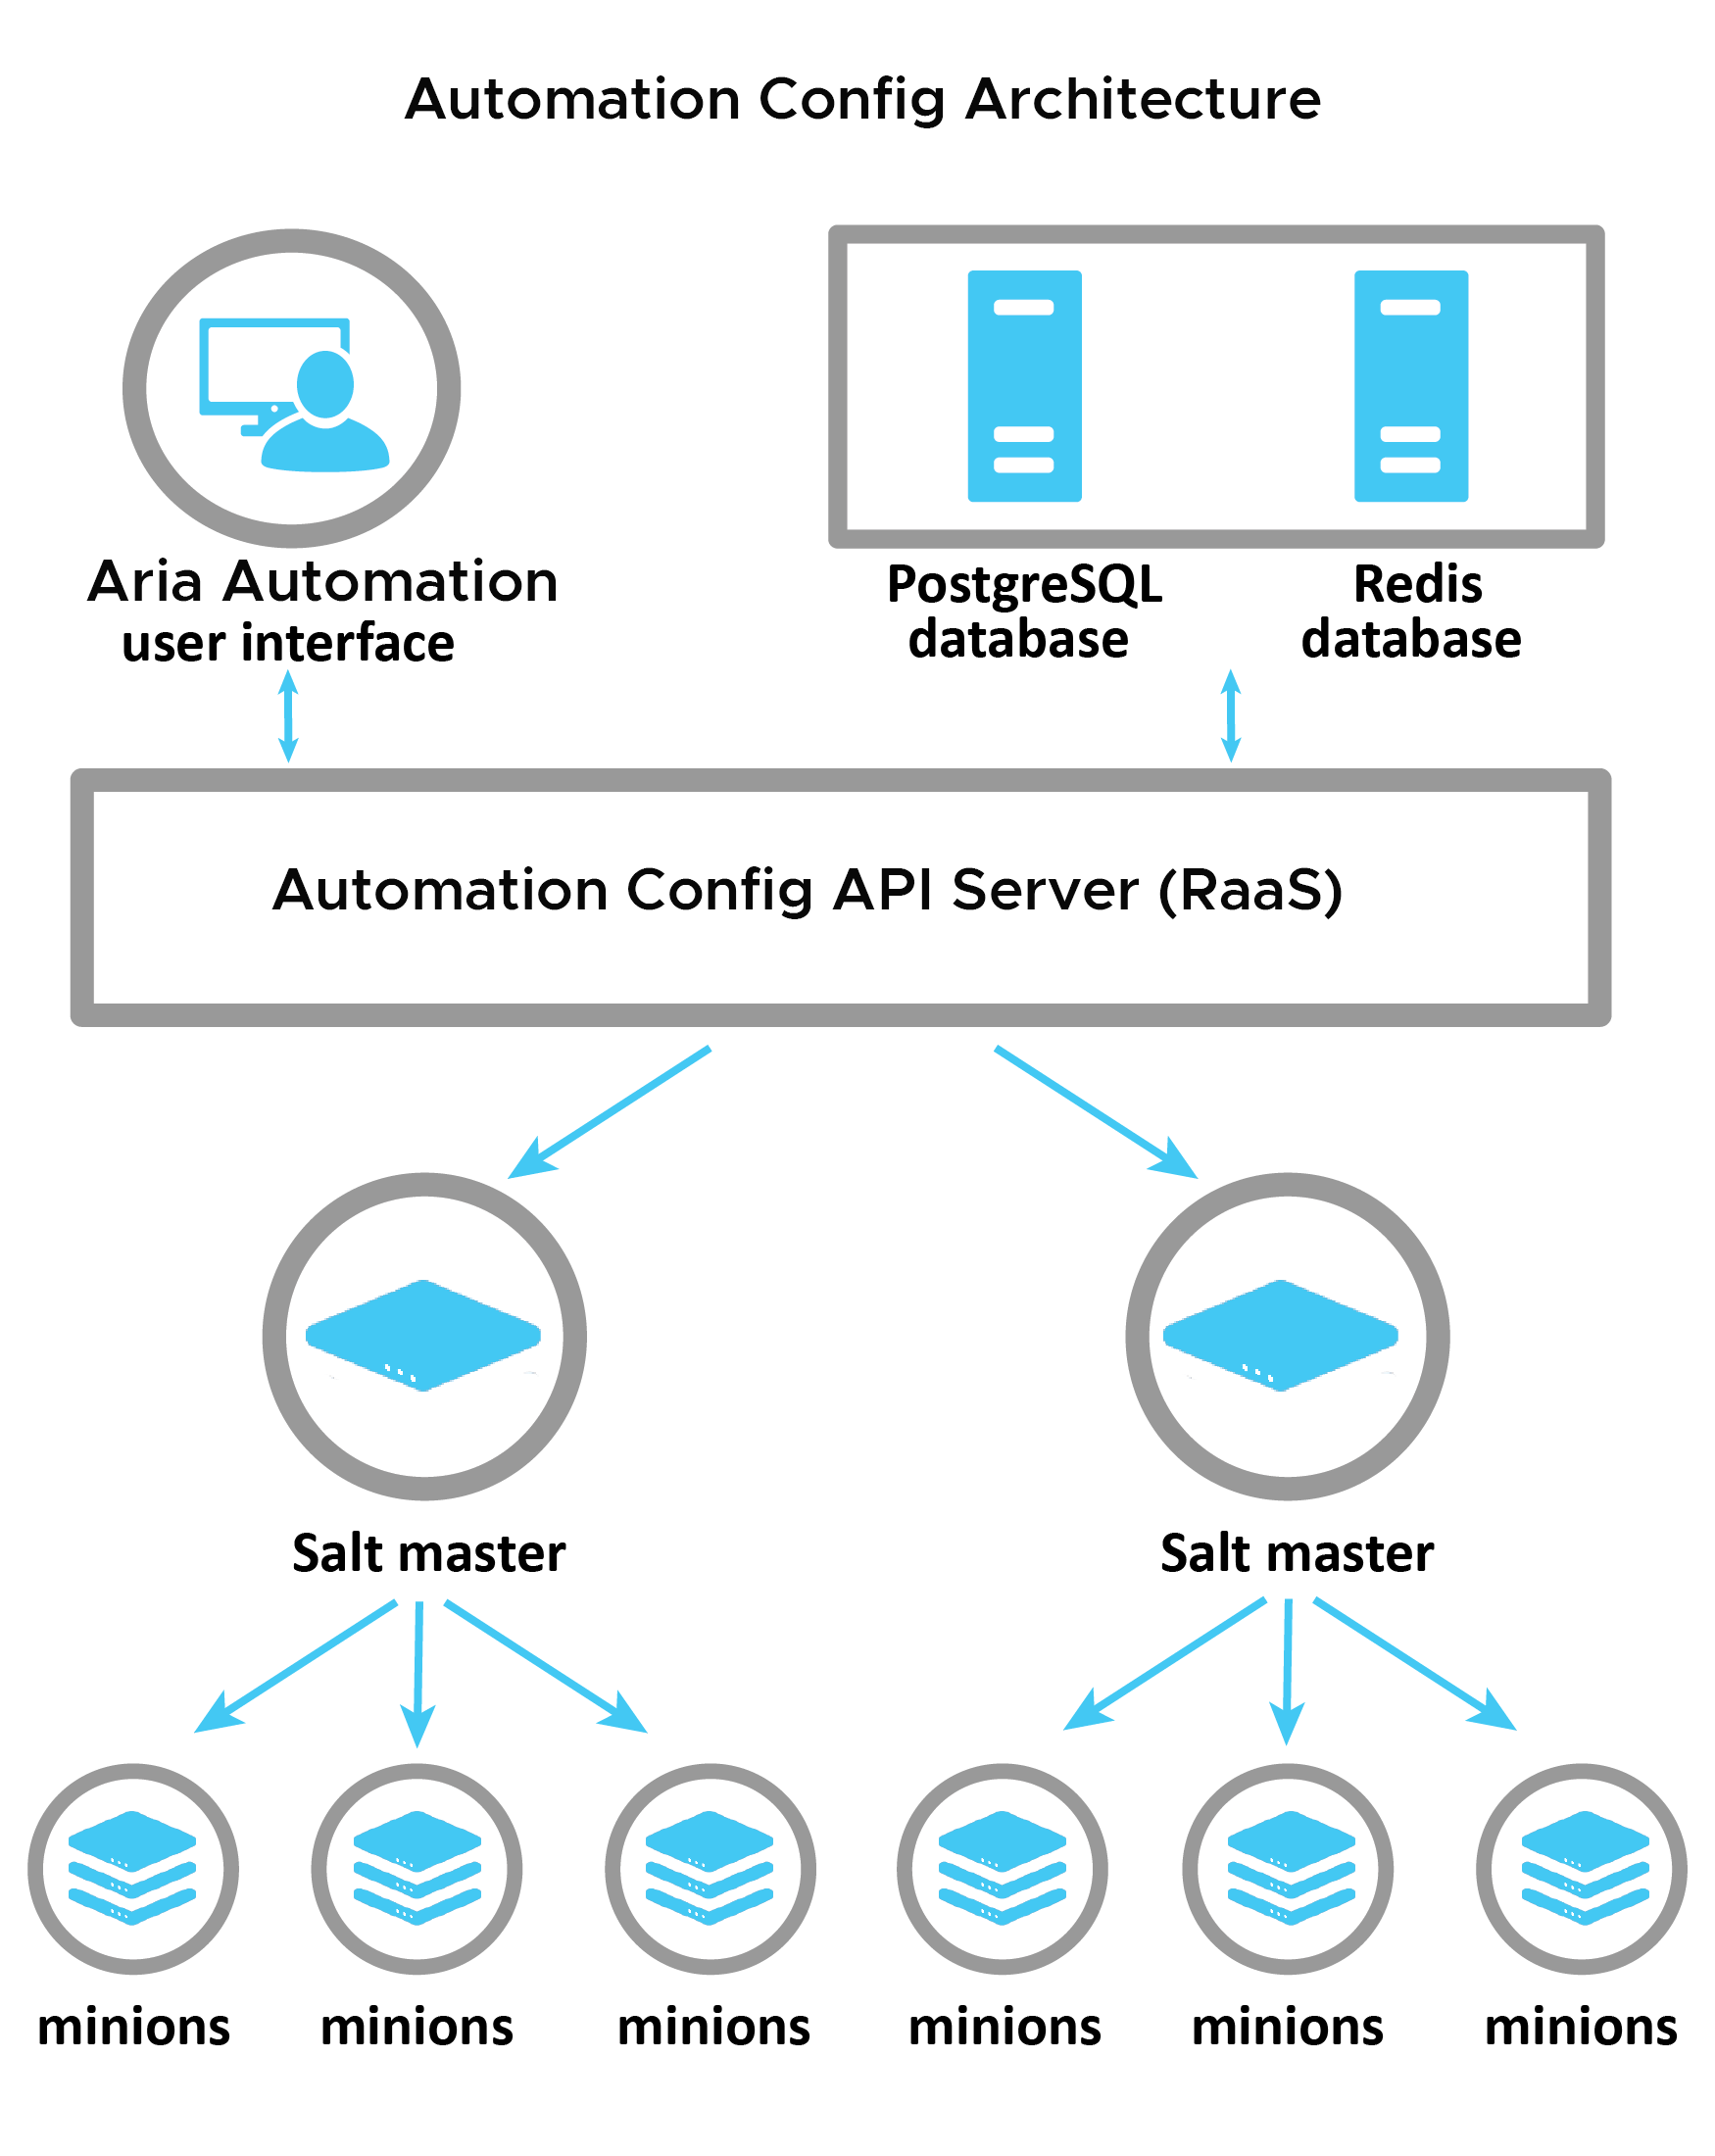
Automation Automation Config Architecture
There are various options for architecting Aria Automation Config for resilience, high availability and scale. For this install I followed a basic installation, with four Virtual Machines (VM): SaltStack Master, PostgreSQL, Redis and Aria Config Server also known as Responder as a Service (RaaS).
Deploying SaltStack and Aria Automation Config
While SaltStack, PostgreSQL, Redis can be deployed on PhotonOS5 the RaaS server presently only appears to work on RedHat Enterprise Linux. Luckily RedHat offers a No-cost Red Hat Enterprise Linux Individual Developer Subscription to build a lab environment.
Build four VMs with the following specification.
| Hostname | vCPU | vRAM | vHDD | Operating System |
|---|---|---|---|---|
| acfg-postgres | 8 | 8GB | 100GB | RHEL 8.10 |
| acfg-raas | 16 | 16GB | 100GB | RHEL 8.10 |
| acfg-redis | 4 | 4GB | 100GB | RHEL 8.10 |
| acfg-salt-master | 16 | 16GB | 100GB | RHEL 8.10 |
Apply Base Configuration On All Four VMs
Open an SSH session to all four VMs, for RHEL 8 run the following commands to install the Salt Project repository and key. For other editions similar commands can be found here.
sudo rpm --import https://repo.saltproject.io/salt/py3/redhat/8/x86_64/SALT-PROJECT-GPG-PUBKEY-2023.pub
curl -fsSL https://repo.saltproject.io/salt/py3/redhat/8/x86_64/latest.repo | sudo tee /etc/yum.repos.d/salt.repo
Disable VM guest firewall to do this for RHEL 8.10 run the following.
systemctl stop firewalld && systemctl disable firewalld
Install Salt Master
Open an SSH session to all Salt Master VM and run the following:
yum install -y salt-master salt-minion
Create a minion configuration file and add configuration to point to itself as its master.
vi /etc/salt/minion.d/master.conf
master: localhost
Enable and start the Salt Master and Minion services.
systemctl enable salt-master && systemctl start salt-master
systemctl enable salt-minion && systemctl start salt-minion
Install Salt Minion on the PostreSQL, RaaS andRedis VMs
Open an SSH session to all Salt Master VM and run the following:
yum install -y salt-minion
Create a minion configuration file and add configuration to point to IP of master.
vi /etc/salt/minion.d/master.conf
master: 192.168.1.33
Enable and start the Salt Minion service.
systemctl enable salt-minion && systemctl start salt-minion
Accept Salt Minion certificates on Salt Master
Salt uses public key cryptography for secure communication between the master and minions. Each minion generates a key pair when it’s first installed. When a minion starts for the first time, it sends its public key to the master for registration. These keys are initially stored as “unaccepted” or “pending” on the master. For security reasons, the master doesn’t automatically accept these keys. An administrator must manually accept them.
Open an SSH session to all Salt Master and run the following, the -L option stands for “List” and the -A option stands for “Accept All”:
salt-key -L

Accepted Keys:
Denied Keys:
Unaccepted Keys:
acfg-postgres
acfg-raas
acfg-redis
acfg-salt-master
Rejected Keys:

salt-key -A

salt-key -L

Accepted Keys:
acfg-postgres
acfg-raas
acfg-redis
acfg-salt-master
Denied Keys:
Unaccepted Keys:
Rejected Keys:
At this stage all of your Salt Minions are being securely managed by your Salt Master.
Add Aria Config Installer Keys To All Four VMs
The Aria Automation Config installation process involves several steps across the four servers. Rather than manually perform these there is supplied an installer package which used SaltStack to orchestrate the installation process and configuration of all of the components.
Aria Automation Config is tighly integrated with Aria Automation and it is important that the version of Config installer matches the version of Aria Automation and appropriate for the OS. I have Aria Automation 8.16.2 deployed and my Aria Config VMs are running RHEL8.10 so the corresponding package is vRA_SaltStack_Config-8.16.2.2.1.el8_Installer.tar.gz
The package files are all package files signed the public key is distributed in ASCII-armored format so that users can verify the package’s authenticity and integrity. Copy the gz file to all four VMs, extract the ASC keys and add them to the RPM packaging system using the rpmkeys using following commands:
yum install -y tar
tar -xzvf vRA_SaltStack_Config-8.16.2.2.1.el8_Installer.tar.gz
cd sse-installer
rpmkeys --import keys/*.asc
Deploy Aria Config Using SaltStack
SaltStack relies on grains, pillar, and state files for its configuration management and automation capabilities.
- Grains - Provide system-specific metadata used for targeting and conditional logic.
- Pillar - Deliver sensitive data to minions in a secure manner.
- State Files - Define the desired configuration of systems in a declarative way.
As mentioned earlier the Aria Config installer package uses SaltStack to orchestrate the installation process and configuration of all of the components. The package contains template grains, pillar, and state files which perform the installation and configuration. First we can create a folder structure and copy the template files across.
cd sse-installer
sudo mkdir /srv/salt
sudo cp -r salt/sse /srv/salt/
sudo mkdir /srv/pillar
sudo cp -r pillar/sse /srv/pillar/
sudo cp -r pillar/top.sls /srv/pillar/
sudo cp -r salt/top.sls /srv/salt/
Pillar is a system in SaltStack used to deliver data to minions. Pillar data is typically used to store sensitive information like passwords, API keys, etc. The top.sls file is used to map minions to their corresponding pillar data. Edit the /srv/pillar/top.sls and update the template to reflect the minion IDs of the four VMs you provisioned.
{# Pillar Top File #}

{# Define SSE Servers #}

{% load_yaml as sse_servers %}
  - acfg-postgres
  - acfg-raas
  - acfg-redis
  - acfg-salt-master
{% endload %}

base:

{# Assign Pillar Data to SSE Servers #}
{% for server in sse_servers %}
  '{{ server }}':
    - sse
{% endfor %}
Grains provide static information about the minion (client) system, such as operating system, IP address, kernel version, etc. Grains can be used to target minions in states and to conditionally apply configurations based on system properties. The mapping of minions to grain template does not need to change but it is useful to look at this, it should look like:
cat /srv/salt/top.sls

base:

  {# Target SSE Servers, according to Pillar data #}
  # SSE PostgreSQL Server
  'I@sse_pg_server:{{ grains.id }}':
    - sse.eapi_database

  # SSE Redis Server
  'I@sse_redis_server:{{ grains.id }}':
    - sse.eapi_cache

  # SSE eAPI Servers
  'I@sse_eapi_servers:{{ grains.id }}':
    - sse.eapi_service

  # SSE Salt Masters
  'I@sse_salt_masters:{{ grains.id }}':
    - sse.eapi_plugin
State files, written in YAML, define the desired configuration of systems using a declarative syntax. States specify what packages should be installed, what services should be running, what files should exist with specific contents and permissions, etc. State files can reference grains and pillar data to conditionally apply configurations. State files are organized into SLS (SaLt State) modules and can be composed together to build complex configurations. The top.sls file maps minions to the state files that should be applied to them.
vi /srv/pillar/sse/sse_settings.yaml
Section 1 of this file contains four variables that correspond to the four nodes. Change the values of the four variables to the minion IDs like:
# PostgreSQL Server (Single value)
pg_server: acfg-postgres

# Redis Server (Single value)
redis_server: acfg-redis

# SaltStack Enterprise Servers (List one or more)
eapi_servers:
  - acfg-raas

# Salt Masters (List one or more)
salt_masters:
  - acfg-salt-master
Section 2 of this file, edit the pg_endpoint variable to the IP address of the PostgreSQL VM.
# Section 2: Define PostgreSQL settings
pg_endpoint: 192.168.1.30
Section 3 of this file, edit the redis_endpoint variable to the IP address of the Redis VM.
# Section 3: Define Redis settings
redis_endpoint: 192.168.1.32
In Section 4 of this file, edit the api_endpoint variableto the IP address of the RaaS VM.
# Section 4: eAPI Server settings
eapi_endpoint: 192.168.1.31
With all of the templates updated we can check the grains, pillars and state files all look good.
salt \* saltutil.refresh_grains
salt \* saltutil.refresh_pillar
salt \* pillar.items
Once all four VMs have had the keys added to their RPM packaging system and you’ve updated the Pillar and State files we’re ready to initiate the deployment and configuration.
The SaltStack highstate is a feature that allows you to apply a set of defined state files to managed minions in a single execution. The highstate is defined in the top.sls file, which maps minions to the state files that should be applied to them. When the highstate is executed, Salt will run all the state files defined in the top.sls file for the targeted minions. On SaltStack Master server run the following to apply highstate to the four nodes to deploy and configure Aria Automation Config.
salt acfg-postgres state.highstate
salt acfg-redis state.highstate
salt acfg-raas state.highstate
salt acfg-salt-master state.highstate
Deploying Virtual Machines with SaltStack
Aria Automation can be integrated with a wide range of configuration management tools, Ansible, Puppet, Terraform and Aria Automation Config. With these integration in place the blueprint/template can upon completion of resource deployment hand off to these tools to provide additional configuration such as guest OS customization.
The integration with Aria Automation Config is simple to configure within Assembler, Infrastructure tab and Connections\ Integration sub menu. The wizard then takes you through adding RaaS IP or FQDN and then credentials to use. The default credentials the installer package configures are username: root and password: salt.
With the integration configured a blueprint/template created in within Assembler, Design tab. Create a template which simply deploys a VM with Salt minion configured to point to its local Salt master.
FormatVersion: 1
inputs: {}
resources:
  Windows2022:
    type: Cloud.Machine
    flavor: small
    remoteAccess:
      authentication: usernamePassword
      username: Administrator
      password: VMware1!
  Windows2022_SaltStack:
    type: Cloud.SaltStack
    properties:
      hosts:
        - $(resource.Windows2022.id)
      masterId: acfg-salt-master